SharePoint Online上のアプリケーションによって書き込まれるリストデータと、ドキュメントライブラリに保存されるファイルをAWSに同期するという要件があり、久しぶりにSharePoint Onlineからのデータエクスポート方法やらPowerShellコマンドレットやらを調べた。
SharePointに馴染みのない方のために超ざっくりした説明をつけると、
- リスト:RDBでいうテーブル。データ型を指定したカラムで構成されたデータが行単位で並ぶ。バックエンドはSQL Serverのテーブル
- ライブラリ:階層化された共有フォルダみたいなもので、どんどんファイルを入れていくところ。アクセス権限やバージョン管理ができる
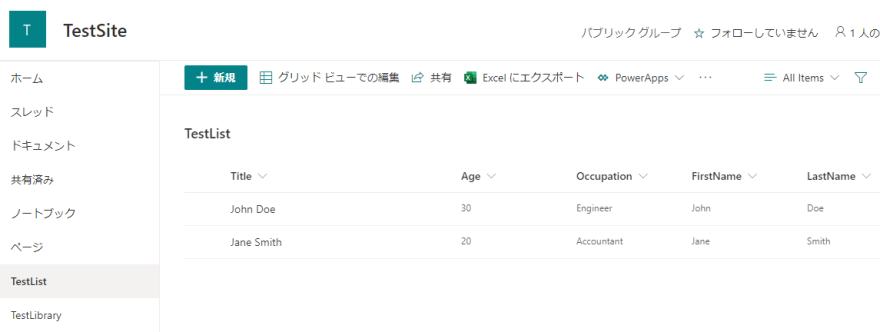
TestSiteというSharePointサイトにTestListというリストとTestLibraryというライブラリを作った(ネーミングセンスはご容赦ください)。
AWS Toolsも使いやすいので、全体的にPowerShellでやっていく。
SharePoint Onlineからデータを取得するのに使うライブラリには主にCSOMとPnPがあるが、PnPの方が新しく、使いやすい。
[https://docs.microsoft.com/ja-jp/powershell/sharepoint/sharepoint-pnp/sharepoint-pnp-cmdlets?view=sharepoint-ps]
データ同期バッチを動かすためのWindows Serverが既にEC2上にあったので、そこで作業する。
まずPnPモジュールをインストールしておく。
Install-Module -Name PnP.PowerShell
リストデータのエクスポート
こんな感じのコードで、SharePoint Onlineに接続しローカルにデータをダウンロードできる。
# SharePointへのアクセス情報
$userName = "<データにアクセスできるユーザー@hogehoge.onmicrosoft.com>"
$userPassword = "<パスワード>"

$siteURL = "https://hogehoge.sharepoint.com/sites/TestSite/"
$secPasswd = ConvertTo-SecureString $userPassword -AsPlainText -Force

[System.Management.Automation.PSCredential]$PSCredentials = New-Object System.Management.Automation.PSCredential($userName, $secPasswd)

# PnPでSharePoint Onlineに接続する
Connect-PnPOnline -Url $siteURL -Credentials $PSCredentials

# リストのデータを取得する
$listName = "TestList"
$selectedFields = @("Title","Age", "Occupation")
$CSVPath = "C:\work\SPOnline\PnPListData.csv"

$listItems = Get-PnPListItem -List $listName -Fields $selectedFields -PageSize 500

# 取得したオブジェクト型データをイタレートしながら処理する
$listDataColl = @()
$listItems | ForEach-Object {
    $listData = New-Object PSObject
    $listItem  = Get-PnPProperty -ClientObject $_ -Property FieldValuesAsText
    ForEach($Field in $selectedFields)
    {
        $listData | Add-Member Noteproperty $Field $listItem[$Field]
    }
    $listDataColl += $listData
}
$listDataColl | Export-CSV $CSVPath -NoTypeInformation
これで「C:\work\SPOnline\PnPListData.csv」にCSV形式でTestListの中身がエクスポートされる。CSVに吐かずとも、その場で色々処理したりすることももちろん可能。やろうと思えばそのままDynamoDBかRDSに挿入できる(ちょっとパフォーマンスが心配だが)。
ライブラリファイルのエクスポート
「PnPでSharePoint Onlineに接続する」の「Connect-PnPOnline」までは同じで、残りは次のようなコードでファイルをダウンロードする。
# ファイルの取得元ライブラリを指定
$folderSiteRelativeURL = "/TestLibrary"
$destinationFolder ="C:\work\SPOnline\PnP"

$Folder = Get-PnPFolder -Url $FolderSiteRelativeURL
$FolderURL = $Folder.ServerRelativeUrl.Substring($Folder.Context.Web.ServerRelativeUrl.Length)
$localFolder = $destinationFolder + ($FolderURL -replace "/","\")

# 取得したオブジェクト型データをイタレートしながら処理する
$filesColl = Get-PnPFolderItem -FolderSiteRelativeUrl $FolderURL -ItemType File
Foreach($File in $filesColl)
    {
        Get-PnPFile -ServerRelativeUrl $File.ServerRelativeUrl -Path $localFolder -FileName $File.Name -AsFile -force
        Write-host -f Green "`tDownloaded File from '$($File.ServerRelativeUrl)'"
    }
この後は普通にAWS Tools for PowerShellを使ってWrite-S3ObjectなりすればOK。
EC2だとインスタンスプロファイル(IAMロール)を付与しておけば、S3にデータをPUTするためにアクセスキーとシークレットキーを生成しなくて良い点がプラス。
SharePoint側はユーザー名・パスワードを使っちゃっているが、ここもSecrets Managerを使うなりでハードコードを避けるか、そもそもパスワード認証以外にしたいところ。ここではその深堀りは割愛する。
rcloneを使ってみる
もう一つこんなごりごりスクリプト書かずに、何やら人気の高いOSSであるrcloneを使う方法もある。
rcloneは色んなデータソースをサポートしていて、その中にはもちろんS3とSharePointもある。SharePoint OnlineのライブラリのバックエンドはどうやらOneDriveらしいので、OneDriveを選択すればOK。
rcloneをインストールしたら、設定でremoteを2つ作成する。
2つのリモート拠点を定義し、それらの間で(どっちの方向も可)コピーや同期ができるという概念。
S3向けには、4番の「Amazon S3 Compliant Storage Providers including AWS, Alibaba, Ceph, Digital Ocean, Dreamhost, IBM CO」を選ぶ。
.\rclone config

e) Edit existing remote
n) New remote
d) Delete remote
r) Rename remote
c) Copy remote
s) Set configuration password
q) Quit config
e/n/d/r/c/s/q> n
name> S3
Type of storage to configure.
Enter a string value. Press Enter for the default ("").
Choose a number from below, or type in your own value
 1 / 1Fichier
   \ "fichier"
 2 / Alias for an existing remote
   \ "alias"
 3 / Amazon Drive
   \ "amazon cloud drive"
 4 / Amazon S3 Compliant Storage Providers including AWS, Alibaba, Ceph, Digital Ocean, Dreamhost, IBM CO
S, Minio, and Tencent COS
   \ "s3"
~~~中略~~~
Storage> 4
** See help for s3 backend at: https://rclone.org/s3/ **

Choose your S3 provider.
Enter a string value. Press Enter for the default ("").
Choose a number from below, or type in your own value
 1 / Amazon Web Services (AWS) S3
   \ "AWS"
 2 / Alibaba Cloud Object Storage System (OSS) formerly Aliyun
   \ "Alibaba"
 3 / Ceph Object Storage
   \ "Ceph"
 4 / Digital Ocean Spaces
   \ "DigitalOcean"
 5 / Dreamhost DreamObjects
   \ "Dreamhost"
 6 / IBM COS S3
   \ "IBMCOS"
 7 / Minio Object Storage
   \ "Minio"
 8 / Netease Object Storage (NOS)
   \ "Netease"
 9 / Scaleway Object Storage
   \ "Scaleway"
10 / StackPath Object Storage
   \ "StackPath"
11 / Tencent Cloud Object Storage (COS)
   \ "TencentCOS"
12 / Wasabi Object Storage
   \ "Wasabi"
13 / Any other S3 compatible provider
   \ "Other"
provider>     1
Get AWS credentials from runtime (environment variables or EC2/ECS meta data if no env vars).
Only applies if access_key_id and secret_access_key is blank.
Enter a boolean value (true or false). Press Enter for the default ("false").
Choose a number from below, or type in your own value
 1 / Enter AWS credentials in the next step
   \ "false"
 2 / Get AWS credentials from the environment (env vars or IAM)
   \ "true"
env_auth>     2
AWS Access Key ID.
Leave blank for anonymous access or runtime credentials.
Enter a string value. Press Enter for the default ("").
access_key_id>
AWS Secret Access Key (password)
Leave blank for anonymous access or runtime credentials.
Enter a string value. Press Enter for the default ("").
secret_access_key>
元々サーバー上にcredentialの環境設定があれば、ここで改めてアクセスキーを入力する必要はない(しない方が、コンフィグに書き込まれないので良い)。
以降はリージョンを選んだりと、難しいポイントは無し。
SharePoint Onlineの方は、26番の「Microsoft OneDrive」を選択する。
e) Edit existing remote
n) New remote
d) Delete remote
r) Rename remote
c) Copy remote
s) Set configuration password
q) Quit config
e/n/d/r/c/s/q> n
name> SP-Online
Type of storage to configure.
Enter a string value. Press Enter for the default ("").
Choose a number from below, or type in your own value
~~~中略~~~
26 / Microsoft OneDrive
   \ "onedrive"
27 / OpenDrive
   \ "opendrive"
28 / OpenStack Swift (Rackspace Cloud Files, Memset Memstore, OVH)
   \ "swift"
29 / Pcloud
   \ "pcloud"
30 / Put.io
   \ "putio"
31 / QingCloud Object Storage
   \ "qingstor"
32 / SSH/SFTP Connection
   \ "sftp"
33 / Sugarsync
   \ "sugarsync"
34 / Tardigrade Decentralized Cloud Storage
   \ "tardigrade"
35 / Transparently chunk/split large files
   \ "chunker"
36 / Union merges the contents of several upstream fs
   \ "union"
37 / Webdav
   \ "webdav"
38 / Yandex Disk
   \ "yandex"
39 / Zoho
   \ "zoho"
         40 / http Connection
   \ "http"
41 / premiumize.me
   \ "premiumizeme"
42 / seafile
   \ "seafile"
Storage>     26
** See help for onedrive backend at: https://rclone.org/onedrive/ **

OAuth Client Id
Leave blank normally.
Enter a string value. Press Enter for the default ("").
client_id>
OAuth Client Secret
Leave blank normally.
Enter a string value. Press Enter for the default ("").
client_secret>
Choose national cloud region for OneDrive.
Enter a string value. Press Enter for the default ("global").
Choose a number from below, or type in your own value
 1 / Microsoft Cloud Global
   \ "global"
 2 / Microsoft Cloud for US Government
   \ "us"
 3 / Microsoft Cloud Germany
   \ "de"
 4 / Azure and Office 365 operated by 21Vianet in China
   \ "cn"
region>     1
Edit advanced config? (y/n)
y) Yes
n) No (default)
y/n>
Remote config
Use auto config?
 * Say Y if not sure
 * Say N if you are working on a remote or headless machine
y) Yes (default)
n) No
y/n> y
If your browser doesn't open automatically go to the following link: http://127.0.0.1:53682/auth?state=Be1GkMEtURoIXTTAF5jgXA
Log in and authorize rclone for access
Waiting for code...
「auto config」を利用すると認証が非常に便利に済むので、OAuth Client IdやOAuth Client Secretを入力する必要はない(ブランクのまま、Enterを押せばOK)。
このあとブラウザが立ち上がり、Microsoft365にログインすれば、このような画面が出てトークンを自動的にrcloneが取得する。
設定が終わったら、以下のようなコマンドでデータを同期することができるので、ジョブとして自動化するのも簡単。
./rclone sync SP-Online:/ S3:/sponline-to-s3-datacopy-test/
rcloneの機能で事足りるユースケースであれば、スクリプトを書かずに済むので便利。
というかAWSの内容はなく、ほとんどSharePoint Onlineの話になってしまった(苦笑)。しかしEC2上で試しているので、EC2を連携サーバーにできるという証明はできた。


Latest comments (0)