This article will guide you through the very basic setup of integrating model based testing using xstate combined with Playwright. Hopefully, you should already have a good grasp of the key concepts related to xstate and its capabilities. If not, don't panic. I suggest you view this short YT Write fewer tests! Model-based testing in React — David Khourshid
The test model
In our example, we will generate a test model to represent a user searching for documents on Playwright.dev website

The two basic paths through this process:
- Perform a search that yeilds results
- Perform a search that does not yeild any results
Setup
To incorporate xstate into your test project requires a few simple steps:
Install xstate / xstate-test
npm install @xstate/test xstate
Import the necessary xstate libraries into your spec file:
import { createMachine } from "xstate";
import { createModel } from "@xstate/test";
Create the state machine
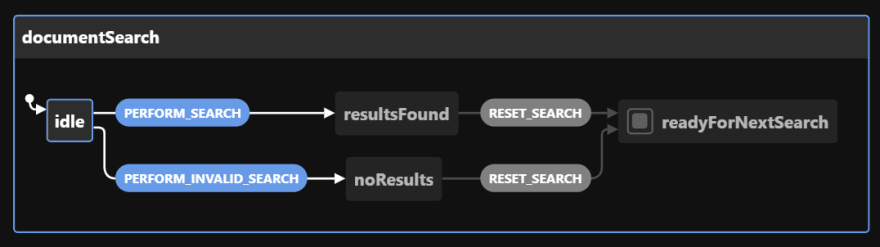
const documentationSearchMachine = createMachine({
  id: 'documentSearch',
  initial: 'idle',
  states: {
    idle: {
      on: {
        PERFORM_SEARCH: 'resultsFound',
        PERFORM_INVALID_SEARCH: 'noResults',
      },
    },
    resultsFound: {
      on: {
        RESET_SEARCH: 'readyForNextSearch',
      },
    },
    noResults: {
      on: {RESET_SEARCH: 'readyForNextSearch'},
    },
    readyForNextSearch: {
      type: 'final',
    },
  },
});
ℹ️ You can use the xstate visualizer to preview the machine above: Go to stately visualizer and paste the snippet above.
Create the model
These are the "actions" that does the heavy lifting of transitioning one state to another.
  const testModel = createModel(documentationSearchMachine, {
    events: {
      PERFORM_SEARCH: async () => {
        const validSearchTerm = 'Text selector';
        await page.locator('[aria-label="Search"]').click();
        await page.locator('#docsearch-input').type(validSearchTerm);
      },
      PERFORM_INVALID_SEARCH: async () => {
        const invalidSearchTerm = 'pztr';
        await page.locator('[aria-label="Search"]').click();
        await page.locator('#docsearch-input').type(invalidSearchTerm, {delay: 300});
      },
      RESET_SEARCH: async () => {
        await page.goto('https://playwright.dev/');
      },
    },
  });
Add your tests
Creating the tests is super easy since we let xstate generate our test plans for us. The snippet below basically generates the tests dynamically based on the model.
  test.beforeAll(async ({browser}) => {
    page = await browser.newPage();
  });

  test.beforeEach(async () => {
    await page.goto('https://playwright.dev/');
  });

  test.afterAll(async ({browser}) => {
    for(let context of browser.contexts())
      await context.close()
  });

  const testPlans = testModel.getSimplePathPlans();
  testPlans.forEach((plan, i) => {
    plan.paths.forEach((path, i) => {
      test(path.description, async ({}) => {
        await path.test(page);
      });
    });
  });
Run the tests
The most important line of the code above is the const testPlans = testModel.getShortestPathPlans();, when this method is utilized to generate the paths, it yields the following results:

As the name suggest, this executes the most basic paths through the machine.
To enable a more exhaustive set of tests, you should use:
const testPlans = testModel.getSimplePathPlans();
This yields more paths through model, as shown in the results below:

☠️ Warning! This method of execution will be slow, especially when your model involves time intensive workflows.
I would suggest you split your execution into two:
-
getShortestPathPlans- iterate through the basic paths through your model for quicker execution as part of your CI - Execute the full breadth of your paths out of hours/overnight using
getSimplePathPlans
Refine the machine to include assertions
Refer the new keys added below (meta) properties. This specifies an assertion to be performed to ensure our model successfully transitioned from one state to another.
  const documentationSearchMachine = createMachine({
    id: 'documentSearch',
    initial: 'idle',
    states: {
      idle: {
        on: {
          PERFORM_SEARCH: 'resultsFound',
          PERFORM_INVALID_SEARCH: 'noResults',
        },
        meta: {
          test: async () => {
            await expect(page.locator('.navbar__title')).toHaveText('Playwright');
          },
        },
      },
      resultsFound: {
        on: {
          RESET_SEARCH: 'readyForNextSearch',
        },
        meta: {
          test: async () => {
            await expect(
              page.locator('#docsearch-list .DocSearch-Hit-title >> text=Selecting elements by label text'),
              'correct search result found'
            ).toBeVisible();
          },
        },
      },
      noResults: {
        on: {RESET_SEARCH: 'readyForNextSearch'},
        meta: {
          test: async () => {
            await expect(
              page.locator('.DocSearch-NoResults'),
              'no results panel should be displayed'
            ).toBeVisible();
          },
        },
      },
      readyForNextSearch: {
        type: 'final',
        meta: {
          test: async () => {
            await expect(page.locator('.navbar__title')).toHaveText('Playwright');
          },
        },
      },
    },
  });
Initial concerns
I still have some lingering doubts about using this approach for model-based testing but I don't see any better alternatives. Some of my outstanding concerns are outlined below but it will be addressed the more I use the tool
- How much maintenance overhead will this introduce? - TBD
- What happens if the model changes, e.g. a new state added/deleted - TBD
- How do I debug/troubleshoot issues?
Anything data driven is notoriously difficult to troubleshoot, luckily we can use vscode's ability to specify conditional breakpoints.

Alternatively, you can drop in a test.skip statement to isolate only certain paths that you would like to execute
e.g.
      test(path.description, async ({}) => {
        test.skip(path.description!=='via PERFORM_SEARCH → RESET_SEARCH')
        await path.test(page);
      });
Takeaways
Is this my life now? Do we model all test cases from now on? If I was to hire a backpacker to maintain/extend the test code base, how much upskilling will be involved?
The key advantages to using xstate is the ability to test all the different paths through an application, traditional test automation approaches handled this poorly.
Creating a test model can be difficult, especially for complex end to end scenarios. Some key learnings:
- Keep your model simple, if you look through the some of the examples xstate models. You will notice that it can get hairy pretty quickly
- Use the model visualizer
- Design and validate your model, preferably have someone else review it
- Iterate. Design and validate and refine your model, preferably have someone else review it. ^ Do these before hacking away
- Use this as a collaborative tool to facilitate a better model
This article barely scratched the surface of the full capabilities of model-based testing using xstate. I'll leave it upto you to explore and apply it to your solution.

Top comments (0)