
Prerequisites : React, Javascript ES6
🍁What is Redux?
Redux is a state container for JavaScript app. It is mostly paired with redux, where it takes control of state away from React components and gives it to a centralised place called a store.

Let's understand how redux works,
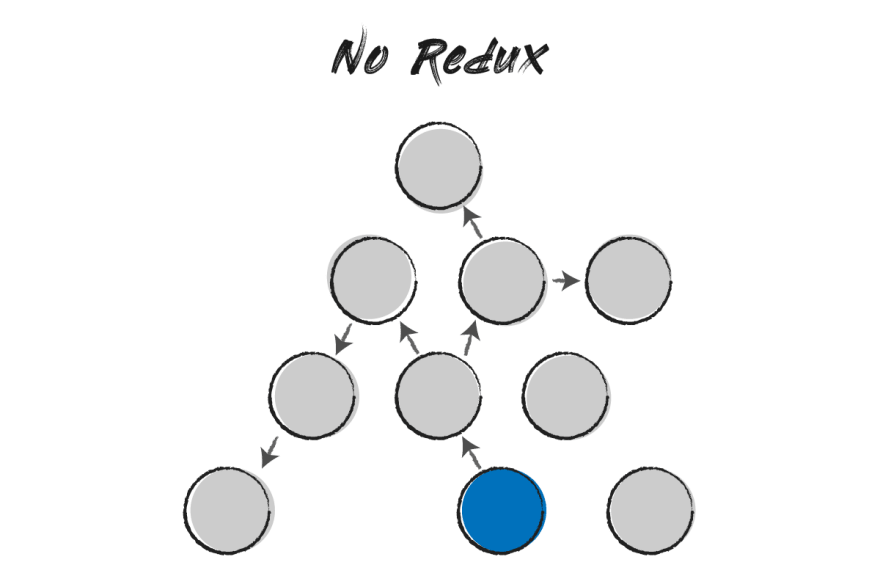
The upper image represents React without Redux. Each circle represents component. When a component initiates a change (the blue circle), this change is communicated to the other components one step at a time. This may seem simple enough when we only have 10 components, but what about an app with 20, 50 or 100 components? As an app becomes larger, debugging can quickly becomes harder, and we lose sight of how information is passed from one component to another.
On the lower is the same React app with Redux. In this, when a component initiates a change, that information goes straight from the blue circle to our store (the green circle). From there, the change is then communicated directly to all the components that need to update.
🍁Understand State management
State management is a way to present the data you use in your application in a form of data structure. Therefore, it will be easier to exchange this data between components. It facilitates the communication between the different components and lets them know about any updated data in an easy way.
In React, there are many different libraries for state management : Redux, Recoil, context api etc.

The above picture depicts the process which is involved during the state management process. Now the blue box represents boilerplate and not every developer looks forward to use Redux. But don't worry, I'll give simple analogy to make you understand properly.
🍀View
It is nothing but the front-end of the application, what ever changes happens, it should reflect the same on the application. For analogy, consider there is a store of Jewellery in the front. You are standing in front of it and looking at it, if somebody purchase, or if the store gets some Jewellery, you see the changes being done in the shop. This is a View.
🍀Store
Store basically keeps all your state management data in one place, so to understand in an analogy, a store which we talked about in the View keeps all the jewellery in its store. Some other store keeps other stuffs. Hence stores.
🍀Action
In Redux term, it has to dispatch an action to the Reducer, so that the state management can be done according to the action sent, which will eventually be reflected in the View of our application. Now, we have seen two new things, which we need to understand, and these are: Action and Dispatch. So to understand both of them, and how are they linked with each other. Assume Action as a thought which comes into your mind, when you enter inside the shop, for example, I want to buy a jewellery. And Dispatch is something which comes out of your mouth, basically your voice/command/request, which sends a message to the Shopkeeper on why have you come to the shop.
🍀Reducer
In Redux language, it is something which makes changes to the the State object in the Store, to be reflected in the View. Sophisticated, right? Now let us understand it in the analogical way, now you have entered into the store, and asked (Dispatched) for buying a jewellery (Action). The request you have raised to a person who would be standing on the other side of the store, we call him/her a shopkeeper, but he/she also is a Reducer. Your next question would be how? Then let me tell you how, as soon as you raise a request, the shopkeeper picks up the desired item for you and gives it to you in exchange of money. Now let us neglect the money part for a while, and focus on the jewellery reduction. So what happened actually in between the process? The shopkeeper (Reducer), made changes in the store by reducing the number of jewellery from the store, and hence the View is also changed, that is, the number of jewellery in the shop is changed now.
🍁Redux-toolkit
The Redux Toolkit package is intended to be the standard way to write Redux logic. To simply the things it is recommend to use Redux Toolkit. It was developed in order to resolve three common Redux concerns:
- Configuring a Redux store is too complicated
- I have to add a lot of packages to get Redux to do anything useful
- Redux requires too much boilerplate code
Let's use Redux Toolkit to make To-Do app.
🍀Setting up Redux Toolkit
Now well set up Redux Toolkit and React-Redux. Start by running:
# NPM
npm install @reduxjs/toolkit
npm install react-redux

# Yarn
yarn add @reduxjs/toolkit
yarn add react-redux
🍀Set up the store
Create the store.js file. Import the configureStore API from Redux Toolkit. We'll start by creating an empty Redux store, and exporting it.
import { configureStore } from '@reduxjs/toolkit'

export const store = configureStore({
  reducer: {},
})
🍀Configure Redux Store to React
Once the store is created, we can make it available to our React components by putting a React-Redux around our application in src/store.js. Import the Redux store we just created, put a Provider around your , and pass the store as a prop.
import React from 'react';
import ReactDOM from 'react-dom/client';
import App from './App';

import store from './store';
import { Provider } from 'react-redux'

const root = ReactDOM.createRoot(document.getElementById('root'));
root.render(
    <Provider store={store}>
        <App />
    </Provider>
);
🍀Create a Redux Slicer
Create file name Reducers/todoSlider.js and import createSlice from Redux Toolkit Api.
Slicer requires a string name to identify the slice, an initial state value, and one or more reducer functions to define how the state can be updated. Slicer allows us define initial state , create action and reducer at same place.
import { createSlice } from '@reduxjs/toolkit'
export const toDoSlider = createSlice({
 name: 'toDo',
 initialState: {
   todoList: [
     { id: 1, content: "Hit the gym" },
     { id: 2, content: "Meet George"}
   ]
 },
 reducers: {
   addToDo: (state, action) => {
     let newTodoList = {
       id: Math.random(),
       content: action.payload.newContent
     }
     state.todoList.push(newTodoList);
   },
   deleteToDo: (state, action) => {
     let { todoList } = state;
     state.todoList = todoList.filter((item) =>
         item.id !==action.payload.id);
   },
   editTodo: (state, action) => {
     let { todoList } = state;
     state.todoList = todoList.map((item) =>
       item.id === action.payload.id ? action.payload : item);
   }
  },
})
// Action creators are generated for each case reducer function
export const { addToDo, deleteToDo, editTodo } = toDoSlider.actions
export default toDoSlider.reducer;
From above code you can observe initial state is define and reducers functions are created to perform add, update and delete operation.
🍀Add Slice Reducers to the Store
Next, we need to import the reducer function from the counter slice and add it to our store inside src/store.js . By defining a field inside the reducer parameter, we tell the store to use this slice reducer function to handle all updates to that state.
import { configureStore } from '@reduxjs/toolkit'

export const store = configureStore({
  reducer: {
        toDo: toDoReducer;
    },
})
🍀Create components and import into app.js
Create a file named src/Components/AddTodo.js.
import React, { useState } from 'react';
import { useDispatch } from 'react-redux';
import { addToDo } from '../Reducers/toDoSlider';
const AddTodo = () => {
  const dispatch = useDispatch();
  const [state, setState] = useState({
     content: '',
     contentError: null
  });
  const handleChange = (e) =>{
    setState({...state,
          [e.target.name]: e.target.value,
          [`${e.target.name}Error`]: null });
  }
  const add = () =>{
    if(content === ''){
      setState({...state,
         contentError: 'You must write something!'});
       return;
    }
    dispatch(addToDo({newContent: content}));
    setState({...state, content: ''});
  }
  const { content, contentError } = state;
   return <div className='form'>
      <h2>What's your plan for today</h2>
      <input type='text' value={content}
        name='content'
        onChange={handleChange}>
      </input>
      <button type='button' className='button'
        onClick={add}>Add
      </button>
      {contentError ?
         <div className='error'>{contentError}</div>: null}
    </div>;
};
export default AddTodo;
From above code you can observe Redux hook useDispatch is use to dispatch addToDo action to update state.
Create a file named src/Components/ListTodo.js.
import React, { useState } from 'react';
import { AiFillEdit, AiOutlineCloseCircle } from "react-icons/ai";
import { useDispatch, useSelector } from 'react-redux';
import { deleteToDo, editTodo } from '../Reducers/toDoSlider';
const ListTodo = () => {
  const { todoList } = useSelector((state) => state.toDo);
  const dispatch = useDispatch();
  const [isEditing, setEditing] = useState(false);
  const [state, setState] = useState({
   id: '', content: '', contentError: null
  });
  const onEditToggle = ( id, content) => {
   setEditing(true);
   setState({ ...state, id, content});
  }
  const handleChange = (e) =>{
   setState({...state, [e.target.name]: e.target.value,
      [`${e.target.name}Error`]: null });
  }
  const { content, contentError, id } = state;
  const edit = () =>{
   if(content === ''){
    setState({...state, contentError: 'You must write something!'});
    return;
   }
   dispatch((editTodo({content, id})));
   setEditing(false);
  }
return <div>
 {
   isEditing ?
    <div className='form'>
      <h2>Update your plan for today</h2>
      <input type='text' value={content} name='content'
         onChange={handleChange}>
      </input>
      <button type='button' className='button'
        onClick={edit}>Edit
     </button>
     {contentError ?
       <div className='error'>{contentError}</div>: null
     }
   </div> :
   <ul className='todos'>
    {
      todoList.map(({id, content})=> {
        return <li className='grid' key={id}>
          <span className='content'>{content}</span>
          <span className='todo-action'>
            <AiOutlineCloseCircle className="close"
              onClick={() => dispatch(deleteToDo({id}))}
            />
            <AiFillEdit className="edit"
              onClick={() =>onEditToggle(id, content)}
            />
          </span>
       </li>
     })
    }
  </ul>
  }
</div>;
};
export default ListTodo;
In above component Redux hook useDispatch is use to dispatch deleteToDo, editTodo action and useSelector to get state from reducer.
Import Components into App.js
import './App.css';
import AddTodo from './Components/AddTodo';
import ListTodo from './Components/ListTodo';
function App() {
  return (
    <div className="App">
      <AddTodo />
      <ListTodo />
    </div>
  );
}
export default App;
🍀Finally, add styles inside app.css
/* variables */
:root{
  --primary: #FFC636;
  --secondary: #0A0B5B;
}
/* reset */
body,p,a,ul,li{
 margin: 0;
 padding: 0;
 text-decoration: none;
}
li{
 list-style-type: none;
}
/* base styles */
body{
 background: var(--secondary);
 overflow-x: hidden;
}
.button{
 background: none;
 border: 2px solid var(--primary);
 color: var(--primary);
 padding: 6px 12px;
 border-radius: 10px;
 text-transform: uppercase;
 box-shadow: 1px 2px 3px rgba(0,0,0,0.6);
 display: inline-block;
 font-size: 1em;
 margin-left: 5px;
}
.button:hover{
 color: #222;
 background: var(--primary);
}
input{
 background: rgba(255,255,255,0.05);
 padding: 10px 16px;
 border-radius: 10px;
 border: 2px solid #9893D8;
 color: #f2f2f2;
 font-size: 1em;
}
.error{
 color: rgb(187, 30, 30);
 text-align: left;
 margin-left: 2px;
}
/* fonts */
body{
 color: #f2f2f2;
}
/* mobile styles */
.App{
 margin: 5%;
}
.form{
 text-align: center;
}
.grid{
 display: grid;
 grid-template-columns: repeat(8, 1fr);
 gap: 10px;
 box-sizing: border-box;
}
.todos{
 margin-top: 20px;
}
.todos li{
 margin-top: 10px;
 background-color: #6767ab;
 padding: 3%;
 box-shadow: 1px 2px 3px honeydew;
 cursor: pointer;
}
.content{
 grid-column: 1/8;
}
.todo-action{
 display: flex;
 font-size: 1.5em
}
/* small tablet styles */
@media screen and (min-width: 620px){
 input{
  width: 300px;
 }
 .todos li{
   margin: 10px 20%;
   padding: 2%;
  }
 }
/* large tablet & laptop styles */
@media screen and (min-width: 960px){
.todos li{
  margin: 10px 25%;
 }
}
@media screen and (min-width: 1200px){
 .todos li{
  margin: 10px 33%;
  padding: 1%;
 }
}
🍀Output

I hope you have liked this small tutorial. Happy coding💗
Always remember, no one reached to the top in one shot. It took them a lot more struggle and hard work than you can imagine. So strive for knowledge, and keep moving forward. Thank you

Top comments (0)