Originally posted at Serverless on March 6th, 2020
This article was updated to reflect changes in the new dashboard at app.serverless.com
When building serverless applications as a collection of Serverless services, we need to decide whether we are going to push each service individually to our version control system, or bundle them all together as a single repo. This article is not going to go into the details about which is better or not, but all our posts so far seem to show examples of services all stored in individual repositories.
What this article is going to demonstrate, however, is that deploying services from within a single monorepo is easily doable within Serverless Framework Pro’s CI/CD solution.
Getting started
You need to make sure that the services you are deploying are bundles together in a repo in separate subdirectories off the root of the repo. You can see a simple example repo here to see how this is structured to make sure that yours matches as closely as possible. Really the biggest part to take note of is that all services are off the root of the repo as separate sub-directories and a f9older with shared code is also off that root. This just simplifies configuration later.
**Note: **Serverless Framework Pro has a generous free tier so you don’t need to worry about not having a paid account just to try this feature out for yourself.
Once you have a repo setup (or you’ve cloned the sample repo), make sure each service in each subdirectory have the same app and org settings to connect to the dashboard and that those changes are also pushed to the repo.
The last step before we walk through setting up the monorepo deployment is to ensure that we have our connection to our AWS account all squared away, especially if you have a brand new dashboard account. Here is a 2 minute video that shows you how to easily and quickly connect to AWS using Providers.
With that out of the way, let’s get cracking!
First deploy
The best way to get started is to just deploy first and get all your services deployed to AWS and created within the dashboard. Here are the steps to follow:
Make sure you have credentials for the CLI to communicate to your Serverless account by running serverless login in the CLI and completing the login process.
If the app property you have added to your services’ serverless.yml files does not yet exist, click the create app button and choose to add an existing Serverless Framework project
During that process you can create or choose a new Provider
Once the app is created, go back to your project on the CLI, make sure to cd into the first service and run serverless deploy — stage [stageyouwanthere]. The — stage is optional since it will always default to a value of dev unless you specify otherwise.
Repeat 4 by *cd*ing into each sub-directory and deploying each service into AWS.
Even if these services are already deployed, you can deploy again. As long as nothing but the org **and **app properties have changed, all that this new deployment does is add these services to your dashboard account.
Connecting to GitHub or BitBucket
Now that everything is added to the dashboard, lets click the menu option to the right of the one of our service names and choose settings:
In the settings menu, select CI/CD and you should see the CI/CD configuration open up. If you are doing this for the first time, you have probably not connected to GitHub or BitBucket before, so just click the connect option and follow the prompts.
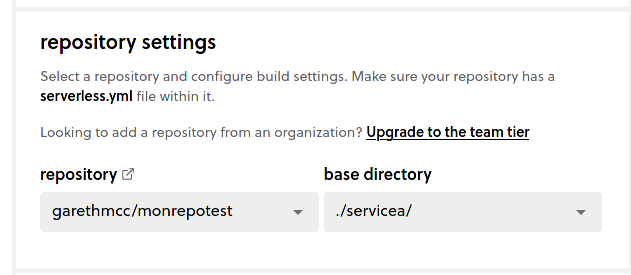
Once you have completed that process, you will need to choose the repository for your monorepo from the dropdown list, and since this is a monorepo, the CI/CD settings will also ask you to choose the right base directory for this specific service. Go ahead and do that!
Setting up automated deployments
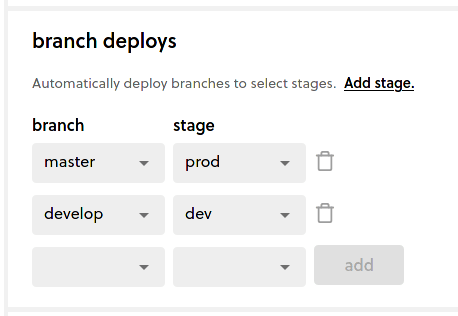
Since we have the basic connection all set up now, let’s scroll down to the branch deploys` section. This is where you can now configure which branch in your repo deploys to which stage or environment. Most repos have a main branch (or master) and this is often selected as the prod stage. You can however add a develop branch that can deploy to the dev stage as in the image:
Just add any additional branch to stage mappings you want to have. This configuration will then trigger an automated deployment as soon as any code changes are made to the branch you configure; for example if a developer creates a PR to the develop branch, one that PR is merged it will automatically trigger a deployment of your service to the dev stage if configured like the image above.
NOTE: You can use **Providers* to configure a different AWS connection for each stage and **Parameters** to pass different configuration values for each stage at deployment time as well.*
You will need to repeat the above process for each sub-directory within your monorepo.
More advanced configuration
Selective deployments
By default, if you have multiple services of a monorepo configured and you merge a change anywhere in that repo, all services will redeploy, just in case. There’s no way for the system to know if there are any dependencies between the services so it cannot assume that only that one service that had a change should be redeployed. In other words, if you had 6 services and you made a change to just one, 6 seperate redeployments will occur, just in case.
However, you can configure it differently. If you open the CI/CD settings for one of the services and scroll down to expand the build settings section, you should see numerous options to help you maximise the efficiency of your CI/CD pipeline for a monorepo.
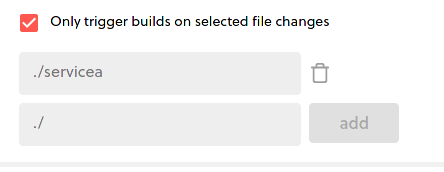
By default, the Only trigger builds on selected file changes option is not selected and means that this service will always be redeployed with any change to the git repository, even if there were no changes to the code of this service. If you only want this service redeployed when its own code is edited, check the box and you should see something like:
Automatically, the directory of the current service is selected. From this point on, servicea will only be re-deployed when its own code is edited.
Dependency deployment
But what if you actually did have services that had dependencies on each other. So in the example with servicea, we could in fact link it to serviceb and configure it so that servicea will always be re-deployed when serviceb is also edited. Just by adding a reference to the correct service directory, I can ensure this will happen:
I could of course do this for any number of services that servicea depends on and vice versa. But what if I have some kind of shared folder that servicea uses. Because we reference a directory structure in our configuration, you can point to any path in your monorepo to be watched for changes. In the example repo, we have a directory called shared that stores a number of classes and functions (or at least it could) that are re-used by multiple services. If I change anything in shared, multiple services need to redeploy.
I can accomplish this just by adding the path to shared:
In the image above, servicea will be deployed on merges to Github if changes are detected in directories servicea, serviceb or shared. And I can configure any service with any specific arrangement of dependencies I need, providing me a ton of great flexibility to deploy what I need under the right circumstances.
Monorepo deployments are much simpler to manage using Serverless Framework Pro CI/CD. But if you do have any feedback for us or want to just share, please hop into our Slack channels or Forums and let us know. Or you can even DM me on Twitter if you have any questions.
Originally published at https://www.serverless.com.


Top comments (0)