This guide will go through all the steps for adding the content of your Gatsby app to Meilisearch. ( https://github.com/shivaylamba/meilisearch-gatsby-plugin-guide.git)
We will use the content of NikitaJS Documentation, an open-source documentation site built with Gatsby, for this guide. We will then make this content searchable using Meilisearch.
Nikita is a toolkit that gathers a set of functions commonly used during system deployment. It is built for Node.js. We chose this project as it doesn’t have search functionality for its documentation.
Introducing our Tools
Meilisearch
Meilisearch is an open-source search engine that works out-of-the-box.
It provides a customizable searching and indexing solution along with features like typo tolerance, filters, and synonyms.
Requirements
To be able to follow this tutorial, you'll need the following:
- An open terminal or command prompt
-
Node.js >= 14.15.X and <= 16.X: this makes it possible to run JS outside a browser
- You can check your active version with the command
node --version - If your version of Node is outside this range, we recommend that you install nvm and use it to access Node 14
- You can check your active version with the command
- NPM and NPX >= 6.x (installed with Node.js): package managers that help you access and use JS libraries
Steps
- Start MeiliSearch
- Setup the Gatsby project
- Add the content of the Gatsby app to Meilisearch
- Build the frontend
- Conclusion
Start MeiliSearch
There are multiple ways to download and run a MeiliSearch instance.
For example, you can use Docker to install and run it locally:
docker pull getmeili/meilisearch:latest

docker run -it --rm -p 7700:7700 getmeili/meilisearch:latest ./meilisearch --master-key=masterKey
The Meilisearch instance will run on the following host:http://localhost:7700.
Setup the Gatsby project
Let’s open a terminal and clone the NikitaJs project that we will be using for this guide:
git clone https://github.com/adaltas/node-nikita.git
You can find the content of the Gatsby app in markdown files in the docs/content folder. This content is used by Gatsby to create the application.
Adding the Meilisearch plugin
Let’s start by installing the meilisearch plugin:
cd node-nikita/docs/website
npm install gatsby-plugin-meilisearch
Let’s also install all the dependencies:
npm install
To see how the website is rendered, run it using npm run serve.
Adding the content of the Gatsby app to Meilisearch
Now that you have installed the plugin and have both the web app and the Meilisearch instance running, let's configure the plugin to make the content searchable.
The main code for the docs website lies in the directory docs/website.
All the plugin configurations can be found in the gatsby-config.js file in the documentation website source directory.
In this example, all the markdown files will be retrieved from the documentation and added to the Meilisearch instance. This will be handled by the gatsby-plugin-mdx module.
Configuring the plugin
The first step is to add your Meilisearch credentials to the Meilisearch Gatsby plugin:
{
    resolve: 'gatsby-plugin-meilisearch,
    options: {
      host: 'http://localhost:7700', // your host URL goes here
      apiKey: 'masterKey',   // your API key goes here
      indexes: [],
    },
  },
The next step is to add the content to the indexes field.
This field can be considered the heart of the plugin. This is where you store the data that needs to be added to Meilisearch.
The indexes field is an array that can be composed of multiple index objects. Each index object contains the following information:
-
indexUidThis field contains the name of the index in Meilisearch. For this example, the indexnikita-api-docswill be created.
indexUid: 'nikita-api-docs'
-
queryThis is the graphQL query that will be executed to retrieve the data, i.e. the content of the pages. The query can be very specific depending on the plugins used. Gatsby comes with inbuilt support for GraphQL and you can use the GraphQL tool (http://localhost:8000/___graphql) provided by Gatsby in development mode to help you build it.
You can now see the graphQL query using the gatsby-plugin-mdx plugin. gatsby-plugin-mdx will fetch all the markdown files in the documentation given through the gatsby-source-filesystem plugin.
This will include the title, navtitle, and description of the markdown files from the frontmatter.
The data is transformed into a JavaScript object:
query: `query MyQuery {
              allMdx {
                edges {
                  node {
                    frontmatter {
                      title
                      navtitle
                      description
                    }
                    slug
                    rawBody
                    id
                  }
                }
              }
            }`,
iii. transformer
It’s a function that transforms the fetched data (from GraphQL query execution) before sending it to Meilisearch.
Let's suppose, the data returned from the query is:
 data = {
  allMdx: {
    edges: [
      {
        node: {
          frontmatter: {
            title: "Introduction",
            navtitle: "intro",
          },
          body: "Introduction to the Nikita.js",
          slug: "/introduction",
          id: "1",
        },
      },
      {
        node: {
          frontmatter: {
            title: "Architecture",
            navtitle: "architecture",
          },
          body: "Architechture of Nikita.js",
          slug: "/architecture",
          id: "2",
        },
      },
    ],
  },
};
We need to change the key names, and create a simple object, therefore, we can use the map function,
transformer: (data) => {
        data.allMdx.edges.map(({ node }) => {
          // Node property has been destructured here
          return {
            id: node.id,
            lvl0: node.frontmatter.title,
            lvl1: node.frontmatter.navtitle,
            content: node.body,
            anchor: node.slug,
          };
        });
}

/*
  It will return a list of transformed structured object

    [
    {
      id: "1",
      lvl0: "Introduction",
      lvl1: "introduction",
      content: "Introduction to the Nikita.js",
      anchor: "/introduction"
    },
    {
      id: "2",
      lvl0: "Architecture",
      lvl1: "architecture",
      content: "Architechture of Nikita.js",
      anchor: "/architecture"
    }
  ]
*/
In this, data will be passed to a customized function. A map function restructures the whole object into a simple array that can be indexed to Meilisearch.
An id field is required for indexing the data in Meilisearch.
After filling in these fields, the Meilisearch configuration should look like this:
   {
    resolve: 'gatsby-plugin-meilisearch',
    options: {
      host: 'http://localhost:7700',
      apiKey: 'masterKey',
      batchSize: 1,
      indexes: [
        {
          indexUid: 'nikita-api-docs',
          settings: {
              searchableAttributes: ['lvl0', 'lvl1', 'lvl2', 'content'],
            },
          transformer: (data) =>
              data.allMdx.edges
                .map(({ node }) => {
                  // Have to update for versioning
                  const currentVersion =
                    node.slug.substring(0, 8).search('project') === -1
                      ? '/current'
                      : ''

                  return {
                    id: node.id,
                    lvl0:
                      node.frontmatter.navtitle || node.frontmatter.title || '',
                    lvl1:
                      node.frontmatter.title || node.frontmatter.navtitle || '',
                    lvl2: node.frontmatter.description || '',
                    content: node.rawBody,
                    url: `${currentVersion}/${node.slug}`,
                  }
                }),
            query: `query MyQuery {
              allMdx {
                edges {
                  node {
                    frontmatter {
                      title
                      navtitle
                      description
                    }
                    slug
                    rawBody
                    id
                  }
                }
              }
            }`,
          },
        ],
      },
    },
Build the project
The gatsby-plugin-meilisearch will fetch and send data for indexation to Meilisearch during the build process
To start the build process, run the following command:
npm run build
After the build, there should be a message in the terminal that your content was successfully indexed:
success gatsby-plugin-meilisearch - x.xxxs - Documents added to Meilisearch
You can validate this by going to http://localhost:7700, entering the API key, and checking that your app content has been added to Meilisearch.
Build the frontend ( UI )
Now that the data is indexed, let’s proceed to build the user interface for creating the search experience.
For this example, we will use the Meilisearch docs-searchbar.js. It is a front-end SDK for Meilisearch that provides an easy integration of a search bar into the documentation site. The content indexed earlier in the Meilisearch instance will be referenced.
Let’s start by installing the docs-searchbar.js SDK in the frontend directory of the project.
# With NPM
npm install docs-searchbar.js
Search Bar
The first step is to import the docs-searchbar module into the AppBar.js code. The file can be found in website/src/components/shared.
import 'docs-searchbar.js/dist/cdn/docs-searchbar.css'
Next add a useEffect Hook to add the docsSearchBar function to the AppBar.js code.
useEffect(() => {
    if(window !== undefined){
      const docsSearchBar = require('docs-searchbar.js').default

      docsSearchBar({
        hostUrl: 'http://localhost:7700',
        apiKey: 'masterKey',
        indexUid: 'nikita-api-docs',
        inputSelector: '#search-bar-input',
        meilisearchOptions: {
          limit: 5,
        },
        debug: true,
        enhancedSearchInput: true,
      })
    }
  }, [])
The docsSearchBar function comes in with a number of different parameters.
The hostUrl and the apiKey serve as the credentials of your Meilisearch instance.
indexUid is the index identifier in your Meilisearch instance where your documentation/website content is stored.
inputSelector is the id attribute of the HTML search input tag. In the case of the docsSearchBar, it will match the id of the input.
enhancedSearhInput: When set to true, a theme is applied to the search box to improve its appearance. It adds the .searchbox class which can be used to further customize the search box.
Next, add an input tag of type search with an id:
<input type="search" id="search-bar-input" />
It’s done!
Testing the Implementation
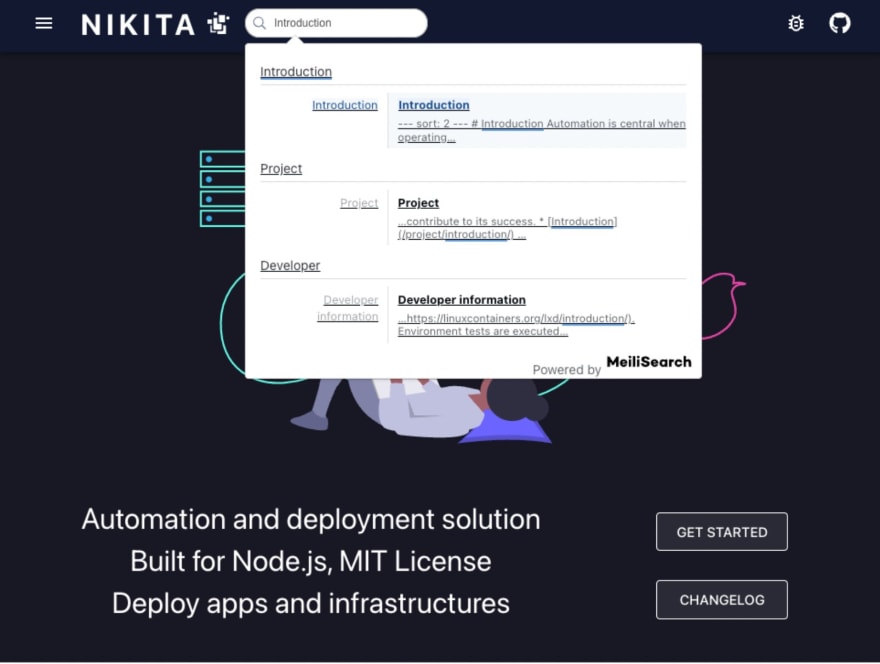
Run the command npm run develop to initiate the site and run it on localhost:8000. A search input should appear like this:
Conclusion
We hope this article was a pleasant introduction to the new Meilisearch plugin for Gatsby.
If you have any questions, please join us on Slack. For more information, see our:

Top comments (0)