In this article , we will be find how to build and deploy an image management application backend.
It will be able to store a record of an image in the database, get the image's record back from the database, update the record, and even delete the record completely as the case may be.
To achieve all of this, we will be using Express (a Node.js framework), Postgres (a database), Cloudinary (a cloud based image storage), GitHub (for version control/storage) and Heroku (a hosting platform).
These tools are all free. So you don’t have to bother about how to go about paying for them. Thanks to these great innovators.
Prerequisites
If you are new to most of these technologies, I would advise you go through my other tutorial on how to create a server and upload images to Cloudinary.
If you are totally to Postgres, then check out this tutorial.
Whenever you are ready, let’s get to work!
How to Store and Retrieve an Image Record
Create Database and Table
So you'll want to start by cloning this project if you don't already have it.
In your pgAdmin:
Create a database and name it tutorial
Create a table and name it tutorial
Create a Login/Group Role and name it tutorial. (Do not forget to give it all privileges.)
Back in your project directory, install the node-postgres (npm i pg) and make-runnnable (npm i make-runnable) packages.
In your package.json file, replace the contents of the
"scripts" with "create": "node ./services/dbConnect
createTables". We will use this to execute the dbConnect file we are about to create.
Create a services/dbConnect file to contain the following code:
const pg = require("pg");

const config = {
  user: "tutorial",
  database: "tutorial",
  password: "tutorial",
  port: 5432,
  max: 10, // max number of clients in the pool
  idleTimeoutMillis: 30000,
};

const pool = new pg.Pool(config);

pool.on("connect", () => {
  console.log("connected to the Database");
});

const createTables = () => {
  const imageTable = `CREATE TABLE IF NOT EXISTS
    images(
      id SERIAL PRIMARY KEY,
      title VARCHAR(128) NOT NULL,
      cloudinary_id VARCHAR(128) NOT NULL,
      image_url VARCHAR(128) NOT NULL
    )`;
  pool
    .query(imageTable)
    .then((res) => {
      console.log(res);
      pool.end();
    })
    .catch((err) => {
      console.log(err);
      pool.end();
    });
};

pool.on("remove", () => {
  console.log("client removed");
  process.exit(0);
});

//export pool and createTables to be accessible from anywhere within the application
module.exports = {
  createTables,
  pool,
};

require("make-runnable");
Now we are all set to create the table in our database. If you are ready, let's rock and roll!
Execute the following code in your terminal:
npm run create
If the image below is your result, then you are good to go:

Check your pgAdmin, and you should have your table seated properly in your database like in the image below:

Alright, it's been a long road. It's time to unite Node, Postgres, and Cloudinary.
How to Create Endpoints to Store and Retrieve Image Records
Endpoint 1: Persist Image
First, require the dbConnect.js file on the top of the app.js file like so:
const db = require('services/dbConnect.js');
Then in the app.js file, make a new endpoint (persist-image) with the following code:
// persist image
app.post("/persist-image", (request, response) => {
// collected image from a user
const data = {
title: request.body.title,
image: request.body.image,
}
// upload image here
cloudinary.uploader.upload(data.image)
.then().catch((error) => {
response.status(500).send({
message: "failure",
error,
});we
});
})
Replace the then block with the following code:
.then((image) => {
db.pool.connect((err, client) => {
// inset query to run if the upload to cloudinary is successful
const insertQuery = 'INSERT INTO images (title, cloudinary_id, image_url)
VALUES($1,$2,$3) RETURNING *';
const values = [data.title, image.public_id, image.secure_url];
})
})
The image.public_id and image.secure_url are gotten as part of the details returned for an image after the image has been successfully uploaded to Cloudinary.
We are now keeping a record of the image.public_id and image.secure_url (as you can see in the code above) in order to use it to retrieve, update, or delete the image record when we see fit.
Alright, let's move forward!
Still in the then block, add the following code under the query we created:
// execute query
client.query(insertQuery, values)
.then((result) => {
result = result.rows[0];
    // send success response
    response.status(201).send({
      status: "success",
      data: {
        message: "Image Uploaded Successfully",
        title: result.title,
        cloudinary_id: result.cloudinary_id,
        image_url: result.image_url,
      },
    })
  }).catch((e) => {
    response.status(500).send({
      message: "failure",
      e,
    });
  })
So our persist-image endpoint now looks like this:
// persist image
app.post("/persist-image", (request, response) => {
// collected image from a user
const data = {
title: request.body.title,
image: request.body.image
}
// upload image here
cloudinary.uploader.upload(data.image)
.then((image) => {
db.pool.connect((err, client) => {
// inset query to run if the upload to cloudinary is successful
const insertQuery = 'INSERT INTO images (title, cloudinary_id, image_url)
VALUES($1,$2,$3) RETURNING *';
const values = [data.title, image.public_id, image.secure_url];
  // execute query
  client.query(insertQuery, values)
  .then((result) => {
    result = result.rows[0];

    // send success response
    response.status(201).send({
      status: "success",
      data: {
        message: "Image Uploaded Successfully",
        title: result.title,
        cloudinary_id: result.cloudinary_id,
        image_url: result.image_url,
      },
    })
  }).catch((e) => {
    response.status(500).send({
      message: "failure",
      e,
    });
  })
})
}).catch((error) => {
response.status(500).send({
message: "failure",
error,
});
});
});
Now let's test out all our hard work:
Open your postman and test out your endpoint like the image below. Mine was successful. Hope yours had no errors too?
Alright, it's been a long road. It's time to unite Node, Postgres, and Cloudinary.
How to Create Endpoints to Store and Retrieve Image Records
Endpoint 1: Persist Image
First, require the dbConnect.js file on the top of the app.js file like so:
const db = require('services/dbConnect.js');
Then in the app.js file, make a new endpoint (persist-image) with the following code:
// persist image
app.post("/persist-image", (request, response) => {
// collected image from a user
const data = {
title: request.body.title,
image: request.body.image,
}
// upload image here
cloudinary.uploader.upload(data.image)
.then().catch((error) => {
response.status(500).send({
message: "failure",
error,
});
});
})
Replace the then block with the following code:
.then((image) => {
db.pool.connect((err, client) => {
// inset query to run if the upload to cloudinary is successful
const insertQuery = 'INSERT INTO images (title, cloudinary_id, image_url)
VALUES($1,$2,$3) RETURNING *';
const values = [data.title, image.public_id, image.secure_url];
})
})
The image.public_id and image.secure_url are gotten as part of the details returned for an image after the image has been successfully uploaded to Cloudinary.
We are now keeping a record of the image.public_id and image.secure_url (as you can see in the code above) in order to use it to retrieve, update, or delete the image record when we see fit.
Alright, let's move forward!
Still in the then block, add the following code under the query we created:
// execute query
client.query(insertQuery, values)
.then((result) => {
result = result.rows[0];
    // send success response
    response.status(201).send({
      status: "success",
      data: {
        message: "Image Uploaded Successfully",
        title: result.title,
        cloudinary_id: result.cloudinary_id,
        image_url: result.image_url,
      },
    })
  }).catch((e) => {
    response.status(500).send({
      message: "failure",
      e,
    });
  })
So our persist-image endpoint now looks like this:
// persist image
app.post("/persist-image", (request, response) => {
// collected image from a user
const data = {
title: request.body.title,
image: request.body.image
}
// upload image here
cloudinary.uploader.upload(data.image)
.then((image) => {
db.pool.connect((err, client) => {
// inset query to run if the upload to cloudinary is successful
const insertQuery = 'INSERT INTO images (title, cloudinary_id, image_url)
VALUES($1,$2,$3) RETURNING *';
const values = [data.title, image.public_id, image.secure_url];
  // execute query
  client.query(insertQuery, values)
  .then((result) => {
    result = result.rows[0];

    // send success response
    response.status(201).send({
      status: "success",
      data: {
        message: "Image Uploaded Successfully",
        title: result.title,
        cloudinary_id: result.cloudinary_id,
        image_url: result.image_url,
      },
    })
  }).catch((e) => {
    response.status(500).send({
      message: "failure",
      e,
    });
  })
})
}).catch((error) => {
response.status(500).send({
message: "failure",
error,
});
});
});
Now let's test out all our hard work:
Open your postman and test out your endpoint like the image below. Mine was successful. Hope yours had no errors too?

Open your Cloudinary console/dashboard and check your media Library. Your new image should be sitting there comfortably like mine below:

And now to the main reason why we are here: check the images table in your pgAdmin. Mine is what you see below:

Oohlala! We made it this far. Please take a break if you need one. I will be here waiting when you return. :)
If you are ready, then let's retrieve the image we persisted a moment ago.
Endpoint 2: Retrieve Image
Start with this code:
app.get("/retrieve-image/:cloudinary_id", (request, response) => {
});
Next, we will need to collect a unique ID from the user to retrieve a particular image. So add const { id } = request.params; to the code above like so:
app.get("/retrieve-image/:cloudinary_id", (request, response) => {
// data from user
const { cloudinary_id } = request.params;
});
Add the following code just below the code above:
db.pool.connect((err, client) => {
// query to find image
const query = "SELECT * FROM images WHERE cloudinary_id = $1";
const value = [cloudinary_id];
});
Under the query, execute the query with the following code:
// execute query
client
  .query(query, value)
  .then((output) => {
    response.status(200).send({
      status: "success",
      data: {
        id: output.rows[0].cloudinary_id,
        title: output.rows[0].title,
        url: output.rows[0].image_url,
      },
    });
  })
  .catch((error) => {
    response.status(401).send({
      status: "failure",
      data: {
        message: "could not retrieve record!",
        error,
      },
    });
  });
Now our retrieve-image API looks like this:
app.get("/retrieve-image/:cloudinary_id", (request, response) => {
// data from user
const { cloudinary_id } = request.params;
db.pool.connect((err, client) => {
// query to find image
const query = "SELECT * FROM images WHERE cloudinary_id = $1";
const value = [cloudinary_id];
// execute query
client
.query(query, value)
.then((output) => {
response.status(200).send({
status: "success",
data: {
id: output.rows[0].cloudinary_id,
title: output.rows[0].title,
url: output.rows[0].image_url,
},
});
})
.catch((error) => {
response.status(401).send({
status: "failure",
data: {
message: "could not retrieve record!",
error,
},
});
});
});
});
Let's see how well we did:
In your postman, copy the cloudinary_id and add it to the URL like in the image below:

YEEESSS! We can also retrieve our image.
If you are here, then you deserve a round of applause and a standing ovation for your industriousness.
Congratulations! You just reached a great milestone.
The code for storing and retrieving image records is here.
How to Update and Delete an Image Record
We will now see how to delete and update an image record as the case maybe. Let's begin with the delete endpoint.
Delete Endpoint
In the app.js file, start with the following code:
// delete image
app.delete("delete-image/:cloudinary_id", (request, response) => {
});
Next, we want to get the unique ID of the image we want to delete from the URL, that is cloudinary_id. So inside the code above add:
const { cloudinary_id } = request.params;
We now start the deleting process.
First, we delete from Cloudinary. Add the following code to delete the image from Cloudinary:
cloudinary.uploader
.destroy(cloudinary_id)
.then((result) => {
response.status(200).send({
message: "success",
result,
});
})
.catch((error) => {
response.status(500).send({
message: "Failure",
error,
});
});
At this point, our API can delete the image from Cloudinary only (you can check it out in postman). But we also want to get rid of the record we have in our Postgres database.
Second, we delete from our Postgres database. To do so, replace the code in the then block with the following query:
db.pool.connect((err, client) => {
  // delete query
  const deleteQuery = "DELETE FROM images WHERE cloudinary_id = $1";
  const deleteValue = [cloudinary_id];
})
Execute the query with the following code underneath it:
// execute delete query
client.query(deleteQuery, deleteValue)
.then((deleteResult) => {
response.status(200).send({
message: "Image Deleted Successfully!",
deleteResult
});
}).catch((e) => {
response.status(500).send({
message: "Image Couldn't be Deleted!",
e
});
});
So our Endpoint should look like this:
// delete image
app.delete("/delete-image/:cloudinary_id", (request, response) => {
// unique ID
const { cloudinary_id } = request.params;
// delete image from cloudinary first
cloudinary.uploader
.destroy(cloudinary_id)
// delete image record from postgres also
.then(() => {
  db.pool.connect((err, client) => {

  // delete query
  const deleteQuery = "DELETE FROM images WHERE cloudinary_id = $1";
  const deleteValue = [cloudinary_id];

  // execute delete query
  client
    .query(deleteQuery, deleteValue)
    .then((deleteResult) => {
      response.status(200).send({
        message: "Image Deleted Successfully!",
        deleteResult,
      });
    })
    .catch((e) => {
      response.status(500).send({
        message: "Image Couldn't be Deleted!",
        e,
      });
    });
  })
})
.catch((error) => {
  response.status(500).send({
    message: "Failure",
    error,
  });
});
});
The time has arrived for us to put our Endpoint to the test.
The following is my Cloudinary media library with two images I uploaded already. Take note of their unique ID (public_id).

If you don't already have that, please use the persist-image endpoint to upload some images.
Now let's proceed to postman:
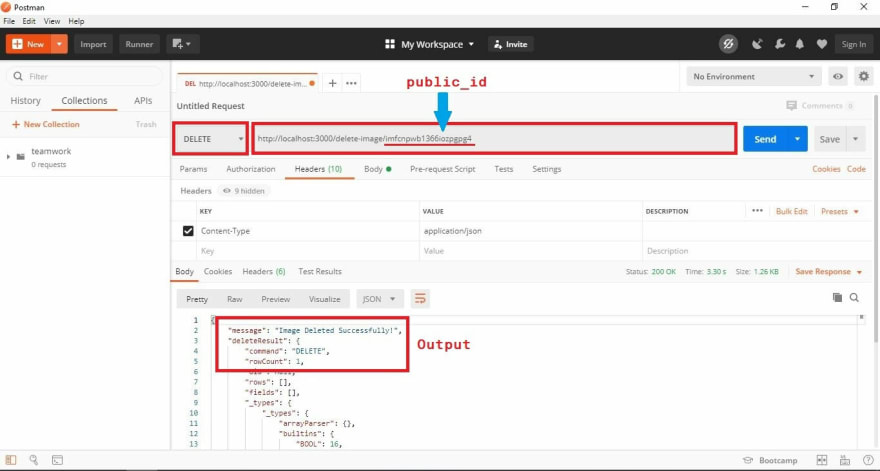
Notice, the unique ID as it matches one of the image in my Cloudinary media library.
From the output, we executed the DELETE command and that deleted one ROW from our image TABLE in our database.
Now this is my media library with one of the images remaining:

Walahhhh... We are now able to get rid of an image.
Do take a break if you need one. ✌🏾
If you are ready, I am ready to update images.
Update Image API
Below the delete-image API, let's start creating the update-image API with the following code:
// update image
app.put("/update-image/:cloudinary_id", (request, response) => {
});
All codes will live in there.
Collect the unique Cloudinary ID and new image details from the user with the following code:
// unique ID
const { cloudinary_id } = request.params;
// collected image from a user
const data = {
title: request.body.title,
image: request.body.image,
};
Delete the image from Cloudinary with the following code:
// delete image from cloudinary first
cloudinary.uploader
.destroy(cloudinary_id)
// upload image here
.then()
.catch((error) => {
response.status(500).send({
message: "failed",
error,
});
});
Next, upload another image to Cloudinary. To do that, enter the following code into the then block:
() => {
cloudinary.uploader
.upload(data.image)
.then()
.catch((err) => {
response.status(500).send({
message: "failed",
err,
});
});
}
Now let's replace our initial record with the new image details. Replace the content of the then block with the following:
(result) => {
db.pool.connect((err, client) => {
        // update query
        const updateQuery =
          "UPDATE images SET title = $1, cloudinary_id = $2, image_url = $3 WHERE cloudinary_id = $4";
        const value = [
          data.title,
          result.public_id,
          result.secure_url,
          cloudinary_id,
        ];
      });
    }
We execute the query using the following code just beneath the query declaration:
// execute query
client
.query(updateQuery, value)
.then(() => {
            // send success response
            response.status(201).send({
              status: "success",
              data: {
                message: "Image Updated Successfully"
              },
            });
          })
          .catch((e) => {
            response.status(500).send({
              message: "Update Failed",
              e,
            });
          });
At this point, this is what I have:
// update image
app.put("/update-image/:cloudinary_id", (request, response) => {
// unique ID
const { cloudinary_id } = request.params;
// collected image from a user
const data = {
title: request.body.title,
image: request.body.image,
};
// delete image from cloudinary first
cloudinary.uploader
  .destroy(cloudinary_id)

  // upload image here
  .then(() => {
    cloudinary.uploader
      .upload(data.image)

      // update the database here
      .then((result) => {
        db.pool.connect((err, client) => {
        // update query
        const updateQuery =
          "UPDATE images SET title = $1, cloudinary_id = $2, image_url = $3 WHERE cloudinary_id = $4";
        const value = [
          data.title,
          result.public_id,
          result.secure_url,
          cloudinary_id,
        ];

        // execute query
        client
          .query(updateQuery, value)
          .then(() => {

            // send success response
            response.status(201).send({
              status: "success",
              data: {
                message: "Image Updated Successfully"
              },
            });
          })
          .catch((e) => {
            response.status(500).send({
              message: "Update Failed",
              e,
            });
          });
        });
      })
      .catch((err) => {
        response.status(500).send({
          message: "failed",
          err,
        });
      });
  })
  .catch((error) => {
    response.status(500).send({
      message: "failed",
      error,
    });
  });
});
It's testing time!
This is my postman in the image below:
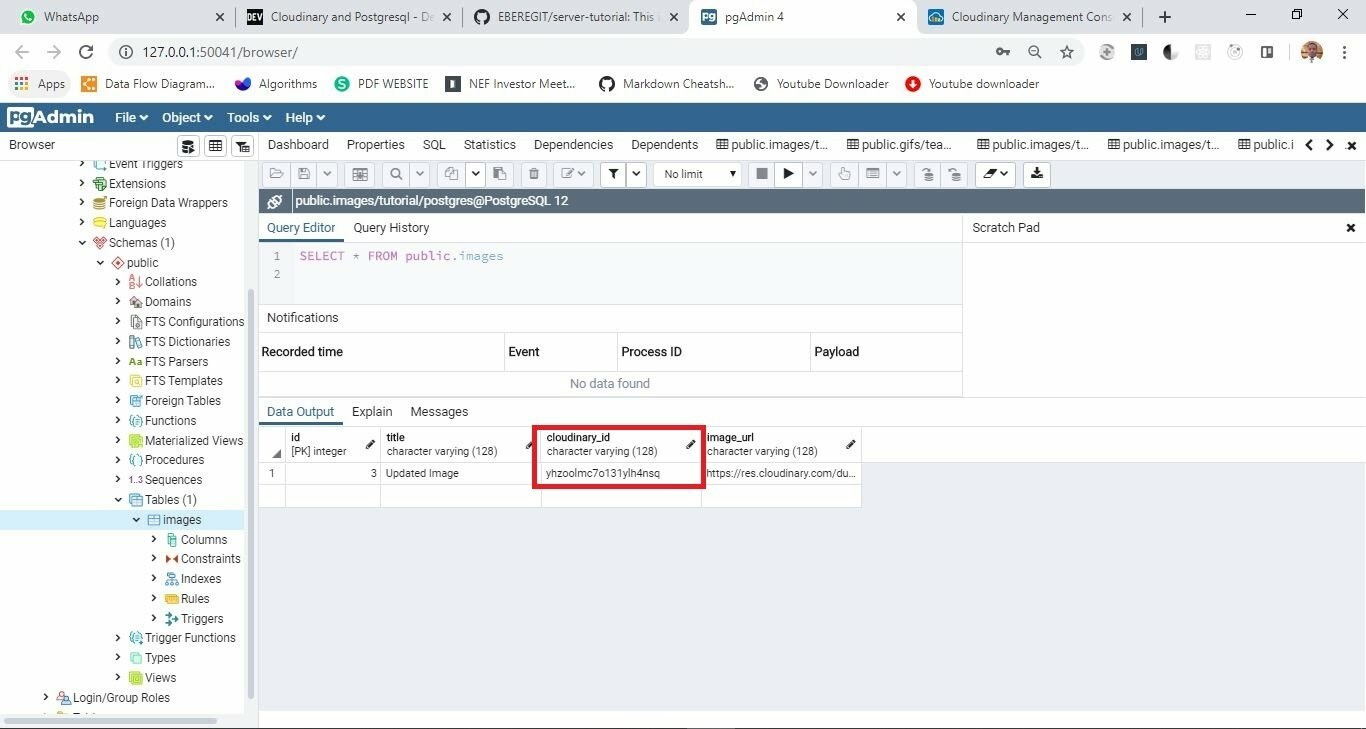Image description](https://res.cloudinary.com/practicaldev/image/fetch/s--wlMTtvlE--/c_limit%2Cf_auto%2Cfl_progressive%2Cq_auto%2Cw_880/https://dev-to-uploads.s3.amazonaws.com/uploads/articles/mtj78gwoc6xdp18kiu14.jpeg)
Take note of the unique cloudinary ID which matches the image left in my Cloudinary media library.
Now take a look at my Cloudinary media library in the image that follows:

Take note of the new image replacing the initial one in my media library above.
Also, see that the unique Cloudinary ID matches that in my database with the new title. See image below:

Yayeh! You did awesomely great! 💪
We just completed an image management application with Node.js, Cloudinary and Postgres.
Code Optimisation With Express Routing
Express Routing enables us to make our Node.js code more optimized or give it a more modular structure by separating the business logic from the controllers. We want to use that to clean up our code so far.
We'll begin by creating a new folder with the name routes in the root directory:
mk dir routes
In the routes folder, create a file with the name: routes.js.
For Windows:
echo . > routes.js
For Mac:
touch routes.js
Empty the routes.js file if anything is there and enter the following code:
const express = require('express');
const router = express.Router();
module.exports = router;
Add the following code above the last line:
const cloudinary = require("cloudinary").v2;
require("dotenv").config();
const db = require("../services/dbConnect.js");
// cloudinary configuration
cloudinary.config({
cloud_name: process.env.CLOUD_NAME,
api_key: process.env.API_KEY,
api_secret: process.env.API_SECRET,
});
Back in the App.js file, delete the following code:
const cloudinary = require("cloudinary").v2;
require("dotenv").config();
const db = require("./services/dbConnect.js");
// cloudinary configuration
cloudinary.config({
cloud_name: process.env.CLOUD_NAME,
api_key: process.env.API_KEY,
api_secret: process.env.API_SECRET,
});
Move all the APIs to routes.js.
Change all occurence of app to router carefully.
My routes.js file now looks like this.
Back in the app.js file, import the routes.js file like so:
// import the routes file
const routes = require("./routes/routes")
Now register the routes like so:
// register the routes
app.use('/', routes);
This is my app.js file at the moment:
const express = require("express");
const app = express();
// import the routes file
const routes = require("./routes/routes")
// body parser configuration
const bodyParser = require("body-parser");
app.use(bodyParser.json());
app.use(bodyParser.urlencoded({ extended: true }));
// register the routes
app.use('/', routes);
module.exports = app;
It's time to test and see if our routes are still working like before.
Make sure yours are working like mine below:
persist-image


update-image

delete-image

Wow! We have been able to separate our routes from our app.js file.
The code for this is here.
Even though our routes.js file is still lengthy, we have a good basis to separate our business logic from our controllers. The time has arrived to do just that.
How to Move Each Endpoint to a Different File
Begin by creating a new folder in the routes folder and name it controllers.
In the controllers folder, create 5 files and name them after the 5 endpoints.
Our folder and files should be structured as follows:

Back in the routes.js file, let's work on the image-upload API. Cut the following code:
(request, response) => {
// collected image from a user
const data = {
image: request.body.image,
};
// upload image here
cloudinary.uploader
  .upload(data.image)
  .then((result) => {
    response.status(200).send({
      message: "success",
      result,
    });
  })
  .catch((error) => {
    response.status(500).send({
      message: "failure",
      error,
    });
  });
}
In the imageUpload file, equate the code you already cut from the image-upload endpoint to exports.imageUpload like so:
exports.imageUpload = (request, response) => {
// collected image from a user
const data = {
image: request.body.image,
};
// upload image here
cloudinary.uploader
  .upload(data.image)
  .then((result) => {
    response.status(200).send({
      message: "success",
      result,
    });
  })
  .catch((error) => {
    response.status(500).send({
      message: "failure",
      error,
    });
  });
}
Now let's import what is necessary for this code to work. So this is my imageUpload file right now:
const cloudinary = require("cloudinary").v2;
require("dotenv").config();
// cloudinary configuration
cloudinary.config({
cloud_name: process.env.CLOUD_NAME,
api_key: process.env.API_KEY,
api_secret: process.env.API_SECRET,
});
exports.imageUpload = (request, response) => {
// collected image from a user
const data = {
image: request.body.image,
};
// upload image here
cloudinary.uploader
.upload(data.image)
.then((result) => {
response.status(200).send({
message: "success",
result,
});
})
.catch((error) => {
response.status(500).send({
message: "failure",
error,
});
});
}
Let's import and register the imageUpload API in the routes.js file like so:
const imageUpload = require("./controllers/imageUpload");
// image upload API
router.post("image-upload", imageUpload.imageUpload);
Now we have this line of code pointing to the imageUpload API in the imageUpload.js file from the routes.js file.
How awesome! Our code is more readable.
Make sure to test the API to be sure it's working properly. Mine works perfectly. See image below:

Now, it's your turn!
Apply what you have learnt to the other APIs. Let's see what you have got.
I will be waiting on the other side...
If you are here, then I believe you have done yours and they're working perfectly – or at least, you already gave it your best shot. Kudos!
Checkout mine here.
Congratulations. You are awesome :)
The code optimisation code is here.
Alright, on to the next step.
How to Deploy to GitHub And Heroku
Now that we've completed our application, let's deploy it on Heroku so that we can access it even without being on our laptop where the code was written.
I will be walking you through uploading our application to GitHub and deploying it to Heroku.
Without further ado, let's get our hands dirty.
How to Upload the Code to GitHub
Uploading or pushing to GitHub is as easy as eating your favorite meal. Check out this resource to learn how to push your project from you local machine to GitHub.
How to Deploy to Heroku
Let's begin by creating an account on Heroku.
If you have created an account, you may have been prompted to create an app (that is a folder where your app will be housed). You can do that, but I will do mine using my terminal since the terminal comes with a few added functionalities that we will need later.
Open your project in a terminal if you have not done so already. I will be using the VS Code integrated terminal.
Install Heroku CLI:
npm install heroku

Login to Heroku CLI. This will open a browser window, which you can use to log in.
heroku login

Create an app. It can have any name. I am using node-postgres-cloudinary.
heroku create node-postgres-cloudinary

Go to your Heroku dashboard and you will find the newly created app.

Waalaah!
That is how mine looks in the image above. I have some apps there already but you can see the one I just created.
Let's now add the PostgreSQL database to the app.
How to Add Heroku Postgres
Click on the app you just created. It will take you to the app's dashboard.

Click on the Resources tab/menu

In the Add-ons Section, search and select Heroku Postgres.

Make sure you select the Hobby Dev - Free plan in the pop-up window that follows:
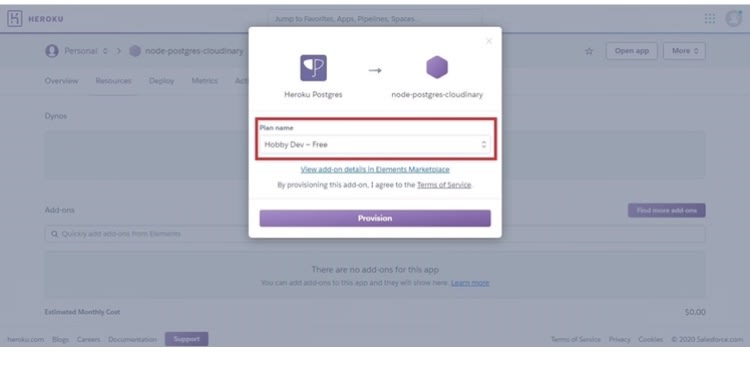
Click on the provision button to add it to the app like so:

Click on the Heroku Postgres to take you to the Heroku Postgres dashboard.

Click on the settings tab:

Click on View Credentials:

In the Credentials, we are interested in the Heroku CLI. We will be using it in a bit

Back to the terminal.
Let's confirm if the Heroku Postgres was added successfully. Enter the following in the terminal:
heroku addons
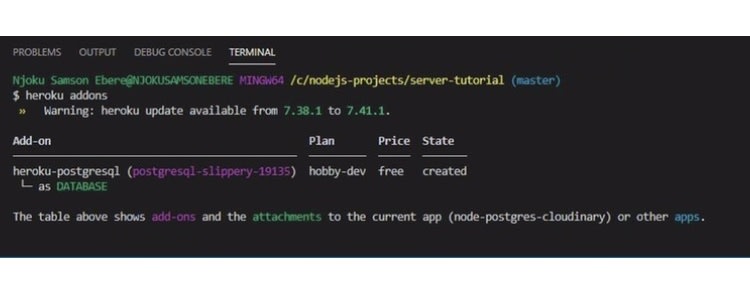
Yeeeeaaaah! It was added successfully.
Before we proceed, make sure that your PostgreSQL path is set correctly if you are on Windows. Follow this link to learn how to set a path. The path should be like this: C:\Program Files\PostgreSQL<VERSION>\bin.
The version will depend on the one installed on you machine. Mine is: C:\Program Files\PostgreSQL\12\bin since I am using the version 12.
The following image might be helpful:

You may have to navigate to the folder where PostgreSQL is installed on your machine to find out your own path.

Login into the Heroku Postgres using the Heroku CLI from our Heroku Postgres credentials. This is mine – yours will be different:
heroku pg:psql postgresql-slippery-19135 --app node-postgres-cloudinary
If you got an error, it is most likely because your path is not set properly.
How to Prepare our Database Connection to Match Heroku's
At the moment, my database looks like this:
const pg = require("pg");
const config = {
user: "tutorial",
database: "tutorial",
password: "tutorial",
port: 5432,
max: 10, // max number of clients in the pool
idleTimeoutMillis: 30000,
};
const pool = new pg.Pool(config);
pool.on("connect", () => {
console.log("connected to the Database");
});
If you try connecting Heroku to this, you are going to get an error. This is because Heroku has a connection string setup already. So we have to setup our connection such that Heroku can easily connect.
I am going to refactor my database connection file (dbConnect.js) and .env file to make this happen.
dbConnect.js
const pg = require('pg');
require('dotenv').config();
// set production variable. This will be called when deployed to a live host
const isProduction = process.env.NODE_ENV === 'production';
// configuration details
const connectionString = postgresql://${process.env.DB_USER}:${process.env.DB_PASSWORD}@${process.env.DB_HOST}:${process.env.DB_PORT}/${process.env.DB_DATABASE};
// if project has been deployed, connect with the host's DATABASE_URL
// else connect with the local DATABASE_URL
const pool = new pg.Pool({
connectionString: isProduction ? process.env.DATABASE_URL : connectionString,
ssl: isProduction,
});
// display message on success if successful
pool.on('connect', () => {
console.log('Teamwork Database connected successfully!');
});
.env file
DB_USER="tutorial"
DB_PASSWORD="tutorial"
DB_HOST="localhost"
DB_PORT="5432"
DB_DATABASE="tutorial"
With the setup of the dbconnect and .env file, we are ready to export our database and tables from our local machine to heroku postgres.
How to Export Database and Tables
Go to your pgAdmin and locate the database for this tutorial. Mine is tutorial.

Right-Click on it and select Backup. This will bring up a new window.

Enter a name for the SQL file like I did. Select the plain format. Then click Backup. This will save the file to your documents folder.
Locate the file and move it into the project directory. It can be anywhere in the directory but I choose to move mine into the services directory because it holds the database related files.
Back in the terminal, navigate to the folder containing the SQL file and run the following code to add the tables we just exported to the heroku postgres database:
cat |
This is what mine looks like:
cat tutorial.sql | heroku pg:psql postgresql-slippery-19135 --app node-postgres-cloudinary

Did you notice that I changed directory to services (cd services)? That is where my sql file is located.
Wow! We have just successfully exported our database and tables to Heroku.
It is almost over...
How to Tell GitHub that We Made Changes
Add the files we have made changes to:
$ git add .
The period (.) adds all files.
Commit your latest changes:
$ git commit -m "refactored the dbConnect and .env file to fit in to heroku; Added the database SQL file"
Push the committed files:
$ git push origin -u master

Finally deploying our App
Go to you app's dashboard:

Search and select a repo, and click on connect:

Select the branch you want to deploy (in my own case, it is the master branch):

Enable automatic deployment by clicking the Enable automatic deployment button as in the image above.
Click on the Deploy button in the manual deploy

We will not have to do all this for subsequent deployments.
Now you have a button telling you to "view site" after build is completed. Click it. This will open your app in a new tab

Oh no! A bug? Application error??
Don't worry, it just a small issue. Something you should never forget to do while making deployments. Most hosting service will require it.
How to Fix the Heroku Application Error
Get back to the root directory of your project.
Create a file and name it Procfile (it has no extension).
In the file, enter the following code:
web: node index.js

This directs Heroku to the server file (index.js) which is the entry point of the application. If your server is in a different file, please modify as required.
Save the file and push the new changes to GitHub.
Wait 2 to 5 minutes for Heroku to automatically detect changes in your GitHub repo and render the changes on the app.
You can now refresh that error page and see your hard work paying off:

You can also test the retrieve image route and see it working.
Congratulations! What a feat you have attained.
Other routes (persist-image, update-image, and delete-image) will not be working because we have not provisioned or added cloudinary add-on. It is as simple as the PostgreSQL one we just did. So you can give it a shot.
Conclusion
We started this tutorial with the aim of learning how to build a backend application using Express, Postgres, Cloudinary, Github and Heroku.
We learned how to store, retrieve, delete, and update an image record. We then organised our code with Express Routing, pushed it to GitHub, and deployed it on Heroku. That was a lot.
I hope you will agree that it was worth it because we learnt a lot. You should try adding the Cloudinary add-on yourself to sharpen your knowledge even more.
Thanks for reading!

Top comments (0)