
1. Grant database access to Azure AD user
First, enable Azure Active Directory authentication to SQL Database by assigning an Azure AD user as the admin of the server. This user is different from the Microsoft account you used to sign up for your Azure subscription. It must be a user that you created, imported, synced, or invited into Azure AD. For more information on allowed Azure AD users, see Azure AD features and limitations in SQL Database.
If your Azure AD tenant doesn't have a user yet, create one by following the steps at Add or delete users using Azure Active Directory.
Find the object ID of the Azure AD user using the az ad user list and replace . The result is saved to a variable.
azureaduser=$(az ad user list --filter "userPrincipalName eq '<user-principal-name>'" --query [].objectId --output tsv)
Add this Azure AD user as an Active Directory admin using az sql server ad-admin create command in the Cloud Shell. In the following command, replace with the server name (without the .database.windows.net suffix).
az sql server ad-admin create --resource-group myResourceGroup --server-name <server-name> --display-name ADMIN --object-id $azureaduser
2. Set up your dev environment
Visual Studio for Windows is integrated with Azure AD authentication. To enable development and debugging in Visual Studio, add your Azure AD user in Visual Studio by selecting File > Account Settings from the menu, and select Sign in or Add.
To set the Azure AD user for Azure service authentication, select Tools > Options from the menu, then select Azure Service Authentication > Account Selection. Select the Azure AD user you added and select OK.
Older way of using System.Data.SqlClient before new version of Microsoft.Data.SqlClient version came to picture
using Azure.Core;
using Azure.Identity;
using Microsoft.Azure.Services.AppAuthentication;

namespace DummyApi
{
    public class AzureSqlAuthTokenService : IDBAuthTokenService
    {
        // See https://docs.microsoft.com/azure/active-directory/managed-identities-azure-resources/services-support-managed-identities#azure-sql
        private static readonly string[] _azureSqlScopes = new[]
        {
        "https://database.windows.net//.default"
        };

        private static readonly TokenCredential _credential = new ChainedTokenCredential(
            new ManagedIdentityCredential(),
            new EnvironmentCredential());

        public string GetToken()
        {
            AzureServiceTokenProvider provider = new AzureServiceTokenProvider(serviceProviderConnection);
            var token = provider.GetAccessTokenAsync("https://database.windows.net/").Result;
            return token;
        }
    }
}
In Above code "serviceProviderConnection" will have following value when debugging in local Visual Studio:
RunAs=Developer; DeveloperTool=VisualStudio
It will be updated to following when deployed to App Service:
RunAs=App
Refer full values in this link :
How to call the above code when connecting to SQLConnection - follow this:
                using (SqlConnection _connection = new SqlConnection())
                {
                    _connection.ConnectionString = sqlConnectionString;
                    _connection.AccessToken = authTokenService.GetToken();

                    _connection.Open();

                    // do some stuff with the sqlconnection to read or write record in SQL.

                    _connection.Close();

                    return true;
                }
3. Modify your project - new way of using Microsoft.Data.SqlClient
In Visual Studio, open the Package Manager Console and add the NuGet package Microsoft.Data.SqlClient
Install-Package Microsoft.Data.SqlClient -Version 4.0.1
Token creation part is handled by this library by default.
In the ASP.NET Core and SQL Database tutorial, the MyDbConnection connection string in appsettings.json isn't used at all yet. The local environment and the Azure environment both get connection strings from their respective environment variables in order to keep connection secrets out of the source file. But now with Active Directory authentication, there are no more secrets. In appsettings.json, replace the value of the MyDbConnection connection string with:
"Server=tcp:<server-name>.database.windows.net;Authentication=Active Directory Default; Database=<database-name>;"


                using (SqlConnection _connection = new SqlConnection(sqlConnectionString))
                {
                    _connection.Open();

                    // do some stuff with the sqlconnection to read or write record in SQL.

                    _connection.Close();

                    return true;
                }
4. Use managed identity connectivity
Next, you configure your App Service app to connect to SQL Database with a system-assigned managed identity.
Enable managed identity on app
To enable a managed identity for your Azure app, use the az webapp identity assign command in the Cloud Shell. In the following command, replace .
az webapp identity assign --resource-group myResourceGroup --name <app-name>
Here's an example of the output:
{
  "additionalProperties": {},
  "principalId": "21dfa71c-9e6f-4d17-9e90-1d28801c9735",
  "tenantId": "72f988bf-86f1-41af-91ab-2d7cd011db47",
  "type": "SystemAssigned"
}
Grant permissions to managed identity
In the Cloud Shell, sign in to SQL Database by using the SQLCMD command. Replace with your server name, with the database name your app uses, and and with your Azure AD user's credentials.
sqlcmd -S <server-name>.database.windows.net -d <db-name> -U <aad-user-name> -P "<aad-password>" -G -l 30
In the SQL prompt for the database you want, run the following commands to grant the permissions your app needs. For example,
CREATE USER [<identity-name>] FROM EXTERNAL PROVIDER;
ALTER ROLE db_datareader ADD MEMBER [<identity-name>];
ALTER ROLE db_datawriter ADD MEMBER [<identity-name>];
ALTER ROLE db_ddladmin ADD MEMBER [<identity-name>];
GO
is the name of the managed identity in Azure AD. If the identity is system-assigned, the name is always the same as the name of your App Service app. For a deployment slot, the name of its system-assigned identity is /slots/. To grant permissions for an Azure AD group, use the group's display name instead (for example, myAzureSQLDBAccessGroup).
Type EXIT to return to the Cloud Shell prompt.
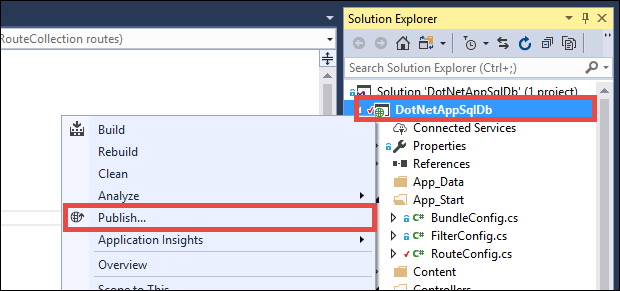
5. Publish your changes
All that's left now is to publish your changes to Azure.

Top comments (0)