In today’s dynamic and data-driven world, the ability to harness information effectively and deliver user-specific results has become paramount. This is particularly true in the accommodation industry, where customer preferences can vary enormously. Leveraging AI and Big Data technologies, I’ve created an intelligent data pipeline capable of tailoring accommodation search results to individual needs.
This article outlines the process of building an AI data pipeline using Hadoop HDFS, MongoDB, Spark, GPT-3, React, and Flask. The goal is to develop an intuitive platform where users can search for Airbnb apartments based on a target city, budget, and duration of stay, all powered by the intelligent language model, GPT-3.
Step 1: Data Acquisition and Upload to HDFS
The data used in this project was derived from a dataset comprising listings from Airbnb, Booking, and Hotels.com. This dataset is focused on exploring the pricing landscape within the most popular European capitals. Each city contributed 500 hotels from each platform, culminating in a total of 7500 hotel listings.
Example Berlin.json:
{
  "airbnbHotels": [
    {
      "thumbnail": "https://a0.muscache.com/im/pictures/miso/Hosting-647664199858827562/original/cfc2fc4c-d703-4827-bc25-f1acb07e0025.jpeg?im_w=720",
      "title": "Private room in Tempelhof",
      "subtitles": ["Privatzimmer in Tempelhofer Feld", "1 bed", "Jul 24 – 31"],
      "price": { "currency": "$", "value": 31, "period": "night" },
      "rating": 5,
      "link": "https://www.airbnb.com/rooms/647664199858827562"
    },
    {
      "thumbnail": "https://a0.muscache.com/im/pictures/b9cb8b8c-51b3-46c4-b9cd-d27053f7d628.jpg?im_w=720",
      "title": "Private room in Mitte",
      "subtitles": ["Tiny, individual Room with private Bathroom", "1 small double bed", "Sep 1 – 8"],
      "price": { "currency": "$", "value": 40, "period": "night" },
      "rating": 4.96,
      "link": "https://www.airbnb.com/rooms/41220512"
    }
Paris.json:
{
  "airbnbHotels": [
    {
      "thumbnail": "https://a0.muscache.com/im/pictures/b9bc653d-df43-4f91-8162-0be5c912a3b4.jpg?im_w=720",
      "title": "Apartment in Paris",
      "subtitles": ["A nice little space and cute", "1 single bed", "May 8 – 13"],
      "price": { "currency": "$", "value": 57, "period": "night" },
      "rating": 4.46,
      "link": "https://www.airbnb.com/rooms/7337703"
    },
    {
      "thumbnail": "https://a0.muscache.com/im/pictures/261b3fb2-fec9-4009-b8b9-90d9976597fd.jpg?im_w=720",
      "title": "Apartment in Paris",
      "subtitles": ["Small cozy cocoon in Paris! 1 person studio", "1 double bed", "Jul 30 – Aug 5"],
      "price": { "currency": "$", "value": 107, "period": "night" },
      "rating": 4.98,
      "link": "https://www.airbnb.com/rooms/25820315"
    }
After downloading the data onto my local system, a Makefile was created to transfer the data onto Hadoop’s distributed file system (HDFS). This process involves copying the JSON files from the local directory into the HDFS using Docker and Hadoop commands, ensuring the data is stored in a distributed manner for efficient processing. Run make copy_files_to_hdfs
.PHONY: copy_files_to_hdfs
copy_files_to_hdfs:
 @for local_path in $(local_dir_hdfs)/*.json; do \
  filename=$$(basename -- "$$local_path"); \
  docker cp $$local_path $(container_id_hdfs):$(docker_dir_hdfs)/$$filename; do
  docker exec $(container_id_hdfs) hadoop fs -copyFromLocal $(docker_dir_hdfs)/$$filename $(hdfs_dir_hdfs)/$$filename; \
 done
Step 2: Data Processing with Spark and Storage in MongoDB
Once the data is in HDFS, the next step is to process and clean it. For this purpose, Apache Spark comes into play. Apache Spark is an open-source, distributed computing system that handles data processing and analytics on large datasets, making it perfect for the task at hand.
Let’s delve deeper into how Spark processes the data and loads it into MongoDB.
from pyspark.sql import SparkSession
from pyspark.sql.functions import explode, lit, col, from_json
from pyspark.sql.types import *

# Create a SparkSession
spark = SparkSession.builder \
    .appName("Data Processing") \
    .master("spark://spark:7077") \
    .getOrCreate()
The first step involves creating a Spark session, which is the entry point to any Spark functionality. Here, we specify the name of the application and the master URL to connect to, which in this case is a Spark standalone cluster.
Next, we define the schema of our data. Spark schema is a blueprint of what our DataFrame should look like, including the types of data it contains.
# Define the schema
schema = StructType([
    StructField("airbnbHotels", ArrayType(
        StructType([
            StructField("thumbnail", StringType()),
            StructField("title", StringType()),
            StructField("subtitles", ArrayType(StringType())),
            StructField("price", StructType([
                StructField("currency", StringType()),
                StructField("value", DoubleType()),
                StructField("period", StringType())
            ])),
            StructField("rating", DoubleType()),
            StructField("link", StringType())
        ])
    ))
])
Once the schema is defined, we load the data from HDFS and process it. The data processing includes adding a new column with the city name and exploding the “airbnbHotels” field into separate rows. We then select the individual fields from the “airbnbHotels” objects.
for city in cities:
    # Load the data for the current city
    df = spark.read.option("multiline", "true").json(f'hdfs://namenode:9000/input/{city}.json')

    # Add a new column with the city name
    df = df.withColumn("city", lit(city))

    # Explode the "airbnbHotels" field into separate rows
    df = df.select("city", explode(df.airbnbHotels).alias("airbnbHotels"))

    # Select the individual fields from the "airbnbHotels" objects
    df = df.select(
        lit(city).alias("city"),
        df.airbnbHotels.thumbnail.alias("thumbnail"),
        df.airbnbHotels.title.alias("title"),
        df.airbnbHotels.subtitles.alias("subtitles"),
        df.airbnbHotels.price.alias("price"),
        df.airbnbHotels.rating.alias("rating"),
        df.airbnbHotels.link.alias("link")
    )
After the processing is done, the data is ready to be loaded into MongoDB. MongoDB is a popular NoSQL database known for its flexibility and scalability.
    # Define MongoDB connection URI for Mongo Atlas, you can create free account
    MONGODB_URI = "mongodb+srv://<username>:<password>@cluster0.mongodb.net/?retryWrites=true&w=majority"
    # Use mongodb://root:example@mongo:27017 if localhost docker for mongo
    # Write DataFrame to MongoDB
    df.write.format("com.mongodb.spark.sql.DefaultSource") \
        .mode("append") \
        .option("uri", MONGODB_URI) \
        .option("database", "booking") \
        .option("collection", "airbnb") \
        .save()
The DataFrame is written into MongoDB using the MongoDB Spark Connector. This allows data to be written from Spark into MongoDB by specifying the MongoDB connection URI, the database, and the collection where the data should be stored.
Finally, the SparkSession is stopped to free up resources:
# Stop the SparkSession
spark.stop()
This step is vital as it not only cleans the data but also transforms and structures it in a way that makes it readily accessible for the subsequent stages of the pipeline.
By using the powerful processing capabilities of Apache Spark and the flexible storage of MongoDB, we can effectively handle, clean, and store large amounts of data. This forms a robust foundation for the next steps in our pipeline where the data will be used to generate tailored search results.

Step 3: Flask API and GPT-3 Integration
In step 3, a Flask API is built to serve as the interface between the GPT-3 model and the MongoDB database. This is a crucial component of the pipeline as it enables real-time interaction with the data stored in MongoDB through the power of GPT-3 natural language processing.
To begin with, necessary modules are imported and a Flask application is set up. The Python JSON Encoder is extended to handle ObjectId instances, which are specific to MongoDB. This is done via a custom JSONEncoder class. This ensures the JSON serialization process can handle the unique ObjectId values from MongoDB documents.
The Flask application also sets up logging to help with debugging and monitoring the application:
logger = logging.getLogger('my_logger')
logger.setLevel(logging.DEBUG)
A MongoDB client is established with the relevant MongoDB URI. The database and collection that will be interacted with are then specified.
The function process_query() communicates with the GPT-3 model, sending a system message and the user's search query. The function then extracts and returns the content from the GPT-3 response.
Next, the function translate_to_mongo_query() takes the output from process_query() and translates it into a MongoDB query. It does this by extracting the city, budget, and dates from the processed query and using these values to create a query dictionary.
The find_results() function takes a user's query, processes it through GPT-3, translates it into a MongoDB query, then executes the query on the MongoDB collection. It then returns the results as a string.
The generate_preamble() function generates a friendly introduction to the apartment options list using the GPT-3 model.
The format_results() function takes the result set and formats each document into a string that includes relevant apartment information.
Finally, the home() function in the Flask app receives the POST request containing the user's query. It uses the find_results() function to get the MongoDB results, which it then sends to the GPT-3 model. The GPT-3 model generates a response, which the function returns as a JSON object. If there are any errors during this process, the function catches the exception and returns the error message.
In summary, this Flask API serves as the glue that connects the user’s search request, GPT-3’s natural language processing, and the MongoDB database.
import os
import requests
import json
from pymongo import MongoClient
from flask import Flask, request, jsonify
import logging
from bson import ObjectId
from flask import json
import openai
import re
from flask_cors import CORS

app = Flask(__name__)
CORS(app)

class JSONEncoder(json.JSONEncoder):
    def default(self, o):
        if isinstance(o, ObjectId):
            return str(o)
        return json.JSONEncoder.default(self, o)

app.json_encoder = JSONEncoder

logger = logging.getLogger('my_logger')
logger.setLevel(logging.DEBUG)

# Get API key from environment variable
api_key = os.getenv("OPENAI_KEY")
print(api_key)  # Debug: print the api_key
if not api_key:
    raise ValueError("Missing OpenAI API key")

# Set the OpenAI API key
openai.api_key = api_key

# Connect to MongoDB
client = MongoClient('mongodb+srv://<username>:<password>@cluster0.td8y4zr.mongodb.net/?retryWrites=true&w=majority')
db = client['booking']
collection = db['airbnb']

def process_query(query):
    headers = {
        "Content-Type": "application/json",
        "Authorization": f"Bearer {openai.api_key}"
    }
    # Use GPT-3 to process the query
    response = openai.ChatCompletion.create(
        model="gpt-3.5-turbo",
        messages=[
            {"role": "system", "content": "You are a helpful assistant. You can retrieve information from a database and present it to the user. You can communicate information about an apartment such as its title, location, price, availability, and the link to its page. The user will provide you with their requirements in the following format: 'city: city_name, budget: budget_amount, dates: start_date to end_date'."},
            {"role": "user", "content": query}
        ],
        max_tokens=100
    )

    # Get the desired information from the response
    processed_query = response.choices[0].message['content'].strip()

    return processed_query

def translate_to_mongo_query(processed_query):
    # Initialize the MongoDB query dictionary
    query_dict = {}

    # Search for city in the processed query
    city_search = re.search(r'city: (.*?),', processed_query, re.IGNORECASE)
    if city_search:
        query_dict['city'] = city_search.group(1).strip()

    # Search for budget in the processed query
    budget_search = re.search(r'budget: \$?(\d+)', processed_query, re.IGNORECASE)
    if budget_search:
        # Convert the budget to the same currency as in your database
        budget_in_dollars = int(budget_search.group(1))
        query_dict['price.value'] = {'$lte': budget_in_dollars}

    # Search for the dates in the processed query
    date_search = re.search(r'dates: (.*?) - (.*?)\.', processed_query, re.IGNORECASE)
    if date_search:
        # Format the dates string to match your database format
        dates_string = f"{date_search.group(1)} – {date_search.group(2)}"
        query_dict['subtitles'] = {"$regex": dates_string}

    return query_dict

def find_results(query):
    logger.debug('Starting to find results')

    # Use GPT-3 to understand the query
    processed_query = process_query(query)
    print("Processed Query:", processed_query)
    logger.debug('Processed query with GPT-3')

    # Translate the processed query into MongoDB query
    mongo_query = translate_to_mongo_query(processed_query)
    logger.debug('Translated query to MongoDB query')
    print("MongoDB query:", mongo_query)

    # Run the query and get the results
    results = collection.find(mongo_query).limit(5)
    logger.debug('Got results from MongoDB')

    # Transform the results into a string, including less information for each result
    results_string = "\n".join([f"Apartment title: {result['title']}, price: {result['price']['value']}, link: {result['link']}" for result in results])

    return results_string

def generate_preamble():
    response = openai.ChatCompletion.create(
        model="gpt-3.5-turbo",
        messages=[
            {"role": "system", "content": "You are a helpful assistant."},
            {"role": "user", "content": "Provide a friendly introduction to a list of apartment options."}
        ],
        max_tokens=100
    )

    # Get the generated preamble from the response
    preamble = response.choices[0].message['content'].strip()

    return preamble

def format_results(results):
    formatted_results = []
    for result in results:
        formatted_result = f"Title: {result['title']}\nCity: {result['city']}\nPrice: {result['price']['value']} {result['price']['currency']} per {result['price']['period']}\nDates: {', '.join(result['subtitles'])}\nRating: {result['rating']}\nLink: {result['link']}"
        formatted_results.append(formatted_result)
    return formatted_results

@app.route('/', methods=['POST'])
def home():
    try:
        data = request.get_json(force=True)
        query = data['query']

        # Get the results string from find_results
        results_string = find_results(query)

        # Create a GPT-3 prompt with the results
        prompt = f"{query}\n{results_string}"

        # Check if the total token count is within the model's limit
        total_tokens = len(query.split()) + len(results_string.split())
        if total_tokens > 4097:
            raise ValueError(f"Total token count ({total_tokens}) exceeds the model's limit (4097)")

        # Use GPT-3 to generate a response
        response = openai.ChatCompletion.create(
            model="gpt-3.5-turbo",
            messages=[
                {"role": "system", "content": "You are a helpful assistant."},
                {"role": "user", "content": prompt}
            ],
        )
        gpt3_response = response.choices[0].message['content'].strip()

        return jsonify({"response": gpt3_response})
    except Exception as e:
        return str(e)

if __name__ == '__main__':
    app.run(debug=True)

Step 4: User Interface with React
In step 4, a React application is built as the user interface where users can enter their search criteria such as city, budget, and period of stay. This is done by creating a functional component SearchBar that maintains two states: query and results.
Here’s how the main components of this script work:
useState(): This React Hook is used to add React state to functional components. query is initialized as an empty string, and setQuery function is used to change its value. The same goes for results and setResults.
handleSubmit(): This is an asynchronous function that is triggered when the user submits the search form. It sends a POST request to the Flask backend (running on http://localhost:5000) with the search query as JSON in the request body. It then waits for the response from the backend, parses the JSON response, and sets the results state with the returned data.
-
return(): This function returns the JSX that renders the search bar and the results. It includes a form with an input field and a submit button. The input field's value is bound to the query state, and any change in the input field updates the query state. When the form is submitted, the handleSubmit function is called. The results are then displayed in a div element.
import React, { useState } from 'react';
import './Search.css';function SearchBar() {
const [query, setQuery] = useState("");
const [results, setResults] = useState("");const handleSubmit = async (event) => {
event.preventDefault();
const response = await fetch('http://localhost:5000', {
method: 'POST',
headers: {
'Content-Type': 'application/json'
},
body: JSON.stringify({ query })
});
const data = await response.json();
setResults(data.response);
};return (
className="search-input" type="text" value={query} onChange={event => setQuery(event.target.value)} /> Search {results} ); }
export default SearchBar;
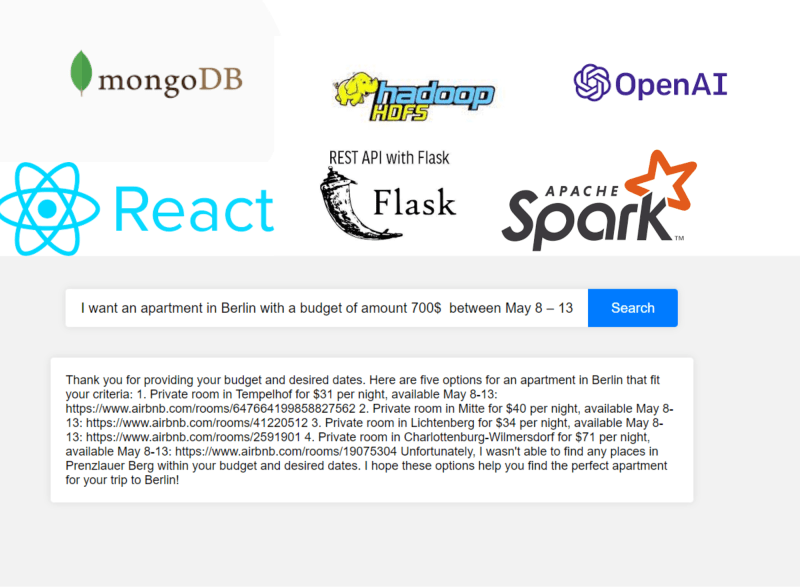
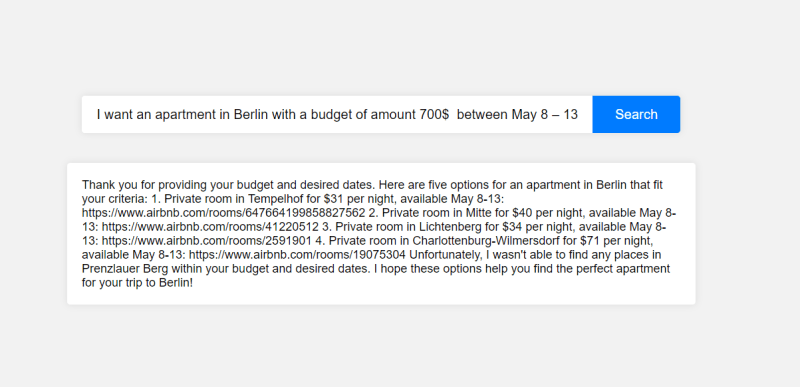
In the given example, the user enters “I want an apartment in Berlin with a budget of amount 700$ between May 8–13” in the search bar. The React application sends this query to the Flask backend, which processes the query using GPT-3, forms a MongoDB query, retrieves matching results from the MongoDB database, and sends the results back to the React application. The application then displays the results, which include a list of apartments that match the user’s criteria with a link to each apartment.
In this article, we have explored an innovative and efficient system that integrates GPT-3, Apache Spark, MongoDB, and React to create a user-friendly search application.
The first step involves data collection from a source like Airbnb, transforming and storing it in a distributed file system like HDFS. Apache Spark is used for this purpose, demonstrating its power in handling large scale data processing tasks.
Next, the data stored in HDFS is processed and loaded into MongoDB using PySpark, showcasing the flexibility and ease of combining big data technologies with NoSQL databases.
The third step introduces GPT-3, a state-of-the-art language model developed by OpenAI. With its remarkable natural language understanding capabilities, GPT-3 is used to interpret the user’s search query, which is then transformed into a MongoDB query to retrieve relevant results from the database.
Finally, a user-friendly interface is developed using React, a popular JavaScript library for building UIs. This interface allows users to input their search queries in a natural language format and get results in real-time, providing a seamless user experience.
In conclusion, this system demonstrates the potential of combining big data technologies, AI, and modern frontend development to create powerful and user-friendly applications. It illustrates the possibilities that open up when different technologies are integrated to work together, providing a practical and efficient solution for complex search problems. The methods and technologies discussed here can be extended or modified for various use cases, paving the way for future innovations in the intersection of AI, big data, and web development.
To run this project, follow these steps:

Step 1: Clone the Repository
First, clone the repository from GitHub using the following command:

git clone https://github.com/Stefen-Taime/IA_Data_Pipeline.git
Step 2: Navigate to Project Directory
Next, navigate to the project directory using this command:

cd IA_Data_Pipeline
Step 3: Use Makefile Commands
You'll need to run a series of commands using the Makefile provided in the project. The Makefile is a tool that simplifies building and managing the project.

Copy Files to HDFS: This will copy the necessary files to Hadoop Distributed File System (HDFS). Run the following command:

make copy_files_to_hdfs
Load Data to MongoDB: This will load the data from HDFS to MongoDB. Run the following command:

make run_load_to_mongo
Run API: This command will start the Flask API which uses GPT-3 to process the user's queries. Run the following command:

make run_api
Start Frontend: This will start the React application, which serves as the user interface for the project. Run the following command:

make start_front_end
Important Note: This project uses OpenAI's GPT-3, and you will need an OpenAI API key to run the application. Make sure to set the OpenAI API key in your environment variables before starting the API.

If you encounter any issues while setting up or running the project, you can refer to the project's documentation or open an issue in the GitHub repository. Remember, this project is an example of how to integrate various technologies, and you might need to adjust some settings based on your specific environment and setup.

Top comments (0)