If you don't know how to create Postman Monitors, kindly follow this post and continue here.
So, last time we created a monitor that checks at regular intervals if our website is up or not.
But, if you think about it, its usability is limited by the fact that we get to know about it only when we check the past results. I mean you do get emails when your test fails, but that's about it. It's limited and not a lot of customization room exists.
In this post, we aim to do just that, we want to get a Slack message when our website goes down.
There are 2 ways to this:
The easy way (Postman Integrations):
Well, as it turns out the team at Postman anticipated that I would someday write this post and they went back in time to create an easy way to do this(Trust me, I won't lie to you).
You can use something called Integrations to get Monitor Run Results to your Slack Channel.
If you can't find the 'Integrations' tab, then the url looks like this:
https://your-workspace-string.postman.co/integrations/browse
But there are some drawbacks to it:
- Integrations are available on Postman Team, Business, and Enterprise plans.
- You can't customize it, you'd get all results to your slack channel from now on. Suppose you want to send the Slack message conditionally (say you want to send these details only on alternate days, you'd have to create different monitors).
The hard(pronounced cooler) way:
Basically, we're going to create a new request in your Postman Collection which will send information to your slack channel. So, just like in the previous method you do have to create a SlackBot capable of sending messages to your slack channel.
Check out this article to create a Slack Bot that has permissions to send a slack message to your channels using a custom webhook.
Take a note of that webhook URL and save it in a new environment that we would be using for our monitors. Save the URL in a variable named slackWebhook as seen below.
1. Create a new request in your collection which will handle sending messages to slack

2. Add details in the URL and body fields.
- The request verb should be POST.
- The URL should contain your webhook URL. We use the environment variable which we created earlier.
TIP: If your current environment is selected properly, your variable names should autocomplete.

- Put the body type as
Rawand selectJSONfrom the dropdown. Put the content as{"text":"Any awesome text here"}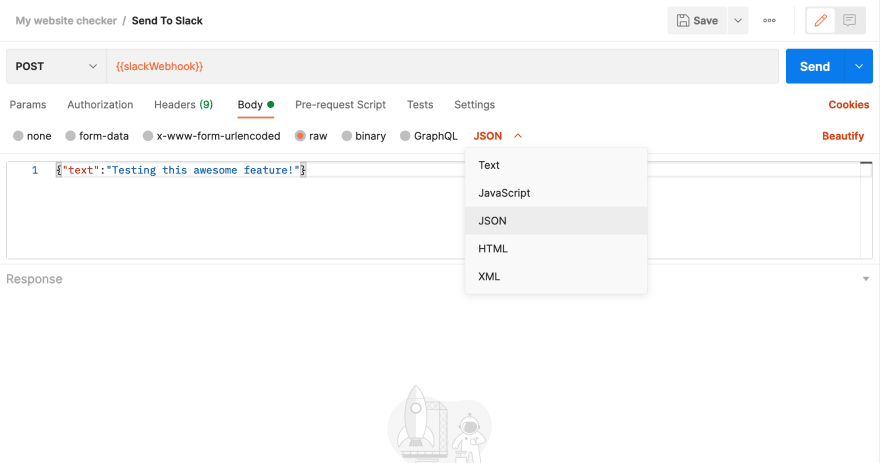
- Hit send
If you receive an OK response, then your webhook URL is setup perfectly. If you receive an error, congrats, you have broken the way Slack/Postman works and you may be eligible for a bounty reward!
JK! Check your environment variables, quotes and other details.
3. Make the Slack message contents dynamic.
In the body contents instead of hardcoding the message like we did in the previous step, use something like this:
{"text":"{{slackMsg}}"}
We're basically instructing Postman to receive this value from the environment variables.
You may be thinking, like my current manager:
Aha! You haven't added the variable in the environment but you're using it! You are stupid! (Yes he says that a lot! FML)
Well, we aim to generate this text dynamically, so... Awkward!
4. Set the Slack response based on the status code.
Go to the Tests tab of the request which we defined previously(the one that actually hits your URL to be inspected).
Modify the content of the tab to contain this:
// Get the status code os the response
let statusCode=pm.response.code;

// Set the contents of the slack message dynamically
pm.environment.set('slackMsg',getSlackMsg(statusCode));

// If the status code was 200, don't send the Slack message
if(statusCode===200){
    postman.setNextRequest(null);
}

// Definition of what message to send on slack
function getSlackMsg(code){
    return code===200 ? 'Everything is awesome!' : 'Uh Oh! There is something fishy with your website!';
}
Let me explain what's happening here:
- First we get the status code and store it in a temp var.
- Now, we call the func
getSlackMsgand get the message to send. You can modify this func to return swear words for your IT admin(Don't do that, that's rude)! - In the same instruction, we set this dynamic content into an environment variable which we talked about earlier(Smug Smile).
- In the end we use a trick to terminate the series of requests to be executed using
postman.setNextRequest(null);
postman.setNextRequest is very helpful in defining the flow of control between multiple requests. Read about it here.
5. Change the environment of your monitor.
Previously, our monitor was using No Environment, we need to change that, go to our defined monitor and edit it to use our newly created environment.

6. Done. Let's test the heck out of this.
Well, you don't have to wait for the Monitor Run to test this. Simply go to your collection and click Run, this would emulate how a monitor runs your request(except for IP/machine differences etc).
If your website is up, you should see only 1 request in the list of requests that ran(remember we only send slack message if something is wrong).
To emulate that, simply remove that conditional check from the Tests tab, save the request and re-run the Collection, you should see 2 requests which ran and should also receive a message in the defined slack channel.
Conclusion
We got an introduction on how to make decisions in the Tests tab of the Postman Request. We added dynamic data in our environment which we computed using the response from one of the executed requests. Then we use that dynamic content to send the information to our slack channel which we created for our Slack workspace.
This was a good introduction to get used to creating custom workflows. We will get into details in this in another post.

Top comments (0)