Introduction:
Jenkins, a widely-used automation server, facilitates the automation of building, testing, and deploying applications. In this blog post, we'll explore an innovative approach using Jenkins EC2 Plugin to provision and terminate spot instances dynamically, optimizing costs and addressing the challenges associated with idle slave instances.
Perquisites:
Step 1: Setting up Jenkins Master
Ensure you have a server with Jenkins installed, which will act as the master. If not, follow the official Jenkins installation guide.
Jenkins installation
Step 2: Creating a Custom AMI
To expedite the EC2 instance provisioning process, create a customized AMI with the required tools and dependencies pre-installed. This ensures a faster setup and avoids delays in the build process. Note: (Java is must in the ami)
Advantages:
Cost Savings:
Leveraging spot instances allows for significant cost savings compared to on-demand instances, making it a cost-effective solution for intermittent build processes.
Storage Efficiency:
Dynamic provisioning eliminates the need for maintaining idle instances, reducing storage costs and optimizing resource utilization.
Fresh EC2 Instances:
With every build, a fresh EC2 instance is provisioned, ensuring a clean and consistent environment for testing and deployment.
AWS Marketplace AMIs:
Access AWS Marketplace to explore and utilize pre-configured AMIs, minimizing the effort required to manage and update instances manually.
Disadvantages:
Provisioning Time:
The process of spinning up EC2 instances may introduce a delay of a few minutes, impacting the overall build time.
AMI Preparation:
Creating a custom AMI with the necessary tools requires upfront effort, and any changes to the environment necessitate updating the AMI.
Steps to setup and configure EC2 Spot instances
Step 1: Installing EC2 Plugin
Install the Jenkins EC2 Plugin on the master. This plugin enables dynamic provisioning of EC2 instances as build slaves. Navigate to Jenkins Dashboard -> Manage Jenkins -> Manage Plugins -> Available tab, search for "EC2" and install the plugin.

**
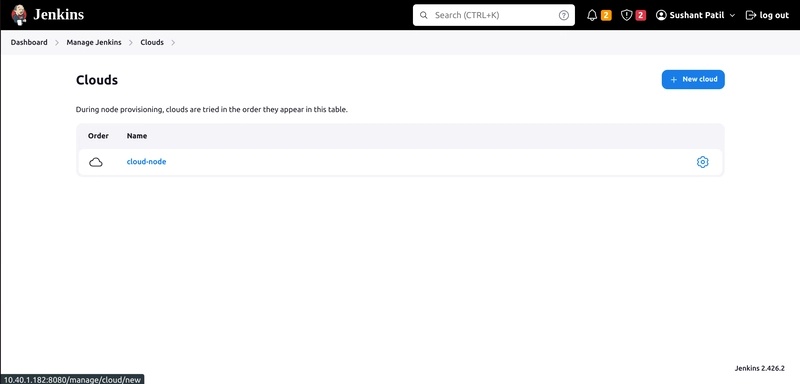
Step 2: Configuring EC2 Plugin
Navigate to the "Manage Jenkins" section and select the "Cloud" option to configure slave settings.


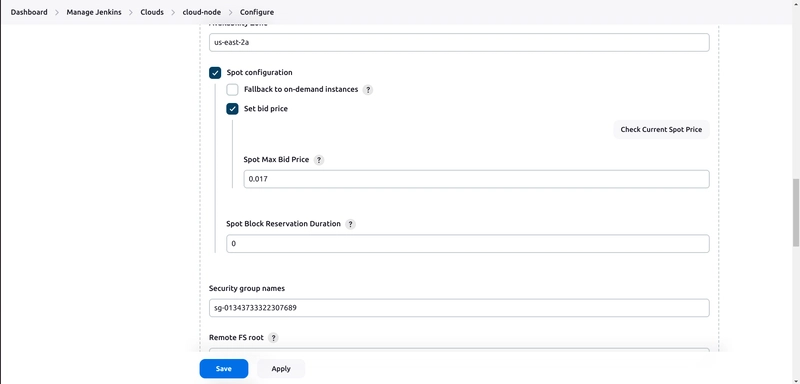
Step 3: Setting Bid price
To prevent immediate spot termination and avoid pending status due to a low bid price, include an additional value when setting the bid price. This will help ensure the stability of your spot slave instances.
Step 4: Setting ami id and instance type
In this step, include the AMI ID of your customized AMI, or alternatively, utilize AWS Marketplace for this purpose.

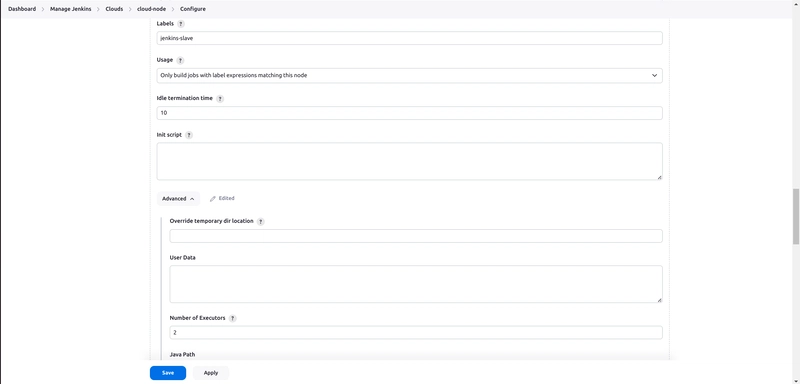
Step 4: Setting label and termination time
The crucial step is to set an idle termination time, which ensures the termination of spot instances if they remain idle for more than 10 minutes. Additionally, labeling is important to schedule workload on specific slaves; otherwise, it may run on the master.
Step 5: sample Jenkins pipeline
pipeline {
    agent {
        label 'jenkins-slave'
    }
    stages {
        stage("print") {
            steps {
                echo "hello"
            }
        }
    }
}

Top comments (0)