
In this tutorial I'm going to explain how to create a feedback form in a Flutter app using Firebase as a backend. The objective is to be able to provide the user with a mechanism so that they can send us suggestions, observations or any other type of comment to us, the developer.
The final app will work on android, iOS and web. This is going to be a very simple tutorial focused on basic fundamentals, the UI that I am going to make is extremely simple, since the objective of this tutorial is not to focus on visual interface layout concepts, instead I will focus on the following points :
- Firebase integration in a Flutter app
- Obtaining data entered by the user through Cloud Firestore
For those of you who don't know what Firebase is: Firebase is a Backend-as-a-Service provider. It gives a variety of tools and cloud services to develop and grow apps. In this specific tutorial, we are going to use Cloud Firestore to store the feedback data that the users are going to submit.
The only requirement that you should meet before starting this tutorial is to have Flutter installed, and to have a minimal idea of how it works. You don't need to know anything about Firebase. For those who learn better by looking at code, here you can find all the source code for this tutorial.
Creating the base app
Let's start by creating a Flutter app. You can do this through your preferred IDE, either Android Studio or VS Code. I like to create it from the terminal:
flutter create --platforms android,ios,web flutter_firebase_feedback_form
The next step is to modify main.dart to add the layout we are going to use. We are going to leave an empty section that we will have to complete later with the Firebase sending code.
// lib/main.dart

import 'package:flutter/material.dart';

void main() {
  runApp(const App());
}

class App extends StatelessWidget {
  const App({Key? key}) : super(key: key);

  @override
  Widget build(BuildContext context) {
    return const MaterialApp(
      home: MainScreen(),
    );
  }
}

class MainScreen extends StatelessWidget {
  const MainScreen({Key? key}) : super(key: key);

  @override
  Widget build(BuildContext context) {
    return Scaffold(
      appBar: AppBar(
        title: const Text('Feedback form'),
      ),
      body: Center(
        child: ElevatedButton(
          child: const Text('Open form'),
          onPressed: () {
            showDialog(
                context: context, builder:
                  (context) => const FeedbackDialog());
          },
        ),
      ),
    );
  }
}

class FeedbackDialog extends StatefulWidget {
  const FeedbackDialog({Key? key}) : super(key: key);

  @override
  State<FeedbackDialog> createState() => _FeedbackDialogState();
}

class _FeedbackDialogState extends State<FeedbackDialog> {
  final TextEditingController _controller = TextEditingController();
  final GlobalKey<FormState> _formKey = GlobalKey();

  @override
  void dispose() {
    _controller.dispose();
    super.dispose();
  }

  @override
  Widget build(BuildContext context) {
    return AlertDialog(
      content: Form(
        key: _formKey,
        child: TextFormField(
          controller: _controller,
          keyboardType: TextInputType.multiline,
          decoration: const InputDecoration(
            hintText: 'Enter your feedback here',
            filled: true,
          ),
          maxLines: 5,
          maxLength: 4096,
          textInputAction: TextInputAction.done,
          validator: (String? text) {
            if (text == null || text.isEmpty) {
              return 'Please enter a value';
            }
            return null;
          },
        ),
      ),
      actions: [
        TextButton(
          child: const Text('Cancel'),
          onPressed: () => Navigator.pop(context),
        ),
        TextButton(
          child: const Text('Send'),
          onPressed: () async {
            /**
             * Here we will add the necessary code to
             * send the entered data to the Firebase Cloud Firestore.
             */
          },
        )
      ],
    );
  }
}
Firebase setup
Before we can add the code to send the data to Cloud Firestore, we need to do the Firebase setup. To do this, we will first register on the official site.
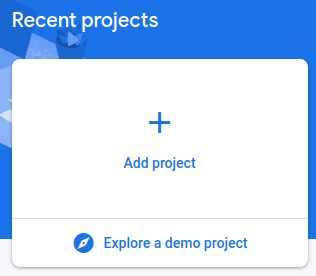
The next step will be to go to the console and create a new project:
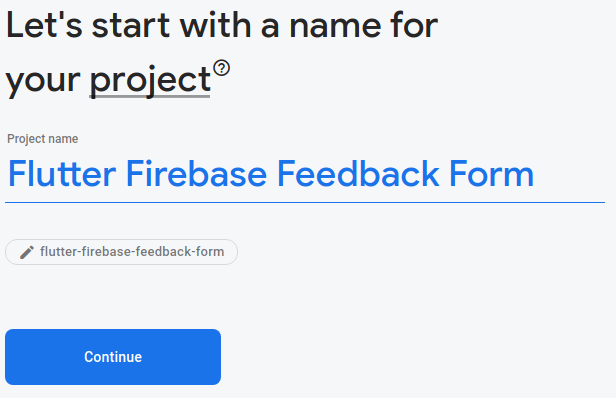
Write a name for the project (use the name you want), and click Continue :
In the next step it will ask us if we want to enable Google Analytics. It's not relevant to this tutorial, so you can safely disable it. We click on Create Project and we will have the project created. The next step is to configure Cloud Firestore.
Cloud Firestore setup
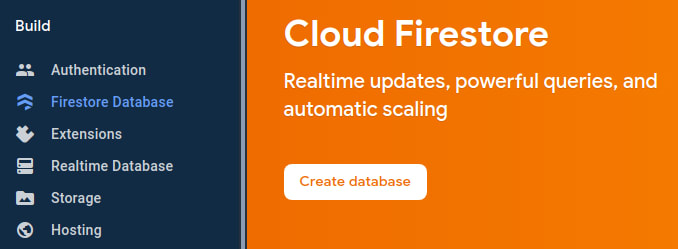
Cloud Firestore is a database integrated in Firebase where we will store the feedback sent by the user. To do this, we must first enable it by going to Firestore Database in the left menu and clicking on Create database.
When clicking, it will ask us if we want to start the database in production mode or test mode. Before explaining the difference between both modes, I will tell you that security is very important in any database. Since the operations carried out against the database have a cost and also modify our data schema, what we want is that only certain operations carried out by certain users are allowed. So, the difference between both options is that the production mode absolutely restricts any operation against the database until we proactively add specific rules. The test mode is designed to play with the database outside of a real environment.
For this tutorial we are going to select production mode:

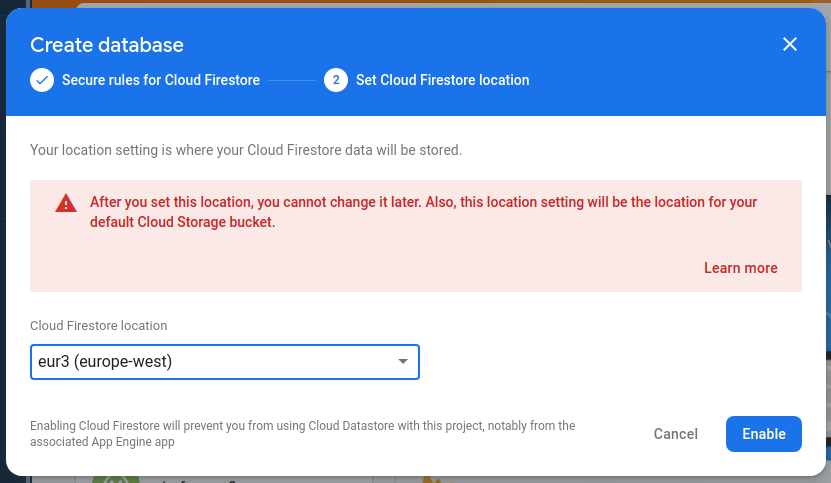
Click on next and select a region (it can be anyone you want). We click on Enable to continue:
Now we have provisioned a database to work with; however, since we have initialized it in production mode, it will not accept any operation of any kind; that is, we will not be able to write on it, or read, or anything. To solve this problem, we are going to add a set of specific rules. Click on Rules in the second tab from the top.
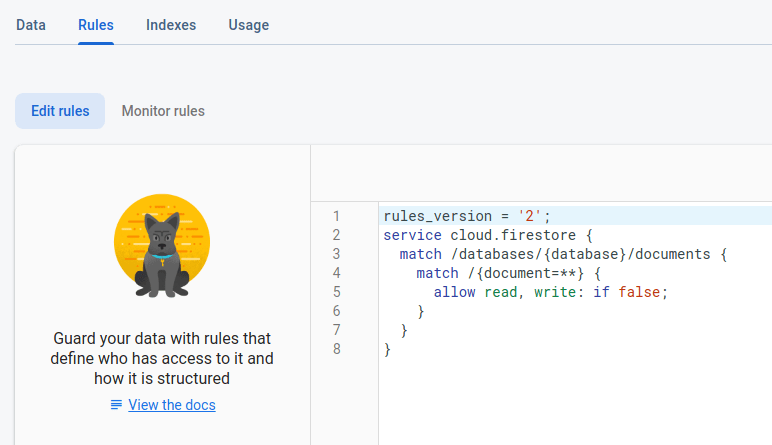
We find the default rules, let's understand what each part means:
rules_version = '2';
This set of rules is from version 2. Don't worry too much about this first line.
service cloud.firestore {
It tells us that we are going to specify data for the Cloud Firestore service.
match /databases/{database}/documents {
What goes inside will refer to the documents in the database.
match /{document=**} {
  allow read, write: if false;
}
Here we are indicating that both read and write operations are going to be prohibited on any file. Specifying if false at the end means disabling the previous read, write operations.
The result of the current state of the rules is that the database is completely locked. To unlock it we will modify the document as follows:
rules_version = '2';
service cloud.firestore {
  match /databases/{database}/documents {

    match /feedback/{documentId} {
      allow create: if true;
      allow read, write, update, delete: if false;
    }

    match /{document=**} {
      allow read, write: if false;
    }
  }
}
With this statement, we are adding a rule to the feedback collection. A collection is a group of documents. Each feedback sent by the user will be a document within this collection.
By specifying allow create: if true; we are indicating that anyone can create these documents. By specifying allow read, write, update, delete: if false; we are indicating that all other operations are prohibited. This means that users will only be able to create new feedback documents, they will not be able to read existing ones, modify them or delete them. We are administrators of the project, so we will be able to execute these actions through the web console.
Click Publish to apply these changes. Now we have the database ready and prepared to be able to write the feedback entered by the user from the app.
Flutter Fire integration
Flutter Fire is the name given to the plugins that integrate Firebase within a Flutter app. There are basically two ways to integrate Firebase into a Flutter app: integration via configuration files, which is done in the native parts of the app, or a newer automated and faster mechanism that was created recently. In this tutorial we are going to use the latter, to do so you have at your disposal an exhaustive explanation in the official documentation, where basically they ask you to install Firebase CLI on your system, and then enable FlutterFire CLI.
ℹ In order not to repeat what is already written in their documentation, I suggest you pause this tutorial for a moment and go to their documentation and perform the steps required to install these components.
Once that's done and we've run flutterfire configure as the documentation tells us, we'll alter the main function to initialize Firebase within the app:
// Add missing imports
import 'package:firebase_core/firebase_core.dart';
import 'firebase_options.dart';

// Modify the previous main() function
Future<void> main() async {
  WidgetsFlutterBinding.ensureInitialized();
  await Firebase.initializeApp(
    options: DefaultFirebaseOptions.currentPlatform,
  );

  runApp(const App());
}
Submit the feedback
Now all that remains is to send the feedback entered by the user to our backend in the cloud. To do this we will add the following code to the block that we had previously left empty.
Where before we had:
TextButton(
  child: const Text('Send'),
  onPressed: () async {
    /**
     * Here we will add the necessary code to
     * send the entered data to the Firebase Cloud Firestore.
     */
  },
)
Now we will have:
TextButton(
  child: const Text('Send'),
  onPressed: () async {
    // Only if the input form is valid (the user has entered text)
    if (_formKey.currentState!.validate()) {
      // We will use this var to show the result
      // of this operation to the user
      String message;

      try {
        // Get a reference to the `feedback` collection
        final collection =
            FirebaseFirestore.instance.collection('feedback');

        // Write the server's timestamp and the user's feedback
        await collection.doc().set({
          'timestamp': FieldValue.serverTimestamp(),
          'feedback': _controller.text,
        });

        message = 'Feedback sent successfully';
      } catch (e) {
        message = 'Error when sending feedback';
      }

      // Show a snackbar with the result
      ScaffoldMessenger.of(context)
          .showSnackBar(SnackBar(content: Text(message)));
      Navigator.pop(context);
    }
  },
)
As you can see, whether we manage to send the feedback or if the process fails, we will communicate it to the user so that they know the result of the process.
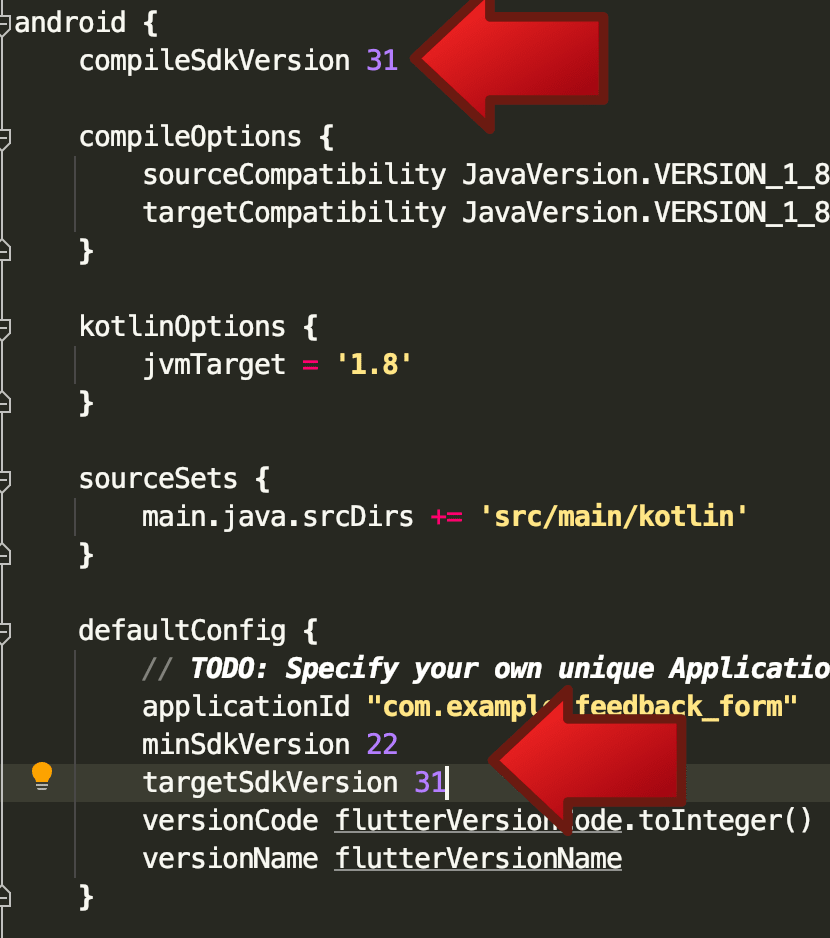
Adjust iOS and Android versions
There's a good chance you won't be able to compile at this point because firebase libraries usually require a higher iOS/Android version than what Flutter creates when you run flutter create.
To upgrade the iOS version: Open XCode, select Runner in the left panel, choose the target Runner, and in the General tab, under Deployment Info, upgrade the iOS version to 12.4 or higher.

To upgrade the Android version: open the android/app/build.gradle file, and set the following values:
compileSdkVersion 31
minSdkVersion 22
targetSdkVersion 31
Execute the app
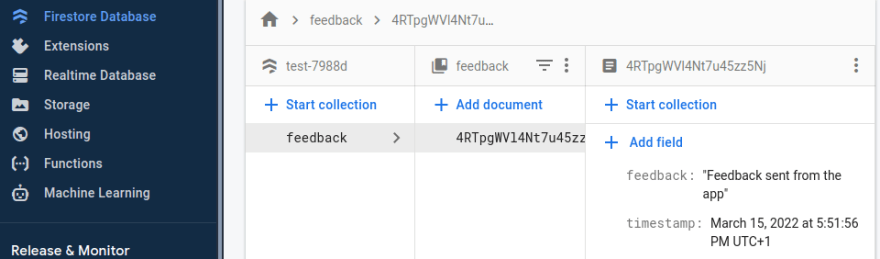
If we have done everything correctly, the application has been executed and we have been able to send data correctly, we will only need to go to the Firebase console to see the data sent. To do this go to the Firebase console, and click on Firestore Database in the left menu:
Conclusion
This is the end of this basic tutorial on Flutter and Firebase's Cloud Firestore. If you have questions or suggestions do not hesitate to write me in the comments. I hope it has been useful to you.
Thank you very much and happy coding!

Latest comments (0)