
NOTE: Please Backup your important data on a USB or an External Hard Drive and in case of your Desktop, I highly recommend you disconnect any secondary or other hard drives, that might include important data.
First of all we need a 8GB USB Pen Drive. The Pen drive will be used as a virtual DVD ROM, where we will burn the image of the operating system in this case Windows 10. Now we will be using windows 10 officially available from the Microsoft Website.
Now go to the following URL
https://www.microsoft.com/en-us/software-download/windows10
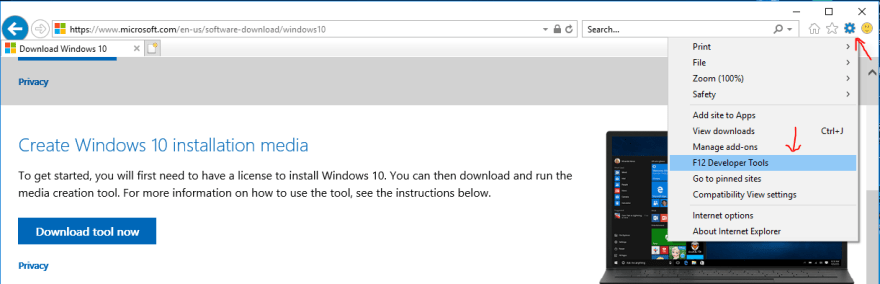
If you open this in Chrome or Firefox, we will be unable to get the ISO link which microsoft does not share. To be able to get the link, that get active for 24 hours for each user, we need to open this in _Internet Explorer. _So open the link in internet explorer.

Once your in internet explorer, click on the cog on the upper right corner of the screen, which brings in the settings menu and from the settings menu select F12 Developer Tools.
Once your select the F12 Developer Tools, a window will cascade on the bottom, with the default DOM Explorer opened. On the window, the last tab will be emulation. Click on Emulation.

Once in the Emulation Tab, you will find a dropdown by the name of User agent string, click on the drop down.
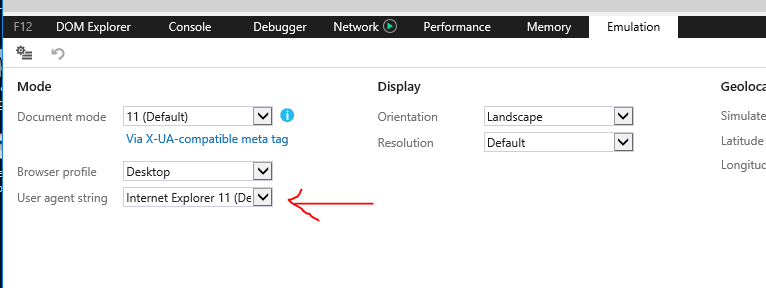
From the Dropdown, scroll down to find Apple Safar (IPAD). Once you select it, the page will refresh.

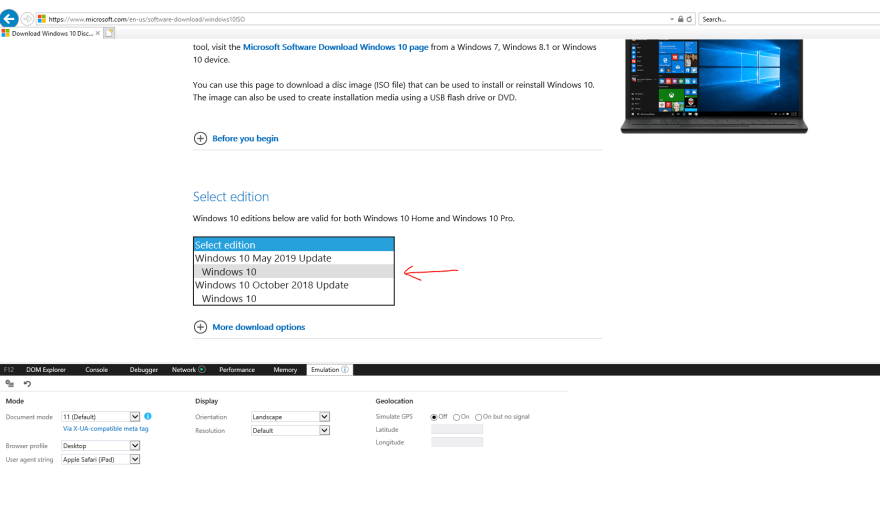
As the page refreshes, now the browser is making the microsoft website believe that you are using an Apple IPAD and browsing on the Safari Browser. This will make the microsoft website ask you to select edition. Once you click the Drop Down, as of current you will find Windows 10 May 2019 Update and below it Windows 10, select that by clicking it. Next it will ask you for the Language, I selected English, you can select as per your preference.
Once selected it will start loading again, and you will be presented with a dialog with 2 buttons. Select 64 bit Download. Now you will be downloading an ISO file.

Filename: Win10_1903_V1_English_x64.iso
Great, give yourself a Thumbs Up, you have just spoofed Microsoft and download an ISO image of windows without any copyright issues.
Now we need another piece of interesting software known as rufus, which can be downloaded from the following link, I am glad its a direct link.
https://github.com/pbatard/rufus/releases/download/v3.6/rufus-3.6.exe
Now you should specifically have 2 files that are required.
- Win10_1903_V1_English_x64.iso
- Rofus-3.6.exe

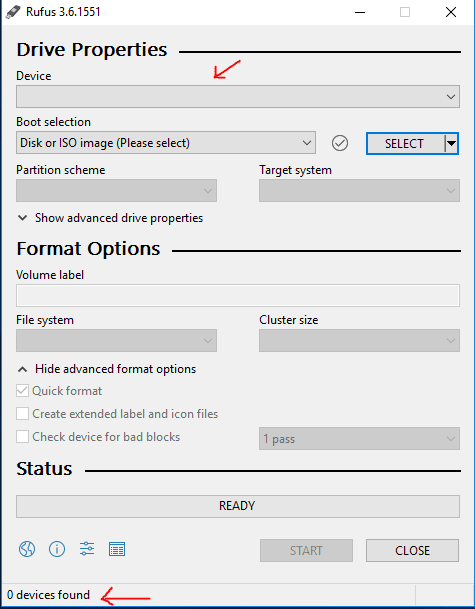
Double Click Rofus-3.6.exe so we can run the program. Once the program appears, you should have the screen as similar below. As of this instant, no USB is connected as show in the Device top on the top and it will show 0 Devices in the Bottom.
Now is the time to plug in your USB. REMEMBER ALL DATA WILL BE ERASED FROM THE USB, SO DON'T KEEP ANY IMPORTANT FILES ON IT. Once you plug in the USB, it should auto detect and show in the Device TAB. I have plugged in a 16GB USB. Now click on Select.

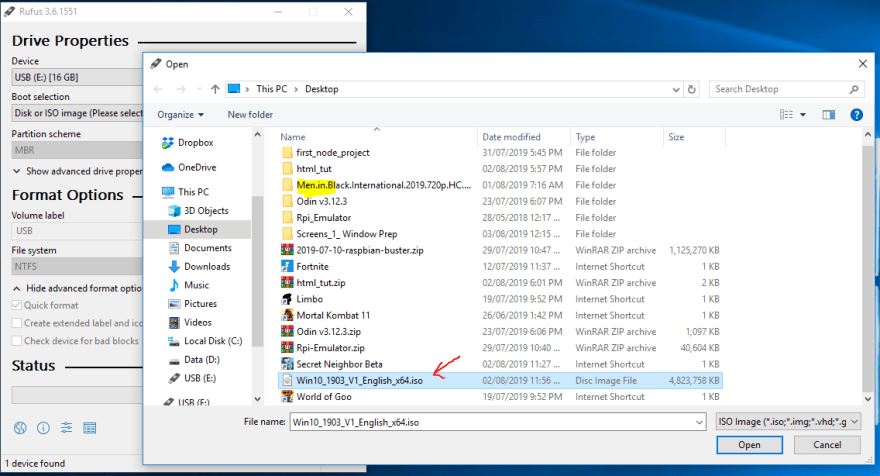
From the Explorer, browse to the Win10_1903_V1_English_x64.iso file and click Open.
Now this screen would identify the default configuration.
IMPORTANT THING
Operating systems have shifted to something called a UEFI boot, which is like when you buy a new laptop nowadays, it just feels as if there was no starting screen and the computer booted direct into windows. This is called UEFI and the old one is called LEGACY.
Now UEFI is much faster than the old one and it has a better communication with the drivers to the hardware. The same 3D card on the same driver does give a slighter higher gain in FPS, when you compare it with LEGACY or UEFI.
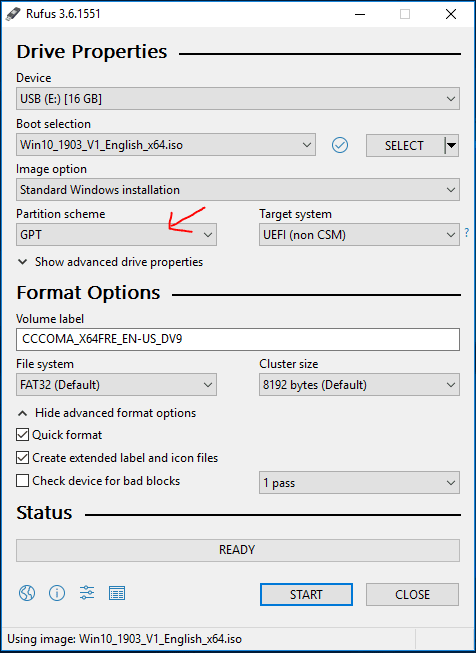
Now where do we set this option? In the BIOS.
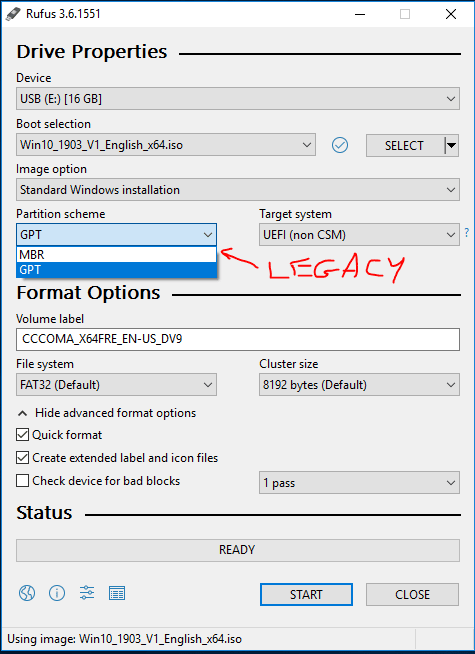
Now if you dont have UEFI option in your BIOS, just click on it and Select MBR.as shown in the screen.
Once this is settled, click on start and wait for it to finish.
You have a WINDOWS Installation USB ready to go, Lets get ready to Rumble!!!!
For any questions and queries, please use the comments sections.

Oldest comments (0)