Authors: Alex O’Regan, Aadhil Abdul Majeed
Ever had a load balancer become the bottleneck in an on-prem Kubernetes cluster? You are not alone. Traditional hardware load balancers add cost, create coordination overhead, and can make scaling painful. A Kubernetes-native approach can overcome many of those challenges by pushing load balancing into the cluster data plane. Calico Load Balancer is an eBPF powered Kubernetes-native load balancer that uses consistent hashing (Maglev) and Direct Server Return (DSR) to keep sessions stable while allowing you to scale on-demand.
Below is a developer-focused walkthrough: what problem Calico Load Balancer solves, how Maglev consistent hashing works, the life of a packet with DSR, and a clear configuration workflow you can follow to roll it out.
Why a Kubernetes-native load balancer matters
On-prem clusters often rely on dedicated hardware or proprietary appliances to expose services. That comes with a few persistent problems:
- Cost and scaling friction – You have to scale the network load balancer vertically as the size and throughput requirements of your Kubernetes cluster/s grows.
- Operational overhead – Virtual IPs (VIPs) are often owned by another team, so simple service changes require coordination.
- Stateful failure modes – Kube-proxy load balancing is stateful per node, so losing an ingress node can break active sessions.
- Configuration drift – Kubernetes is declarative, but the upstream load balancer is not, which causes divergence over time.
Calico Load Balancer flips that model. Instead of dedicated hardware, it uses the Calico eBPF data plane on ordinary Linux nodes in the cluster, advertises service IPs via BGP, and makes the load balancing decision consistent across nodes. The result is a system that is cheaper to scale, easier to operate, and more resilient to node or path changes.
How Calico Load Balancer works (and why Maglev matters)
The core idea is consistent hashing. Instead of each node picking a backend at random and storing that decision in per-node state, Calico Load Balancer computes the same backend choice on any node for the same flow. This is implemented with Maglev, a consistent hashing algorithm that:
- Evenly distributes connections across backends.
- Minimizes disruption when load balancer nodes come and go.
- Allows any load balancer node to make the same backend selection, even mid-connection.
Kube-proxy uses random selection plus per-node state, which is fine for many cases but can fail under node churn or route changes. Maglev avoids that by making the decision deterministic. Nodes may still cache the mapping for performance, but the flow-to-backend decision can be reproduced anywhere, which is what keeps sessions stable when traffic lands on a different node.
Strategic Assessment: Is This Right for Your Deployment?
Questions you can ask your team to identify if Calico Load Balancer can help your environment:
- Which services are most impacted by node churn today?
- Where do we see the most operational overhead in Virtual IP (VIP) provisioning?
- How do we secure access to service VIPs?
- Does the network have Equal Cost Multi-Path (ECMP) access to service VIPs?
- How do we handle VIP failover?
- Are there services with high-throughput requirements?
The Life of a Packet
A key design goal is to keep client sessions stable while enabling horizontal scale. Here is a simplified flow for a typical ECMP + BGP setup:
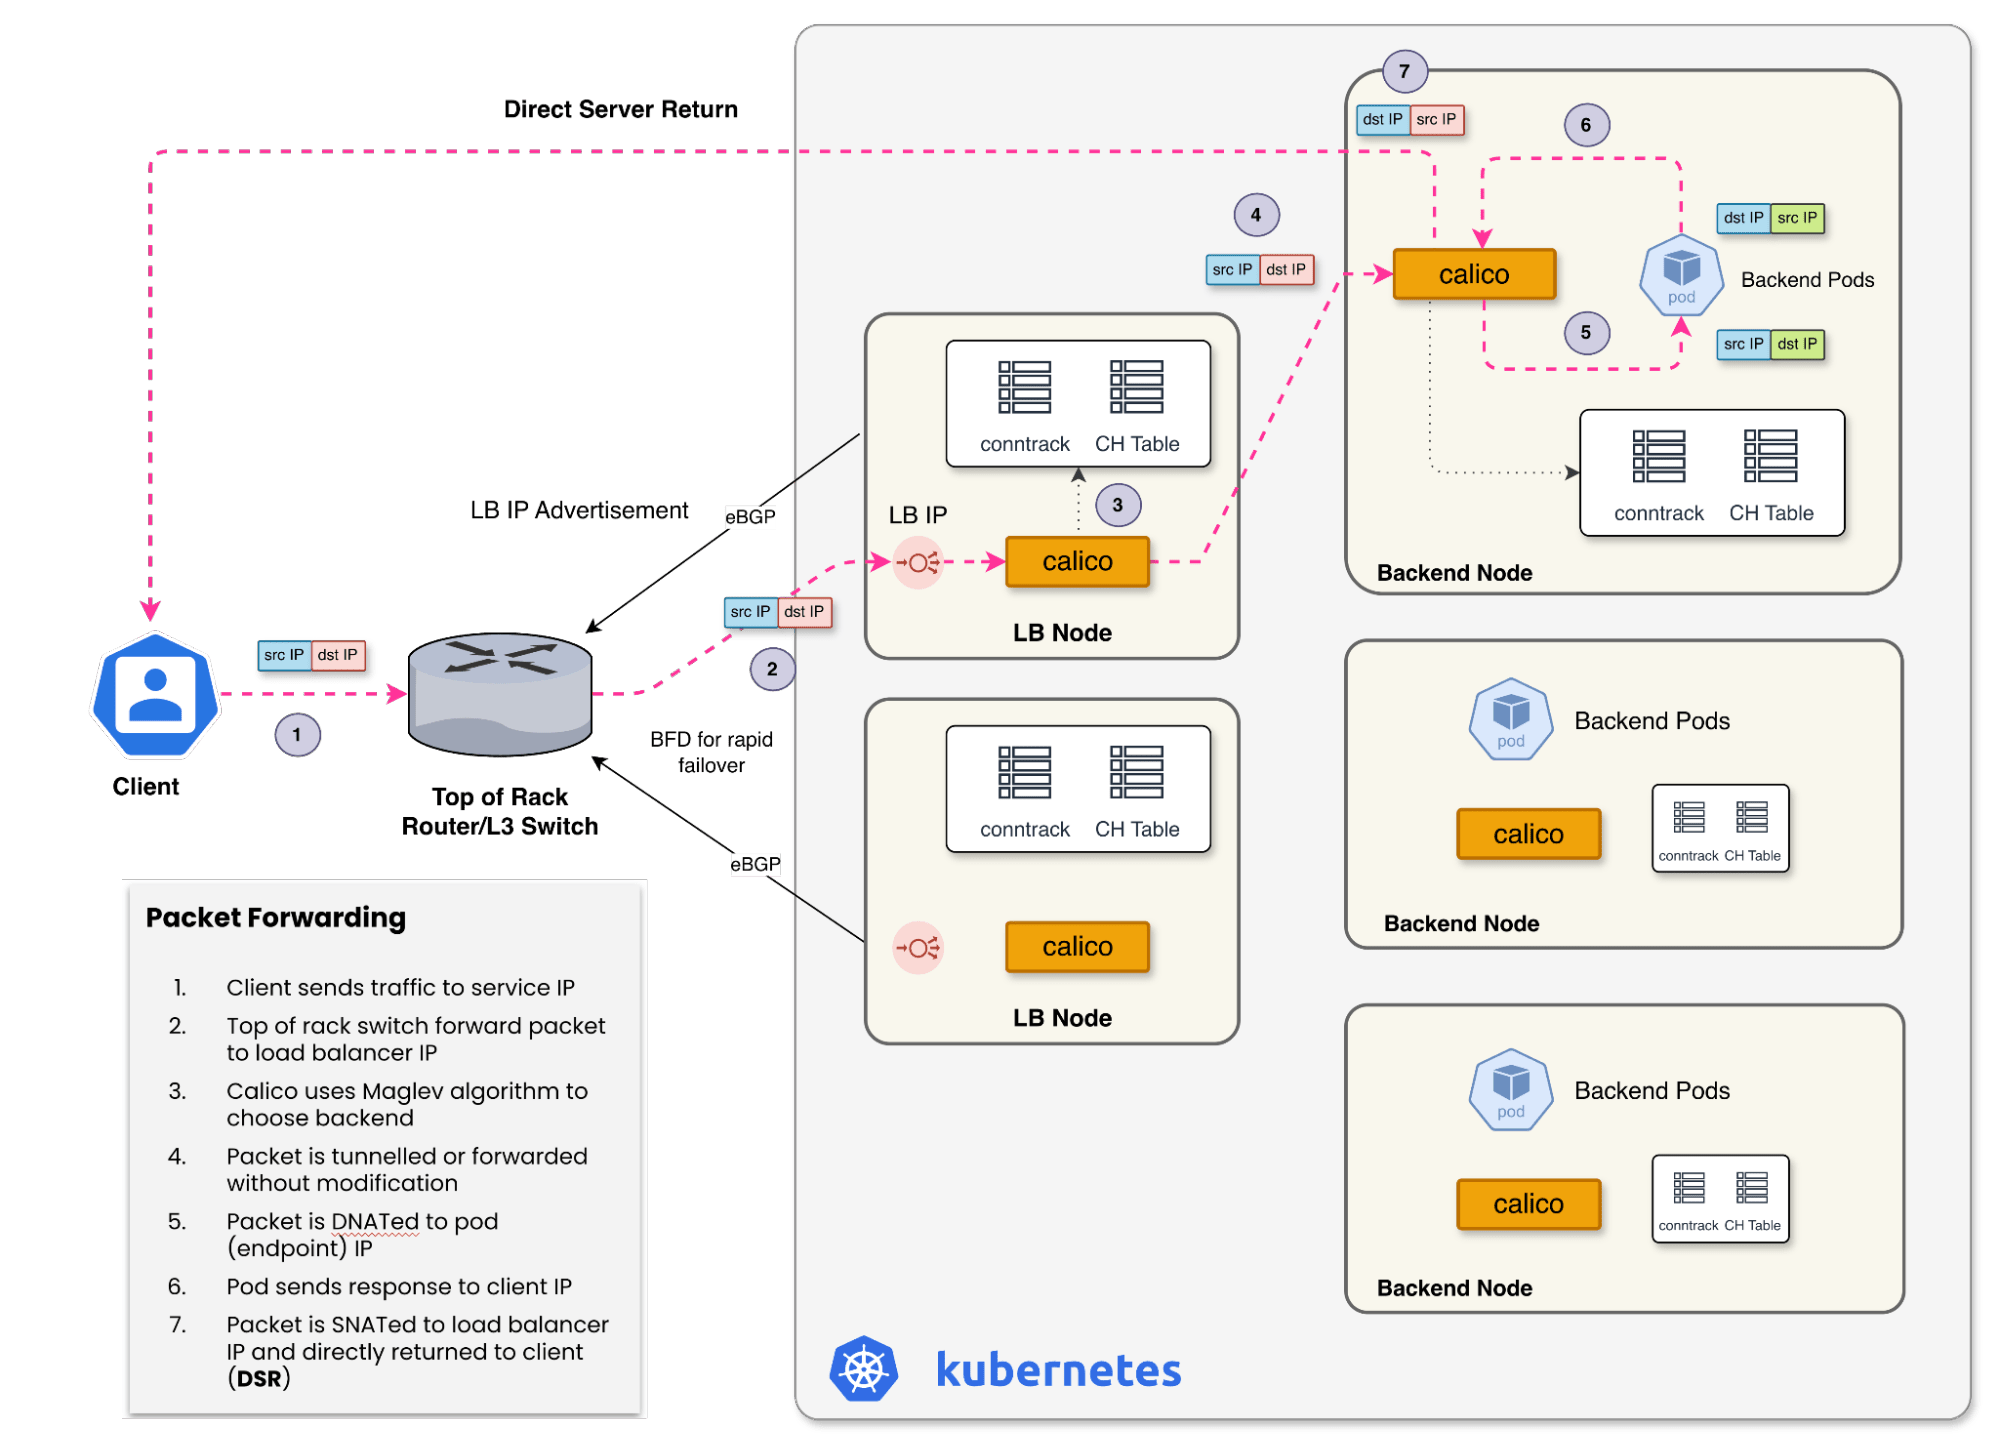
This diagram shows how Direct Server Return (DSR) allows the return path to bypass the load balancer node, reducing latency and hop count.
A few important details:
- The top-of-rack router uses ECMP to pick a load balancer node to receive the packet.
- That node runs the Maglev algorithm to choose the backend pod. It DNATs the packet and tunnels it to the node that hosts the pod.
- The pod replies, and the node SNATs the packet back to the service VIP before it leaves.
- With DSR (Direct Server Return), the return path bypasses the load balancer node and goes straight back to the client. The client always sees responses from the advertised service VIP.
That DSR path is important. It keeps the data path efficient and reduces load balancer hop count on the return path. It also prevents the client from seeing internal pod IPs.
DSR compared to a traditional return path
If you have only worked with classic NAT-based load balancers, DSR can feel unusual. The key difference is that the response does not have to traverse the same load balancer node that handled the inbound packet. That has two practical benefits: less work for the load balancer nodes and lower return-path latency.
Maglev and caching: deterministic and fast
There are two pieces working together in Calico Load Balancer:
- The Maglev lookup table: Provides the deterministic backend choice. Any node can compute the same result for the same flow, which is why mid-connection packets can land on a different node without breaking the session.
- A per-flow cache: (for example, via conntrack) can retain that decision for efficiency, and to preserve existing connections when the backend lookup table changes. It is not the source of truth for correctness.
This is a subtle but important difference from kube-proxy. In kube-proxy, the per-node conntrack decision is the only thing tying a flow to a backend. In Calico Load Balancer which uses Calico’s eBPF dataplane, the decision can be reproduced on any node, which is what makes failover or ECMP rehash events non-disruptive.
What happens during failures or path changes
Consistent hashing is not just about distribution. It is about resilience. In practice, you can test this by intentionally re-routing traffic for an existing TCP connection to a different node. Even if the new node has no prior per-flow state, it can recompute the same backend decision using Maglev, so the connection can continue without disruption.
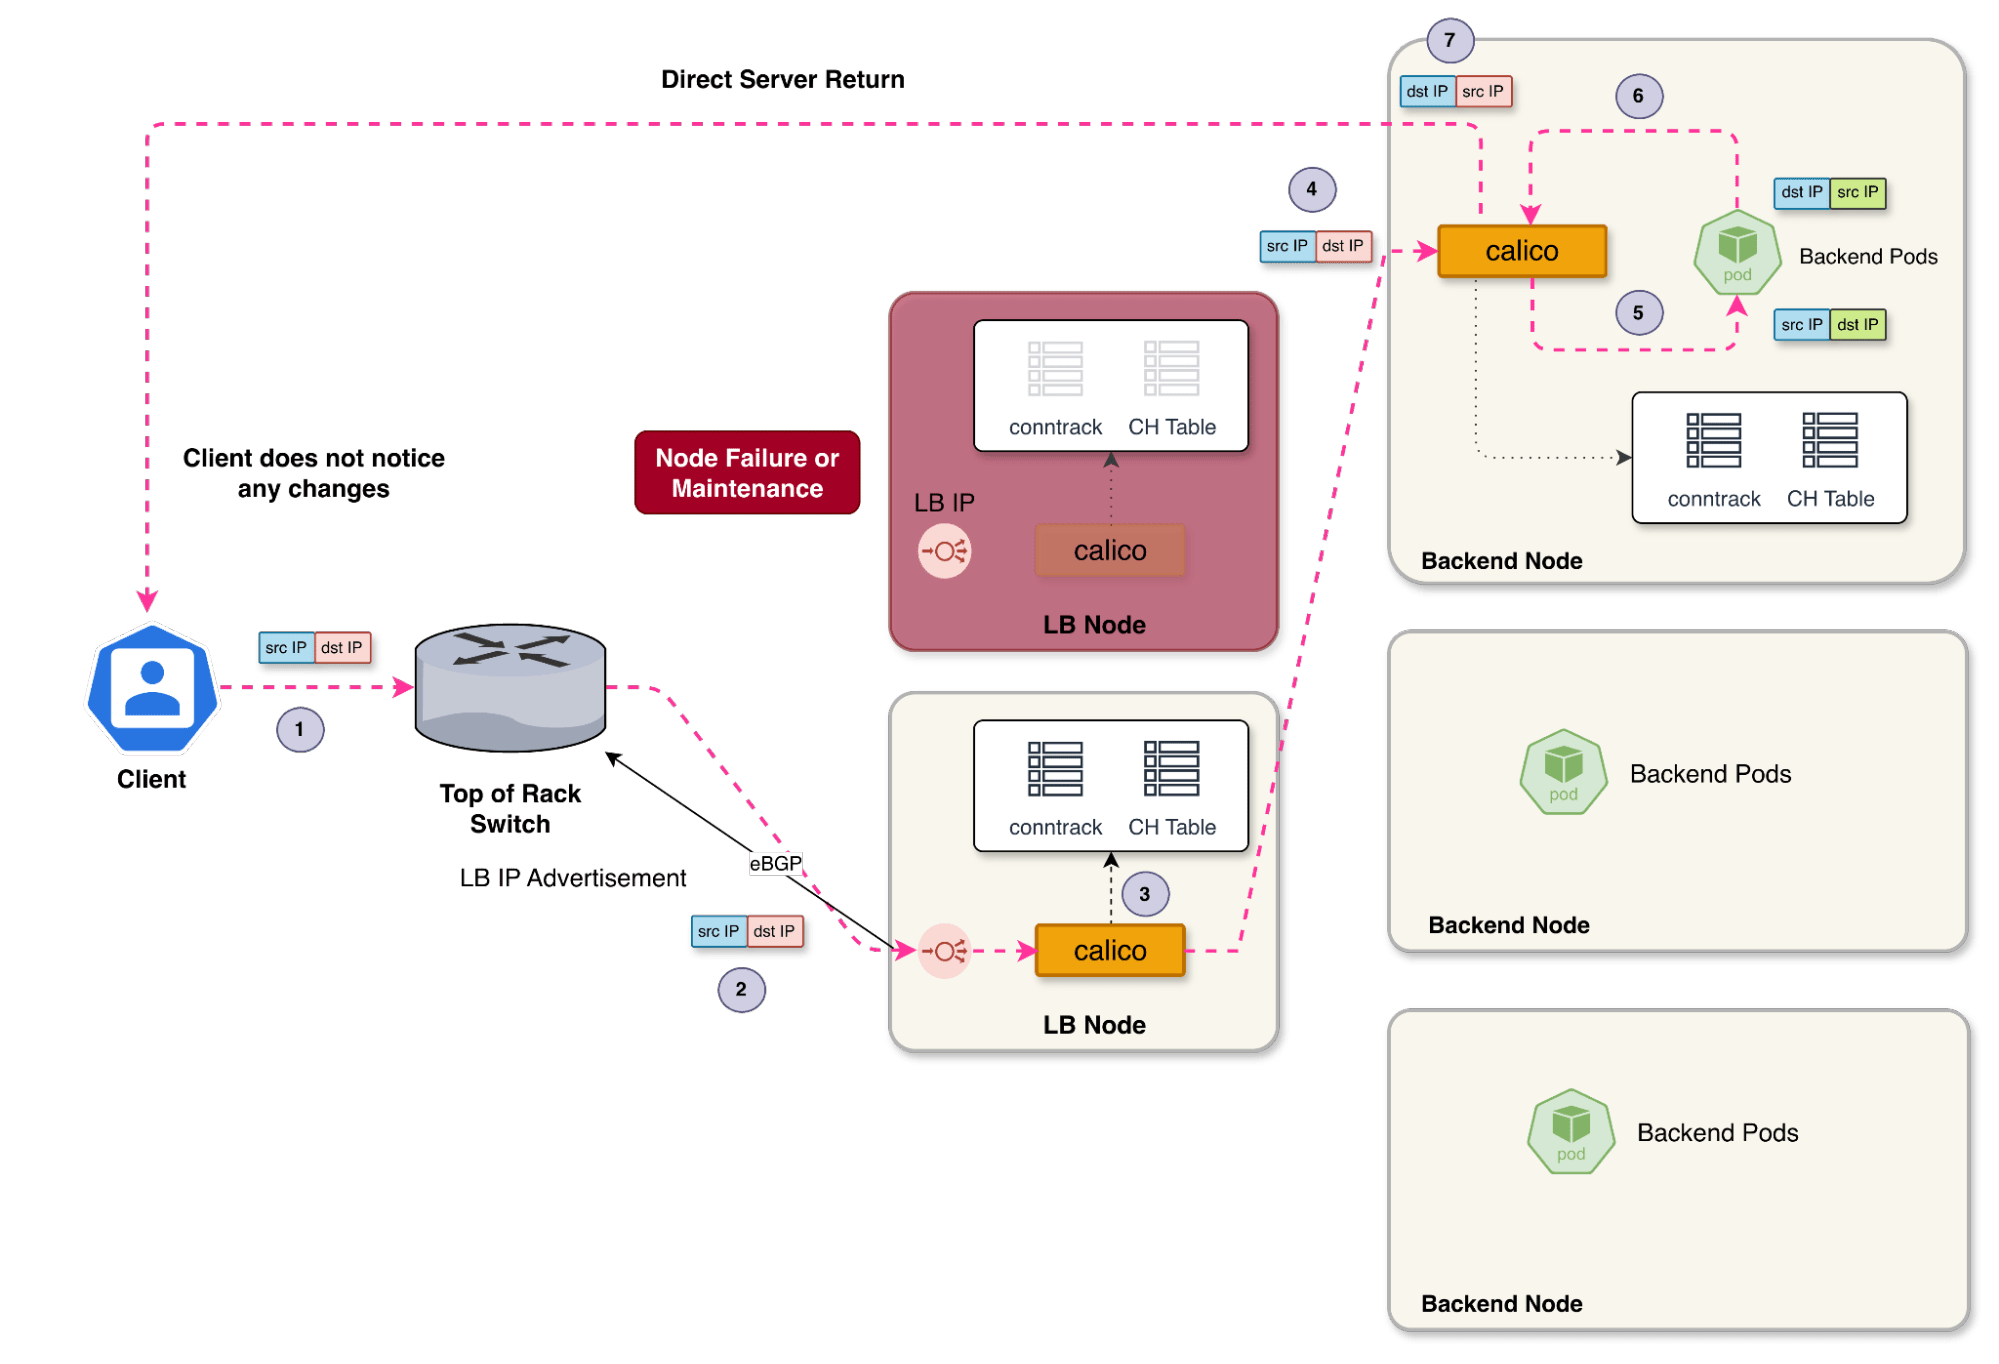
Calico uses Maglev consistent hashing to ensure TCP sessions remain stable even if a load balancer node fails or is drained
This matters when:
- A load balancer node fails or is drained.
- ECMP next hops reshuffle due to network outages.
- You scale the load balancer pool up or down.
Because the decision is deterministic, the packet can land on any node and still find the correct backend. The whole cluster then seemingly acts as a single, distributed load balancer, with per-node caches for additional performance and resilience.
Configuration workflow (high level)
Calico Load Balancer is configured and managed declaratively just like any other Kubernetes resource. A typical configuration flow looks like this:
- Create a dedicated IP pool for Calico LB IPAM, marked for LoadBalancer use.
- Create a Service of type LoadBalancer. Calico IPAM allocates a VIP from that pool.
- Advertise the VIP to the upstream network using Calico BGP (optional BFD for faster detection of outages).
- Ensure your upstream router uses ECMP to send traffic for the VIP to the Calico load balancer nodes.
# Calico IP pool for load balancer VIPs
apiVersion: projectcalico.org/v3
kind: IPPool
metadata:
  name: loadbalancer-ip-pool
spec:
  cidr: 192.210.0.0/20
  blockSize: 24
  assignmentMode: Automatic
  allowedUses:
    - LoadBalancer


# Kubernetes Service using Calico LB
apiVersion: v1
kind: Service
metadata:
  name: my-app
  annotations:
    lb.projectcalico.org/external-traffic-strategy: maglev
spec:
  type: LoadBalancer
  selector:
    app: my-app
  ports:
    - port: 443
      targetPort: 8443
From there, the VIP is advertised and traffic can arrive through the ECMP paths to any load balancer node. Calico handles the rest.
Platform Benefits
The benefits discussion above can translate into real operational advantages for platform teams:
- Remove Hardware Dependency: Scale load balancing capacity by adding standard Kubernetes nodes rather than purchasing expensive appliances or coordinating with vendors and avoid vendor lock-in.
- Kubernetes-native approach: Reduces complexity by keeping all service configuration within your existing GitOps workflows – no separate load balancer management interfaces or external ticketing systems.
- Session persistence: Addresses one of the most common causes of user-facing outages in traditional setups, where losing an ingress node would drop all active connections.
- Self-service capability: Empowers development teams to provision and modify load balancer configurations without waiting for network team approvals, significantly reducing time-to-market for new services.
- Predictable traffic distribution: Maglev’s consistent hashing ensures that traffic distribution remains predictable and fair even as backend pods scale up and down, preventing the “hot spot” issues that can occur with simpler load balancing algorithms.
Conclusion
Calico Load Balancer gives you a Kubernetes-native way to scale your load balancer and protect critical services without the operational drag of traditional appliances.
Ready to scale your on-prem networking?
If you want to try this in your environment, here is a safe, incremental path:
-
- Identify a non-critical service that is a good LoadBalancer candidate.
- Create a Calico IP pool for LoadBalancer VIPs and advertise it via BGP to your upstream network.
- Enable a LoadBalancer Service with Maglev for that service and confirm the VIP is reachable.
- Validate failover: remove a load balancer node or change ECMP next hops and verify sessions continue.
- Document the workflow and replicate to other services.
The post Calico Load Balancer: Simplifying Network Traffic Management with eBPF appeared first on Tigera - Creator of Calico.

Top comments (0)