What is Magento?
Magento is the leading eCommerce platform used for online stores built on open source technology which provides online merchants with a flexible shopping cart system, as well as control over the look, content and functionality of their online store.
Magento offers powerful marketing, search engine optimization, and catalogue-managemen tools.
Magento 2 was released in 2015 and is a reinvisioning of the platform bringing it up to date with the latest development practices as a foundation for future features and growth.
Features
- Website Management Features.
- Checkout, Payment, & Shipping.
- Search Engine Optimization (SEO)
- Analytics And Reporting.
- Marketing Promotions And Tools.
- Order Management.
- Customer Service.
- Customer Accounts.
Requirements for installing Magento 2
- Web server: Apache 2.4 Or Nginx 1.8.x
- PHP 7.1.x
- Database: MySQL 5.6 or higher, MariaDB 10.0 or higher, Percona 5.7
- php_xdebug2.2.0 or later : Recommended for development environments only.
- Required PHP Extensions: intl, mbstring, mcrypt, mhash, openssl, PDO_MySQL, SimpleXML, soap, xml, xsl, zip
Install Magento 2 on Ubuntu Using Nginx
Step 1:
Install nginx by running following command in terminal.
apt-get -y install nginx
Step 2:
Install and configure php-fpm.
Step 2.1:
Install php-fpm and php** -cli**.
apt-get -y install php7.1-fpm php7.1-cli
This command installs the latest available version of PHP 7.1.X. See Magento 2.2.x technology stack requirements for supported PHP versions.
Step 2.2:
Open the php.ini files in an editor.
vim /etc/php/7.1/fpm/php.ini vim /etc/php/7.1/cli/php.ini
Step 2.3:
Edit both files to match the following lines and save and exit the editor.
memory_limit = 2G
max_execution_time = 1800
zlib.output_compression = On
Step 2.4:
Restart the php** -fpm** service.
systemctl restart php7.1-fpm
Step 3:
Configure Nginx.
Step 3.1:
Run the line to create a new virtual host for your Magento site.
vim /etc/nginx/sites-available/magento
Step 3.2:
Make the following configuration.
upstream fastcgi_backend {
    server unix:/run/php/php7.1-fpm.sock;
}
server {
     listen 80;
     server_name www.magento-dev.com;
     set $MAGE_ROOT /workspace/magento2;
     include /workspace/magento2/nginx.conf.sample;
}
Match your domain name with the base URL you chose when installing Magento then save and exit the editor.
Step 3.3:
Activate host by creating a symlink.
ln -s /etc/nginx/sites-available/magento /etc/nginx/sites-enabled
Step 3.4:
Run the command to restart nginx.
systemctl restart nginx
Step 3.5:
Add site url to hosts file.
vim /etc/hosts 127.0.0.1 www.magento-dev.com
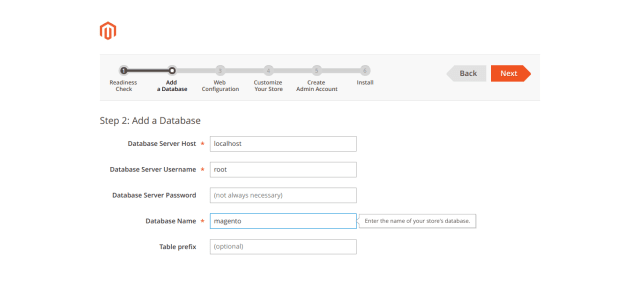
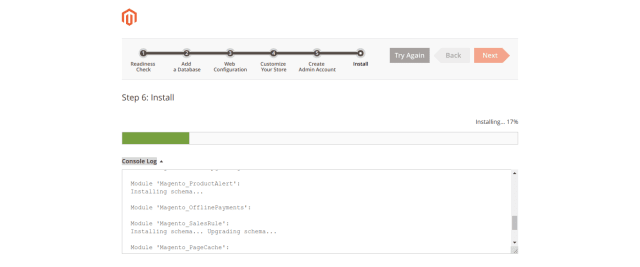
Now try your site’s URL on a web browser to verify the site yourself. It will open the Magento setup wizard shown in the image. You can install Magento by completing all the steps of the setup wizard as well. This is another method of installing Magento.

There are 6 steps to complete web setup wizard shown in images.


Step 4:
Install and configure Magento2 command line.
Step 4.1:
Run the following to change to the docroot directory.
cd /workspace
Step 4.2:
Download and extract the Magento 2 and name it magento2.
Step 4.3:
Enter the following lines to set directory ownership and file permissions.
cd /workspace/magento2
find var vendor pub/static pub/media app/etc -type f -exec chmod g+w {} \;
find var vendor pub/static pub/media app/etc -type d -exec chmod g+ws {} \;
chown -R :www-data
chmod u+x bin/magento
Step 4.4:
Install Composer globally.
curl -sS https://getcomposer.org/installer | sudo php -- --install-dir=/usr/bin --filename=composer
Step 4.5:
Update Magento dependencies.
cd /workspace/magento2
composer install -v
Step 4.6:
Run the below in command line to install Magento.
cd /workspace/magento2/bin
./magento setup:install --base-url=http://www.magento-dev.com/ --db-host=localhost --db-name=magento --db-user=magento --db-password=magento --admin-firstname=admin --admin-lastname=admin --admin-email=admin@admin.com --admin-user=admin --admin-password=admin123 --language=en_US --currency=USD --timezone=America/Chicago --use-rewrites=1
Last but not least, change to developer mode to continue with nginx configuration.
cd /workspace/magento2/bin
./magento deploy:mode:set developer
Your Magento store setup is now completed. Go to the browser and open site URL and you can see your store.

The post Getting Started with Magento 2 appeared first on Atyantik Technologies.

Top comments (0)