
There are several mapping platforms out there for developers to integrate location technology into their apps and websites. If you're looking to switch from Mapbox to a new mapping provider, TomTom is a great alternative. TomTom's geofencing, electric vehicle routing, and trucking capabilities are top-notch, and they also offer unique customization and styling capabilities. And as an added bonus, they are privacy advocates and never sell your personal data or use it for profit. Learn how to easily migrate from Mapbox to TomTom in this tutorial.
Introduction
Once upon a time, creating maps was a huge challenge for web developers. Including any map at all was generally an exercise in creating a static map (an entire field of its own) and including it on the page. If you wanted an interactive map, you pretty much had to create your own GIS application entirely.
Today, location-based services like TomTom Maps SDK for Web and the TomTom location APIs have changed that by encapsulating the complexity of geospatial applications in easy-to-use services you can easily build into a website, without needing a boatload of geospatial know-how.

The following article walks through the construction of a simple Tom Tom application, along with a short example illustrating how the construction of the TomTom API is consistent with industry APIs to indicate how to port it from another mapping application, in this case the MapBox GL JS API.
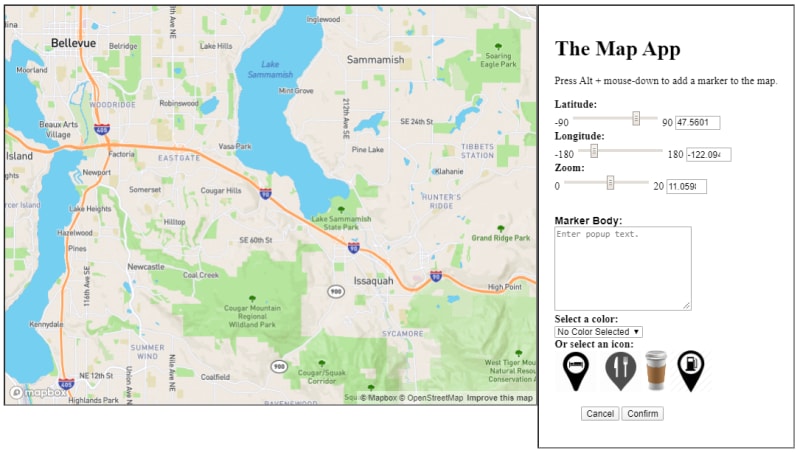
The Mapbox App
The following web application illustrates what a typical MapBox GL application might look like. The application lets the user navigate via longitude, latitude, and zoom levels to any point on Earth and see the coordinates and zoom level of the map. It also lets users assign markers with associated popups by clicking on the map while holding down the Alt (or Option) key.
Migrating this particular app to TomTom turns out to be surprisingly simple, especially since TomTom has ensured that the APIs involved are consistent with those found in other mapping applications, such as MapBox and Google Maps. If you're building a website that needs mapping and location capabilities, TomTom's services provide powerful, easy-to-implement traffic, routing, and search capabilities, and also provide SDKs for web and mobile development, making it very easy to integrate into your application or migrate from another mapping solution.
As with many services, the MapBox GL JavaScript library can be loaded directly from the web.
<script src='https://api.mapbox.com/mapbox-gl-js/v1.8.0/mapbox-gl.js'></script>
<link href='https://api.mapbox.com/mapbox-gl-js/v1.8.0/mapbox-gl.css' rel='stylesheet' />
This also loads the CSS files. Once this is done, the base class msgbox1 is initialized, and the style of the map is set:
mapboxgl.accessToken = <API_Token>;
var map = new mapboxgl.Map({
container: 'map',
style: 'mapbox://styles/mapbox/streets-v9'
});
Styles in MapBox reference a different set of identifiers than Tom Tom, and can be seen in more details in the Map API's options.style section (https://docs.mapbox.com/mapbox-gl-js/api/).
Converting to a TomTom Maps Application
To get started making this a TomTom Maps SDK for Web application, you’ll need an API key, or multiple if you’d like to separate each API and use a unique key for each one – this is up to you, but you can get by fine with just one.
To get a TomTom API key, create a new account (or log-in if you have an existing account) at the TomTom Developer portal, then click on the Dashboard tab. This will let you establish a new token if you have not done so. In general you will need only one, which should cover most basic TomTom services.
TomTom recommends that, rather than downloading the Maps SDK scripts and CSS for direct deployment, you should use the TomTom CDN to access this. Referencing the CDN version makes sure you will automatically use the most recent release to allow for bug fixes and performance improvements.
In this case, all we have to do is change the src URL to point to the TomTom Maps SDK (maps-web.min) and the linked stylesheet href for the CSS.
<script src="https://api.tomtom.com/maps-sdk-for-web/cdn/5.x/5.38.0/maps/maps-web.min.js"></script>
<link rel='stylesheet' type='text/css' href='https://api.tomtom.com/maps-sdk-for-web/cdn/5.x/5.38.0/maps/maps.css'>
Note that this runs the mapping code through the direct browser interface maps-web.min.js. If you are building the application for use with WebPack via nodejs, use maps.min.js, which conforms to the UDM standards, and then in your script import the tt object via an import statement:
import tt from '@tomtom-international/web-sdk-maps'
This global variable tt contains the relevant class object model.
In addition to this, you need a key that determines how many maps can be deployed.
With this and the token you can then create a default map by setting up an HTML div and adding a script. In this particular case, the details for this were set up as a default data structure called initOptions, and this was then passed to a class constructor called MapApp (covered below) that wraps the TomTom tt.Map() class.
<div id='map' style='width: 400px; height: 300px;'></div>
<script>
const mapAPI = tt;

let initOptions = {
 key: 'giEAoojDTwzgRTfqnYDAJG7w4dYGkzeV',
 container: 'map',
 style: 'tomtom://vector/1/basic-main',
 center: [-122.01, 47.53],
 zoom:10,
};

let mapApp = new MapApp(initOptions);
</script>
The options object passed this way identifies the type of container, but also provides a namespace under the message protocol that indicates that this is a street map. This determines the feature set that gets displayed. A full listing of the protocols (covering vector views, satellite views, and day vs. night views) can be found under Map Styles in the Map Display API documentation.
The HTML for the TomTom version of the page is straightforward, having both a "map" ID and "map" class. The code for the interface is also straightforward: the first part holding the displays for showing longitude, latitude, and zoom, and the latter a display that will appear when the user alt-clicks on the map itself to specify a location. This is the same as the MapBox GL JS application.
<div class="appContainer">
 <div id='map' class="map" style="width:800px;height:600px;"></div>
<div  class="interface">
 <h1>The Map App</h1>
 <p>Press Alt + mouse-down to add a marker to the map.</p>
 <form>
 <div>
   <label for="lat">Latitude</label>
   <span class="minVal">-90</span> <input value="0" id="lat"  type="range" min="-90" max="90" class="slider"/> <span class="maxVal">90</span>
       <input value="0" id="latText" type="number" min="-90" max="90" />
 </div>
 <div>
   <label for="lng">Longitude</label>
   <span class="minVal">-180</span> <input value="0" id="lng"  type="range" min="-180" max="180" class="slider"/> <span class="maxVal">180</span>
       <input value="0" id="lngText" type="number" min="-90" max="90" />
 </div>
 <div>
   <label for="zoom">Zoom</label>
   <span class="minVal">0</span> <input value="0" id="zoom"  type="range" min="0" max="20" class="slider"/> <span class="maxVal">20</span>
       <input value="0" id="zoomText" type="number" min="0" max="20" />
 </div>
 </form>
 <div id="addMarkerDialog">
 <form method="dialog" id="addMarkerForm">
   <div class="dialog">
   <div class="dialogBody">
     <div class="property">
       <label>Marker Body</label>
       <textarea id="message" placeholder="Enter popup text."></textarea>
     </div>
   </div>
   </div>
   <div>
     <label for="color">Select a color</label>
     <select id="color" value="">
       <option value="" selected="selected">No Color Selected</option>
       <option value="blue">Blue</option>
       <option value="red">Red</option>
       <option value="green">Green</option>
       <option value="yellow">Yellow</option>
       <option value="purple">Purple</option>
     </select>
   </div>
   <div>
     <label>Or select an icon</label>

     <input src="https://s3-us-west-2.amazonaws.com/s.cdpn.io/620300/travel-transport-hotel-vacation-holidays-tourist-tourism-travelling-traveling_147-512.png" type="image" class="icon" id="hotel"/>
     <input src="https://s3-us-west-2.amazonaws.com/s.cdpn.io/620300/cafe-512.png" type="image" class="icon" id="restaurant"/>

     <input src="https://s3-us-west-2.amazonaws.com/s.cdpn.io/620300/kindpng_229940.png " type="image" class="icon" id="coffee1"/>
     <input src="https://s3-us-west-2.amazonaws.com/s.cdpn.io/620300/9772.png " type="image" class="icon" id="coffee1"/>
     <input value="" id="selectedImage" type="hidden"/>
   </div>
   <menu>
     <button id="addMarkerCancelBtn">Cancel</button>
     <button id="addMarkerConfirmBtn" value="default">Confirm</button>
   </menu>
   </div>
</div>
Of special note here are the four image input fields. They can be used to select an item as an image marker for the map and are actually used as the template for those icons. To add or change the icons, just add or change the associated input fields.
The script for working with the map is contained within two classes: one that handles the user interaction controls called MapApp and a second that builds the marker and its associated popup called MarkerPopup.These in turn wrap the corresponding Map, Marker, and Popup components defined for MapBoxGL.
const mapAIP = tt;

class MapApp {
  constructor(initOptions){
    tt.accessToken= initOptions.accessToken;
    this.initOptions = initOptions;
    this.map = new mapAPI.Map(initOptions);
    this.markers = [];
    let me = this;
    this.latElt  = document.querySelector("#lat");
    this.latElt.value = this.initOptions.center[1];
    this.latTextElt  = document.querySelector("#latText");
    this.latTextElt.value = this.initOptions.center[1];
    this.lngElt = document.querySelector("#lng");
    this.lngElt.value = this.initOptions.center[0];
    this.lngTextElt = document.querySelector("#lngText");
    this.lngTextElt.value = this.initOptions.center[0];
    this.zoomElt = document.querySelector("#zoom");
    this.zoomElt.value = this.initOptions.zoom;
    this.zoomTextElt = document.querySelector("#zoomText");
    this.zoomTextElt.value = this.initOptions.zoom;
    this.addMarkerDialog = document.querySelector("#addMarkerDialog");
    this.messageElt = document.querySelector('#message');
    this.confirmBtn = document.querySelector('#addMarkerConfirmBtn')
    this.cancelBtn = document.querySelector('#addMarkerCancelBtn')
    this.colorSelect = document.querySelector('#color')
    this.selectedImageElt = document.querySelector('#selectedImage');
    document.querySelectorAll('.icon').forEach((elt)=>elt.addEventListener('click',evt=>{
      me.selectedImageElt.value = evt.target.id;
      me.colorSelect.value = "";
    }))
    this.activeMarker = {}
    this.latElt.addEventListener("input", evt => me.update());
    this.lngElt.addEventListener("input", evt => me.update());
    this.zoomElt.addEventListener("input", evt => me.update());
    this.latTextElt.addEventListener("input", evt => me.update());
    this.lngTextElt.addEventListener("input", evt => me.update());
    this.zoomTextElt.addEventListener("input", evt => me.update());
    this.confirmBtn.addEventListener("click", evt => me.addMarkerPopup(evt));
    this.cancelBtn.addEventListener("click", evt => me.closeMarkerPopup(evt));
    this.map.on("drag", evt => {
      let center = evt.target.transform._center;
      this.latElt.value = center.lat;
      this.latTextElt.value = center.lat;
      this.lngElt.value = center.lng;
      this.lngTextElt.value = center.lng;
    });
    this.map.on("zoom", evt => {
      let zoom = evt.target.transform.zoom;
      this.zoomElt.value = zoom;
      this.zoomTextElt.value = zoom
    })
    this.map.on("click", evt => {
      if (evt.originalEvent.altKey && !evt.originalEvent.shiftKey) {
        this.activeMarker = {}
        console.log(evt);
        this.activeMarker.lngLat = evt.lngLat;
        this.activeMarker.zoom = evt.target.transform.zoom;
        this.addMarkerDialog.classList.add('visible');
      }
    });

  }
  update(){
    this.map.setCenter([this.lngElt.value,this.latElt.value]);
    this.map.setZoom(this.zoomElt.value);
  }

  addMarkerPopup(){
    console.log(this.activeMarker);
    this.activeMarker.message = this.messageElt.value;
    this.activeMarker.color = this.colorSelect.value;
    console.log(`${this.selectedImageElt.value}`);
    let baseElement = document.getElementById(`${this.selectedImageElt.value}`);
    if (baseElement != null){
      let imgNode = document.createElement("img");
      imgNode.setAttribute("src",baseElement.getAttribute("src"));
      imgNode.setAttribute("class",baseElement.className);
      this.activeMarker.element = imgNode;
    }
    this.activeMarker.draggable = true;
    this.markers.push(new MarkerPopup(this.map,this.activeMarker))
    this.selectedImageElt.value = "";
    this.closeMarkerPopup();
  }
  closeMarkerPopup(){
    this.addMarkerDialog.classList.remove('visible');
  }
}

class MarkerPopup {
  constructor(map,activeMarker) {
    let options = {offset:[0,-40]};
    this.popup = new mapAPI.Popup(options)
      .setLngLat(activeMarker.lngLat)
      .setText(activeMarker.message)
      .addTo(map);
    this.marker = new mapAPI.Marker({
      color:activeMarker.color,element:activeMarker.element,
      draggable:activeMarker.draggable })
      .setLngLat(activeMarker.lngLat)
      .setPopup(this.popup)
      .addTo(map);
  };
}
The TomTom map object specifies positions using LngLatLike objects, which can either be a LngLat() dedicated object, an object with lng and lat attributes, or an array in the form [lng,lat], where lng is the longitude in the range of -180 and 180 and lat is the latitude between -90 and 90.
Issaquah, a suburb of Seattle, has coordinates [-122.01, 47.53], and is used as the center point for the maps given here.
In addition to position, the maps make use of a zoom coordinate that can range from 0 (where the whole world is displayed) to around 23, where each tick represents a four times zoom in the number of tiles being displayed. In other words, a zoom of ten means that you are at a scale of 2^10 (or about 1000 times the resolution), for about 2^20 (c. one million) tiles.
Markers and popups are used to highlight individual points on the map. While not demonstrated here, it is possible to indicate a level of detail range determined by zoom where individual markers show up.
Popups are HTML div elements that appear relative to the markers when clicked or rolled over (depending upon options settings). The markers themselves default to SVG-based pointers that can be set to various colors (via the color attribute). It's also possible to set the icon to an HTML element such as an img element or an SVG element. Similarly, the popup can be set to a text field (illustrated here) or an HTML field.
In general, HTML should be avoided if the application has the potential for user interaction, as it becomes possible for someone to use it to take advantage of code injection as a way of hacking a server.
Note also the options variable passed to the Popup with the offset value. Popups are usually bound to entities, and at least with TomTom, the popup will usually appear at the same place as the base marker is anchored. By passing an offset as an [x,y] array of pixels, the popup bubble will appear relative to the marker's base, with an offset of [0,0] indicating they share anchor points. It's also possible to use the .setLngLat method on an offset, but as the map is zoomed, the marker and the popup positions will diverge in that case..
Finally, note the const declaration at the top. The MapAI const holds an instance of the tt object that provides the base class for operations, but, as will be shown below, there are advantages to using a variable by pointer here.
The CSS is similarly straightforward:
.appContainer {
 display:flex;
 flex-direction:row;

}
.map {
 width:800px;
 height:600px;
 border:inset 2px gray;
}

.interface {
 padding:0.25in;
 border:inset 2px gray;
}


.dialog {
 display:flex;
 flex-direction:column;
 font-family:Arial;
}
.dialogHead {
 position:absolute;

 display:block;
 height:32px;
 margin:0;
 width:100%;
 left:0;
 top:0;
 background-color:navy;
 color:white;
 line-height:20px;
 text-align:center;
 font-family:Arial;
 font-weight:bold;
}
.dialogBody {
 margin-top:32px;

}
.dialogBody .property label {
  display:block;
 font-weight:bold;

}
.dialogBody textArea {
 width:200px;
 height:120px;

}
#addMarkerDialog {
   display:none;
}
#addMarkerDialog.visible {display:block;}
.hide {display:none;}
label {font-weight:bold;display:block}
label:after {content:":"}

.icon {max-width:64px;max-height:64px}
Once the classes have been defined, they need to be initialized:

let initOptions = {
 container: "map",
 style: "tomtom://vector/1/basic-main",
 zoom: 10,
 center: [-122.01, 47.53],
 accessToken: <TomTom_API_token>
};

let mapApp = new MapApp(initOptions);
This associates the map object with the element with id of the same name, sets the map style as described above, determines the beginning zoom and center of the map, and passes the access token to the map object to allow for service call access.

Wrapping Up
Converting from MapBoxGL to TomTom is straightforward. If you're comfortable with the MapBox GL interfaces, then TomTom conversions should be quite easy, and include with them greater robustness of the TomTom products.
Visit our developer portal and check out our documentation and examples for Web, iOS, and Android. Lastly, don't forget to connect with us on Twitter, Twitch, and YouTube, and check out our blog for more tutorials and developer forum for any questions you may have.
Happy building!
With nearly 30 years of experience, TomTom is the leading location technology specialist, developing the most reliable maps, navigation software, traffic and live services for the automotive industry, enterprises and developers worldwide. We are committed to creating precision technology that brings us closer to our vision of a safer, cleaner, congestion-free world.
This article first appeared on https://developer.tomtom.com.

Latest comments (0)