Today I'll be introducing you to the wonderful world of mechanical keyboards, as well as the awesome keyboard software QMK. This is not meant to be an exhaustive technical tutorial, but rather an overview of some of the wonderful keyboards and paraphernalia that are out there for you to discover, though I will add some links to documentation at the bottom. I know what you must be thinking... "Topher, I already have a keyboard and it works just fine. And besides, keyboards are just a means to an end, a boring thing I have to use to type out words." Well, buckle up, boys and girls, and prepare to be dazzled.
The Hardware
The first thing we'll cover are the keyboards themselves.
Whether you want a big keyboard, like this (not my keyboard)...

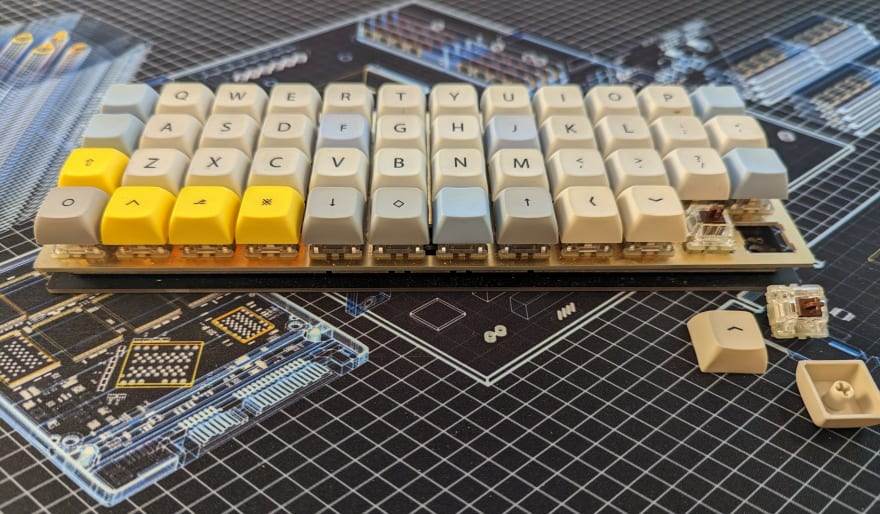
Or a little keyboard, like these...

That last one is a split-board that provides better ergonomics, as the sides can be moved apart so your wrists are constantly bent while you're typing.
You can make whatever you want.
I know what you're thinking now... "Gee, Topher, I just don't have the time or skills to make something like that." Hogwash! You can put together a custom keyboard that is no harder to assemble than a Lego set. You just get a case, a pcb, some switches and keycaps, and plug everything in.
Maybe, however, you'd like something a bit more challenging or custom. Well, you can do that too. Further to the other end of the difficulty spectrum, here's one with a handwired matrix/microcontroller, a brass plate designed in CAD, and a case milled from a piece of wood.


Keycaps in your favorite color and thickness, artisanal keycaps, switches with your preferred tactility and sound, piezo speakers, RGB lighting, rotary encoders... the list of customization you can achieve is endless.
The Software
Now that we've covered the keyboards, it's on to the really fun part... QMK!
What is QMK, you ask? QMK is a powerful opensource keyboard firmware written in C with TONS of features. I'll cover the basics first, like keymap layouts, and then go over some of the more advanced and fun aspects. Using my keyboard as an example, you can see in the following code what my keymap looks like. The first part, the part commented out, is simply a visual representation of the layout. The section below that with the many "KC_" is the actual code. I'd also like to point out that these can be arranged however you'd like. Maybe you'd prefer the Alt key be where the Ctrl key is, and vice-versa. No problem, just move KC_LCTL to after KC_LALT! You can rearrange and reassign any and every key in just a few seconds.
  /* Qwerty
     * ,-----------------------------------------------------------------------------------.
     * | Tab |   Q  |   W  |   E  |   R  |   T  |   Y  |   U  |   I  |   O  |   P  | Bksp |
     * |------+------+------+------+------+-------------+------+------+------+------+------|
     * | Esc  |   A  |   S  |   D  |   F  |   G  |   H  |   J  |   K  |   L  |   ;  |  "   |
     * |------+------+------+------+------+------|------+------+------+------+------+------|
     * | Shift|   Z  |   X  |   C  |   V  |   B  |   N  |   M  |   ,  |   .  |   /  |Enter |
     * |------+------+------+------+------+------+------+------+------+------+------+------|
     * | Ins  | Ctrl | Alt  | GUI  |Lower | Shft |Space |Raise | Left |  Up  | Down |Right |
     * `-----------------------------------------------------------------------------------'
     */
    [_QWERTY] = LAYOUT_ortho_4x12(
            KC_TAB,  KC_Q,    KC_W,    KC_E,    KC_R,    KC_T,    KC_Y,    KC_U,    KC_I,    KC_O,    KC_P,    KC_BSPC,
            KC_LCTL,  KC_A,    KC_S,    KC_D,    KC_F,    KC_G,    KC_H,    KC_J,    KC_K,    KC_L,    KC_SCLN, KC_QUOT,
            MT(MOD_LSFT,KC_CAPS), KC_Z,    KC_X,    KC_C,    KC_V,    KC_B,    KC_N,    KC_M,    KC_COMM, KC_DOT,  KC_SLSH, MT(MOD_RCTL,KC_ENT),
            KC_INS, KC_LCTL, KC_LALT, KC_LGUI, LOWER,   MT(MOD_RSFT,KC_ENT),  KC_SPC,  RAISE,   KC_LEFT, KC_DOWN, KC_UP, KC_RGHT
            ),
Ah, and now you're thinking, "But Topher, what about the rest of the keys? Where are the numbers? Where are the chars!? Won't you think of the chars?!" Well, that brings us to another common feature of QMK:
Layers
I like to explain layers as being akin to the Shift key, whereas you don't have a separate key for "a" and "A", but rather you press Shift to capitalize the letter. Layers are very similar; one key can perform multiple functions simply with the addition of a second key. Here you can see my "lower" and "upper" layers.
  /* Lower
     * ,-----------------------------------------------------------------------------------.
     * |   ~  |   !  |   @  |   #  |   $  |   %  |   ^  |   &  |   *  |   (  |   )  | Del  |
     * |------+------+------+------+------+-------------+------+------+------+------+------|
     * | Del  |  F1  |  F2  |  F3  |  F4  |  F5  |  F6  |   _  |   +  |   {  |   }  |  |   |
     * |------+------+------+------+------+------|------+------+------+------+------+------|
     * |      |FMTPNT| CUT  | COPY |CPYFMT|FNDHLT|      |      | Home | End  |      |      |
     * |------+------+------+------+------+------+------+------+------+------+------+------|
     * | Sig  |      |      |      |      |      |      |      | Next | PgUp | PgDn | Play |
     * `-----------------------------------------------------------------------------------'
     */
    [_LOWER] = LAYOUT_ortho_4x12(
            KC_ESC, KC_EXLM, KC_AT,   KC_HASH, KC_DLR,  KC_PERC, KC_CIRC, KC_AMPR,    KC_ASTR,    KC_LPRN, KC_RPRN, KC_DEL,
            KC_DEL,  KC_F1,   KC_F2,   KC_F3,   KC_F4,   KC_F5,   KC_F6,   KC_UNDS,    KC_PLUS,    KC_LCBR, KC_RCBR, KC_PIPE,
            MT(MOD_LSFT,KC_CAPS), _______, XPASTE, COPY, KC_LALT, _______, _______,  KC_PGDN, KC_PGUP, _______, _______, _______,
            KC_PSCR, KC_LCTL, KC_LALT, KC_LGUI, _______, _______, _______, _______, _______, KC_HOME, KC_END, _______
            ),
  /* Raise
     * ,-----------------------------------------------------------------------------------.
     * | Esc  |   1  |   2  |   3  |   4  |   5  |   6  |   7  |   8  |   9  |   0  | Del  |
     * |------+------+------+------+------+-------------+------+------+------+------+------|
     * |  `   |  F1  |  F2  |  F3  |  F4  |  F5  |  F6  |   -  |   =  |   [  |   ]  |  \   |
     * |------+------+------+------+------+------|------+------+------+------+------+------|
     * |      | SIG  | RENT | FVTAB|      |      |      |ISO # |ISO / | Home | End  |      |
     * |------+------+------+------+------+------+------+------+------+------+------+------|
     * |PrntSc|      |      |      |      |      |      |      | Next |PgDn  |PgUp  | Play |
     * `-----------------------------------------------------------------------------------'
     */
    [_RAISE] = LAYOUT_ortho_4x12(
            KC_TILD,  KC_1,    KC_2,    KC_3,    KC_4,    KC_5,    KC_6,    KC_7,    KC_8,    KC_9,    KC_0,    KC_DEL,
            KC_GRV,  KC_F7,   KC_F8,   KC_F9,   KC_F10,   KC_F11,   KC_F12,   KC_MINS, KC_EQL,  KC_LBRC, KC_RBRC, KC_BSLS,
            MT(MOD_LSFT,KC_CAPS), _______,  _______,  _______, _______,  _______,  _______,  KC_PGDN, KC_PGUP, _______, _______, _______,
            KC_PSCR, KC_LCTL, KC_LALT, KC_LGUI, _______, _______, _______, _______, _______, KC_HOME, KC_END, _______
            ),
While I have my layers arranged with an "upper" and "lower" layer (with a further "adjust" layer when both those layers are activated), there are other layer schemes that work as well. One example would be to have your layers stacked, so that your highest layer is layer [3], then further layers on [2], [1], and [0].
If the idea of a small keyboard sounds frustrating, or the idea of multiple layers daunting, don't fret! You could have a fullsize keyboard, just like the one you have now (or bigger, if you'd like), but with the addition of a single layer that simply has a whole host of macros.
This brings up another common and awesome feature of QMK:
Macros
Macros allow all kinds of super useful functions and can get really involved, but at their most basic macros allow you to instantly and automatically perform multiple keystrokes and functionalities with a single key combination. Let me give you a nifty example. Every programmer is familiar with copy/paste. Here's a macro that copies (Ctrl+c) on keydown and pastes (Ctrl+v) on keyup, meaning you simply hold the key to copy and then release the key when you want to paste.
   case CP:
        // keydown
        if (record->event.pressed)
        {
            SEND_STRING(SS_LCTL("v"));
        }
        // keyup
        else
        {
            SEND_STRING(SS_LCTL("v"));
        }
        break;
At my last job, I had several macros that simply output text/signatures that I was often typing out, like so...
   case SIG:
        if (record->event.pressed)
        {
            SEND_STRING("\n\n-Topher Ludlow\nTravel Coordinator\nEmergency Medical Services Authority\nCell: 916-621-****\n");
        }
        else
        {
        }
        break;
        case RENT:
        if (record->event.pressed)
        {
            SEND_STRING("Send the rental agreement and return receipt to ****@emsa.ca.gov\n");
        }
        else
        {
        }
        break;
Perhaps, if you're a gamer, you'd like a macro that spams a single keypress. Really, any combination of keys you can think of can be achieved with a macro.
Another feature of QMK are mod-tap keys. These keys allow one function when pressed, while allowing another when tapped. The classic example, which you may have noticed in my first layer, is Shift; tapping it turns caps-lock on, while holding it activates Shift. This keycode look like this: "MT(MOD_LSFT,KC_CAPS)". Another mod-tap key in layer activates Ctrl when held and Enter when tapped: "MT(MOD_RCTL,KC_ENT)".
Final Thought
What I've gone over really only begins to scratch the surface of what can be done with QMK. If you like RGB, you can load up any of the numerous existing patterns or completely write your own. If you'd like speakers attached to your keyboard, there's code to turn your keyboard into a... keyboard. Tired of QWERTY? Change your layout to DVORAK. Want to do stenography with your keyboard? Load up the steno protocol. The possibilities are endless, and if you want a feature that doesn't exist yet you can create it! The keyboard community, incidentally, is very welcoming and helpful.
The following links are in order of "eye candy" to "technical", so if you've found any of this intriguing I encourage you to read on and learn more!
https://www.reddit.com/r/MechanicalKeyboards/
https://www.reddit.com/r/olkb/
https://blog.splitkb.com/introduction-to-qmk-features/
https://thomasbaart.nl/category/mechanical-keyboards/firmware/qmk/qmk-basics/

Top comments (0)