cross-post from medium.com
Edited 2019 Mar 11 to include changes introduced in TensorFlow.js 1.0. Additional information about some of these TensorFlow.js 1.0 updates can be found here.
Converting a pre-trained model to a web friendly format

If you’ve been following along, you should already have a high level understanding of how to bring a pre-trained model into a browser application. Now, let’s look at the first steps in this process in greater detail.
Before you can convert a pre-trained model to a web-friendly format and bring it to the browser, you first need a model. A great first model to start learning with is the Image Segmenter from the Model Asset Exchange (MAX). You can deploy and run the Image Segmenter model through Kubernetes or Docker Hub. To get an idea of what it does you can check out Nick Kasten’s Magic Cropping Tool.
Get the Model
You can begin by downloading and extracting the model files used in the MAX Image Segmenter. The extracted contents contain a frozen model graph. Frozen graphs encapsulates all required model data in a single file (.pb extension).
The TensorFlow.js converter supports Keras (i.e., HDF5) and TensorFlow (e.g., frozen graphs, SavedModel) models.
A few other model formats you may encounter include:
- Checkpoints which contain information needed to save the current state of the model. Then resume training after loading the checkpoint. Checkpoints are not supported by the converter.
- SavedModel which is the universal serialization format for TensorFlow. Unlike checkpoints, SavedModels store the model data in a language-neutral format.
- HDF5 which is the format used by Keras to store model data. It is a grid format popular for storing multi-dimensional arrays of numbers.
Know the Model
It is good practice to review and understand a model before you use it. You don’t need to know every little detail about the model, but a good start is to get to know the model’s format, inputs, and outputs.
In most cases, you will have to pre-process the input(s) to the model, as well as, process the model output(s).
Learn about the model’s inputs, outputs, and operations by inspecting the model’s graph. One useful and easy-to-use visual tool for viewing machine learning models is Netron.
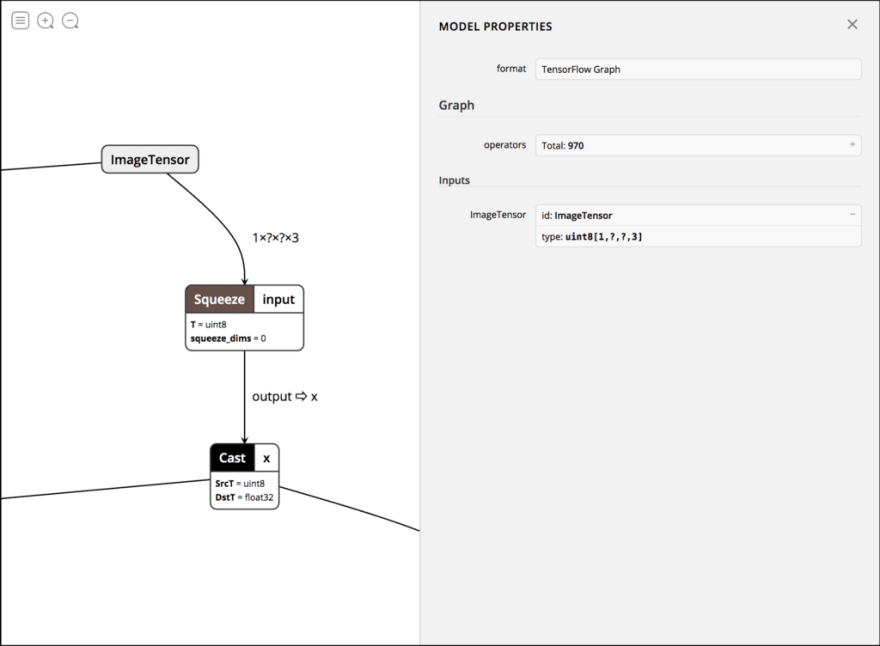
To inspect the Image Segmenter model, open the extracted frozen_inference_graph.pb file in Netron. You can zoom out to see the scope and size of the model. Likewise, you can zoom in to specific nodes/operations on the graph.
Without clicking on any nodes, click on the hamburger/menu icon to see the model’s properties (e.g., number of operators, input type, etc.). In addition, click on a specific node to view the properties. Alternatively, you can enter CTRL+F to open the search panel and type a specific node to jump to it.

The input for the Image Segmenter is an ImageTensor of type uint8[1,?,?,3]. This is a four-dimensional array of 8-bit unsigned integer values in the shape of 1,?,?,3. The ? s are placeholders and can represent any length. They would correspond to the length and width of the image. The 1 corresponds to the batch size and the 3 corresponds to the length of the RGB value for a given pixel, which is three numbers.
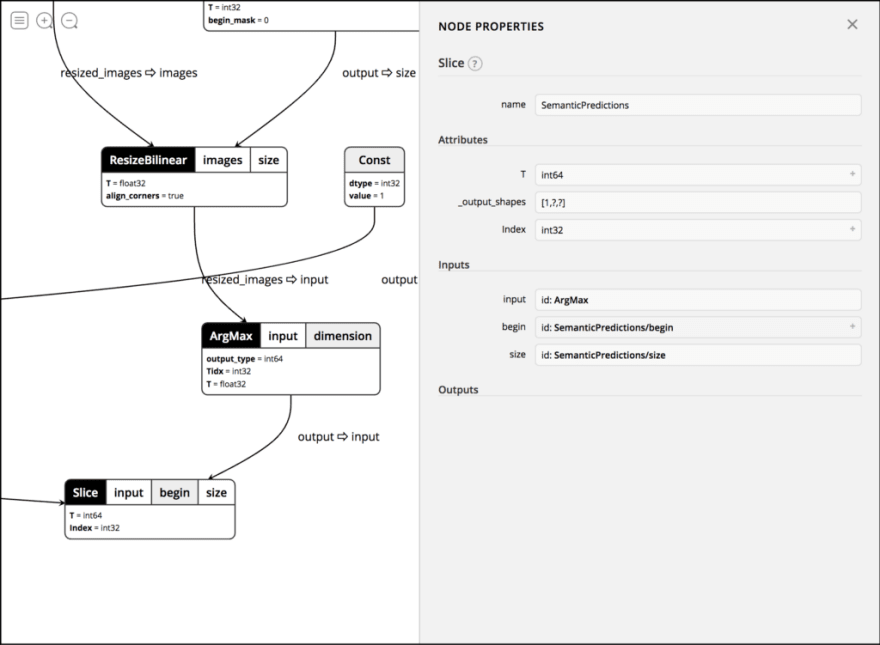
Clicking on the last node (Slice), you get its name (i.e., SemanticPredictions) and attributes. The name is important to remember. You will need to provide it to the converter tool.

Other available options to view information about a graph are the summarize_graph and TensorBoard tools.
Change the Model
You are now ready to run tensorflowjs_converter to get your web friendly format.
The converter is available through the command line after installing the
tensorflowjsPython package
To convert the Image Segmenter specify:
-
SemanticPredictions for the
output_node_names -
tf_frozen_model for the
input_format - file path to the frozen graph
- directory path to store the converted model
If successful the tensorflowjs_converter outputs the dataflow graph (model.json) and shards of binary weight files. The shard files are small in size to support easier browser caching.
NOTE: If using
tensorflowjs_converterversion before 1.0, the output produced includes the graph (tensorflowjs_model.pb), weights manifest (weights_manifest.json), and the binary shards files.
Conversion can fail because of unsupported operations. The converted model may also be too large to be useful. In this case, there are steps you may be able to take.
To make the web friendly model smaller you can convert only part of the model graph. Any unused nodes or nodes used only during training can get stripped. It is not needed with the Image Segmenter model, but if you had to strip unused nodes, it would look something like the following:
This is also useful for failures from unsupported operations. For some unsupported operations use strip_unused to bypass the operation. You can then convert the stripped graph to get a web friendly version.
This helps get the model converted, but also adds extra work. You may need to implement the unsupported operation outside of the model. This will apply it to the input(s) to the model and/or output(s) from the model.
More options to further optimize the model are available.
More to Come…
Your pre-trained model should now be converted to the format supported by TensorFlow.js. You can load the converted format and run it in a browser environment.
Stay tuned for the follow up to this article to learn how to take the converted model and use it in a web application.


Oldest comments (0)