Learning is a big part of a coder life, and from my point of view, it’s important to look at programming as a hobby.
Besides the main technology you are learning, there are many other technologies and lots of soft skills. One important is curiosity.
In this article I would like to share with you my experience with how to develop an action for the Google Assistant, using Kotlin. I will focus mainly on the struggles I had using Koltin as a backend and App Engine as a container for it.
All this started with my curiosity about how an action work and taking the extra mile to build an action and share it with the GDG community.
But why the need for this?
Working in the technology area it’s a complex job. Out there, so many tools, architecture patterns and a huge amount of information. Nobody can know everything and you need to choose what you invest your time. My Java background and for the last two years, Kotlin pushed me to try the Google Actions Kotlin library and not to learn and invest my time into node js, no offense here :) Google Actions development is based on node js and almost every tutorial out there is based on it so for me was like challenge accepted!
Small talk
Because Actions are powered by AI, they interact as humans do. No user manual or learning curve required. Google reports that 41% of people who own a voice-activated speaker say it feels like talking to a friend or another person.
Actions on Google is the platform where developers can build Actions for Google Assistant. Actions are conversational interactions that allow users to talk with Google Assistant. Your Action’s users will be able to ask, “Ok Google, talk to . . .” your action name and your Action will respond!
Users don’t have to install anything to use your Action; however, all Actions must be submitted and approved by Google before they can be discovered.
Start design
At a first sight, the set-up process seems a bit hard but Google has broken down the process into an easier process to follow Conversation Design, which comes with extremely in-depth guides to understanding each step of the process. Details here.
If you are at the very beginning stage with Google Actions, I recommend these res1 res2 res3
The Action I build using DialogFlow
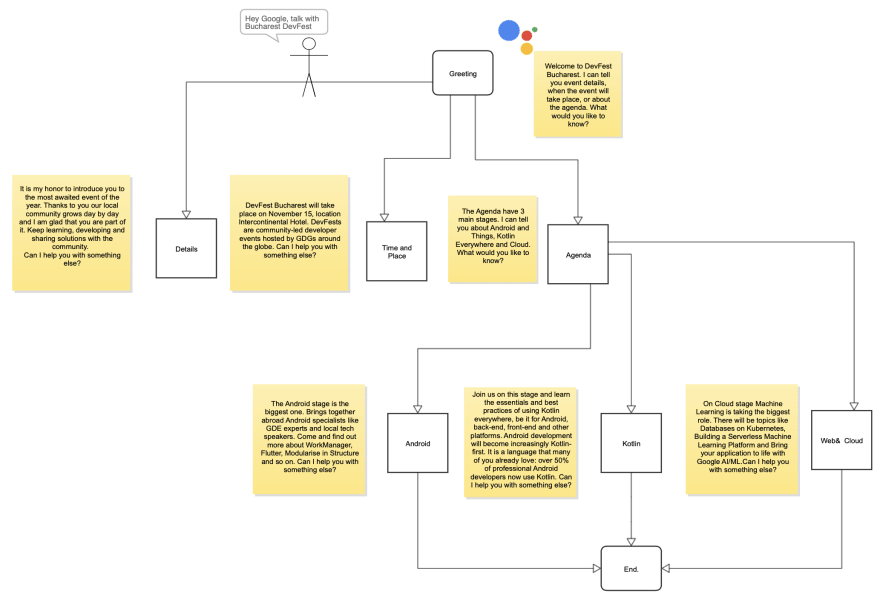
Bucharest DevFest is an action intended to help Bucharest GDG organizers to share information about their next DevFest event. DevFests are community-led developer events hosted by Google Developer Groups around the globe. GDGs are focused on community building and learning about Google’s technologies.
With this in mind, I started to develop the action which would be able to share information about what is this event about, where and when would take place and which are the topics.
Here's a sketch of what a conversation with this app looks like:
Project setup and tools
Because I wanted to write the code my way (using Kotlin) I chose Google Cloud's serverless platform App Engine to take care of managing the underlying infrastructure.
I started with their git project template and did all the steps mentioned there.
The first step (already created a new project in google action console, and linked it to a DialogFlow project) is to import the Agent in your DialogFlow project: 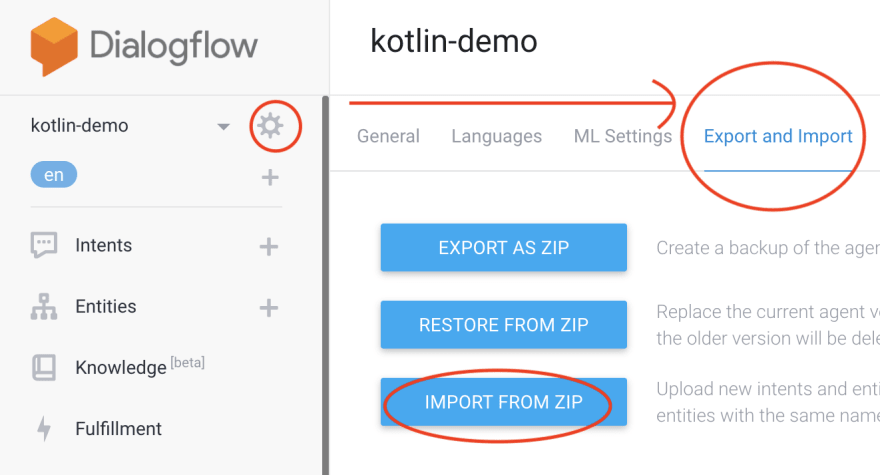
After cloning the above repo, you can use IntelliJ to open it and start writing your own code.
The first remark to say is that if you try to run the code locally the used logger (org.slf4) will crash so none of your debugging logs will be there. (this happens because somehow their boilerplate code is some commit behind the library repo.
To fix it you need to add this dependency into the build.gradle file:
compile 'org.slf4j:slf4j-simple:1.6.1'
After this, you can start your local server from within IntelliJ, open the Gradle tray and run the appEngineRun task. In the Run tray you should have an out like this one: 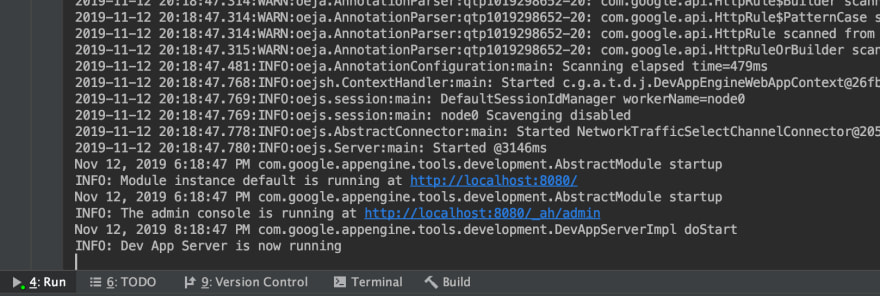
Now your local server is running.
Next, you need to make this accessible from the internet, so your google assistant can access it. To do this I used ngrok to expose my localhost 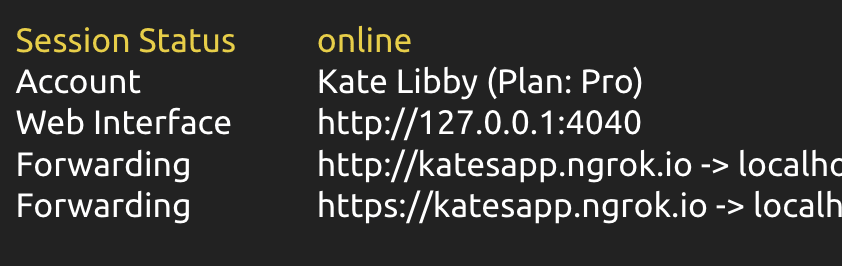
The third step is to go back in the Dialogflow console, from the left navigation menu under Fulfillment > Enable Webhook, set the value of URL to https://<...>.ngrok.io and Save.
Now is the moment when you are able to test your action using your local webserver.
Now comes the fun part, the coding.
You add your Intents into the DialogFlow console and then you are handling the request in the MyActionsApp class which extends DialogflowApp() like this: 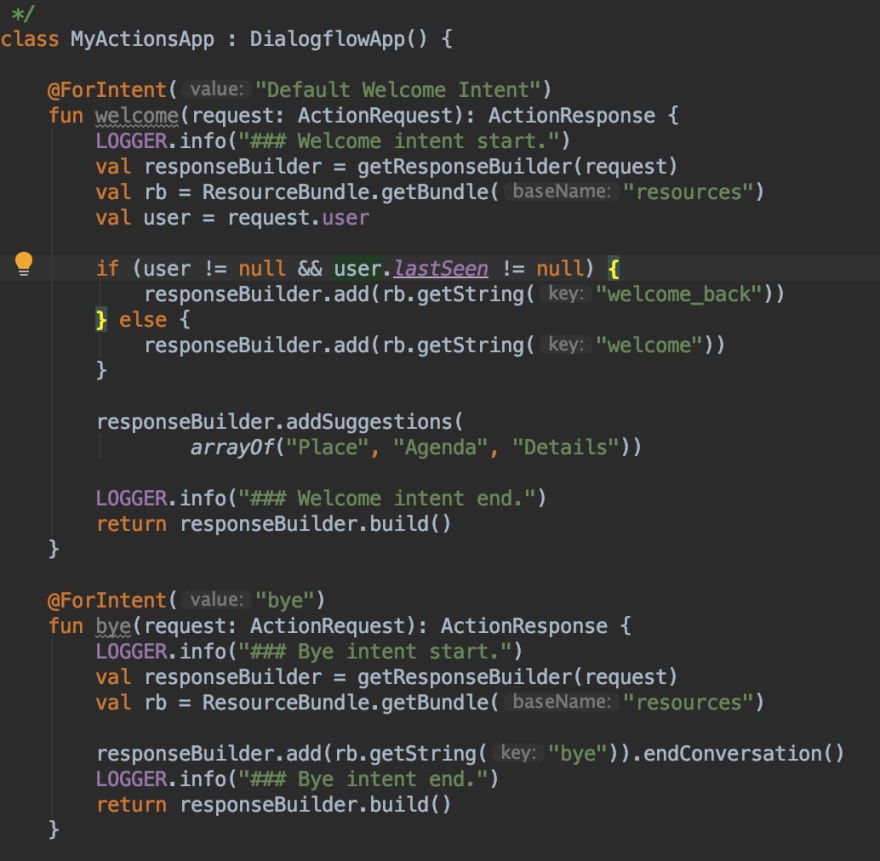
All the string resources are going into this directory 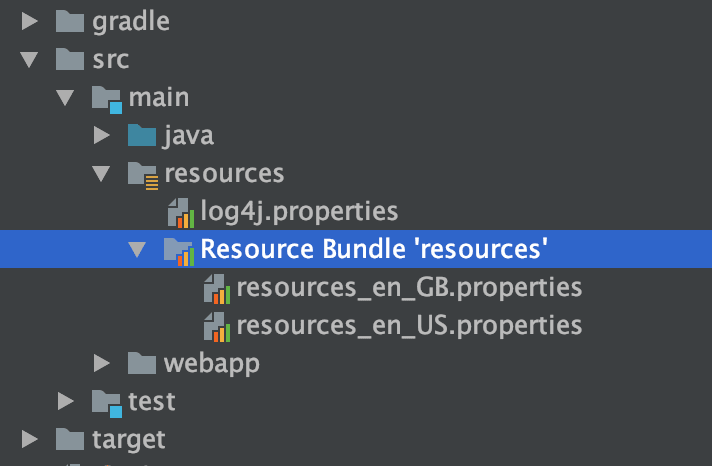
This goes well if you want to distribute your action in different countries.
Another struggle I had was with the default project for the gcloud CLI. Because I had an old project already setup with the Google Cloud, somehow that was my default project.
To fix this I added two new build type to project gradle file 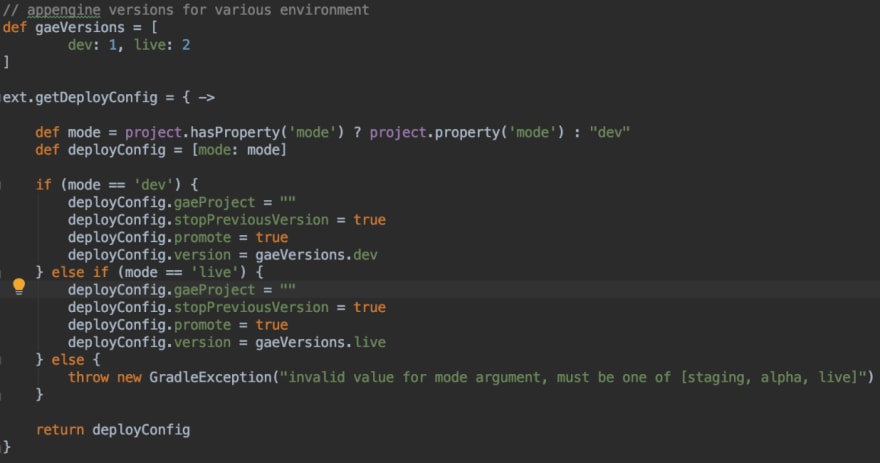
Just set correctly your projectId. (you can check the id in the DialogFlow console).
Another interesting and easy step to be done is to integrate your code with the Firebase Firestore in order to get your action content dynamically. But this is another discussion.
So what do you think? would Google Action be your next fun project?
Thank you for reading this. If you have any questions, comments or funny jokes comment below.

Top comments (0)