AWS EC2 stands for Elastic Compute Cloud. It is one of the most popular and widely used service offered by AWS. EC2 is a foundational pillar in the digital landscape of AWS ecosystem. It offers flexible and scalable infrastructure for businesses to thrive in the cloud.
With EC2 users can provision virtual servers within minutes, choosing from diverse instance types tailored to specific workload requirements. Before EC2, managing computing resources posed challenges such as upfront investments in hardware and inefficient scaling. With EC2, businesses can provision servers on-demand, paying only for what they use, leading to increased agility, scalability, and innovation.
Following are different types of instance types EC2 provides:
- General purpose
- Compute optimized
- Memory optimized
- Storage optimized
- Accelerated computing
You can find more details about different instance types here.
Launching a new instance
To launch a new EC2 instance, go to EC2 dashboard page.
- Click on “Launch instances” button.

- Give a name to the EC2 instance. Under “Application and OS images (AMI)” section. Select any available AMI. I have selected “Amazon Linux” as the AMI for this instance. An AMI, or Amazon Machine Image is a pre-configured template used to create virtual machines (instances) within EC2. It serves as a blueprint for launching EC2 instances, providing the necessary operating system, software packages, configurations, and even data stored on the instance’s root volume.
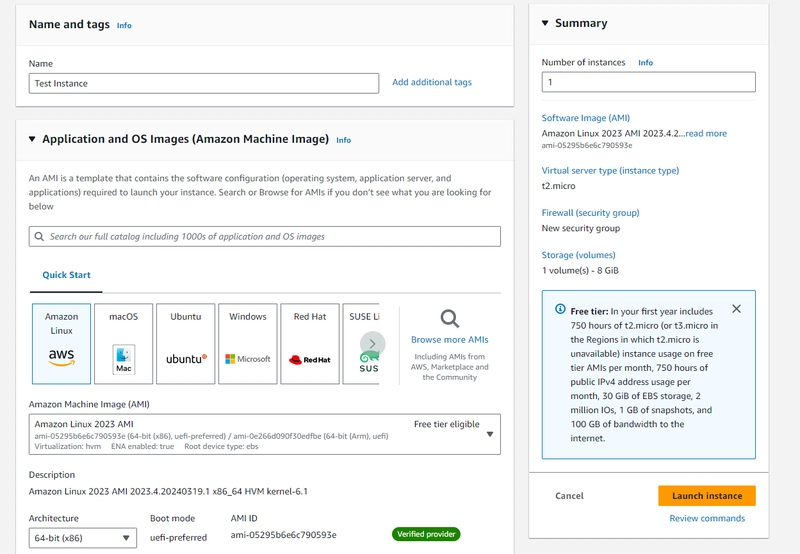
- Select an appropriate instance type as per your use case and workload. For the current instance I am going with
t2.microtype of instance. Create a new key pair login credentials. A key pair login is a security credentials that you can use to prove your identity when connecting to the EC2 instance.

- Under the “Network settings”, you can configure a firewall and network settings for the EC2 instance. You can create a security group and specify inbound and outbound traffic rules to restrict access to the EC2 instance. We will discuss more about security groups in later sections.

- You can also configure storage for EC2 instance. AWS also offers EBS (Elastic Block Store), an easy-to-use, scalable block store service that you can use for EC2. For now, I am keeping the default configuration for storage.

- Once you are done configuring the instance, click on “Launch instance” button to start the instance. After the instance is successfully launched. You can see its details in the “instances” section of EC2 dashboard.

Instance Operations
You can stop, terminate, or reboot an EC2 instance from the dashboard by selecting the instance and clicking on “Instance state” option.

Security Groups
A security group acts as a virtual firewall for EC2. Security groups are used to control the inbound and outbound traffic for an EC2 instance.
- Inbound rules: these rules define the incoming traffic allowed to reach the EC2 instances. You can configure inbound rules to permit specific IP addresses, ranges, or protocols (such as SSH for remote access or HTTP for web traffic)
- Outbound rules: these rules define the traffic allowed to leave the EC2 instances. These rules control the communication initiated by the instances.
A security group can be used with multiple EC2 instances and it can also reference another security group. Security groups are region/VPC specific which means that a security group created in ap-south-1 cannot be used in ap-northeast-3 region.
Connecting to EC2 instance
Primarily there are two ways of connecting to an EC2 instance.
- SSH: You can connect to the instance using SSH. To connect using SSH you need to prove your identity using a key value pair that we created when launching the instance.
- EC2 Instance Connect: Using this way, you can connect to the instance using browser based SSH client.
To view more options on how to connect to the instance. Click on “Connect” button after selecting the instance from the dashboard page.

Top comments (0)