
Software developers are lazy, and I mean that in a good way. I've been writing software since 1981, and professionally since 1995. In those almost 40 years, I have learned a thing or two about this profession. One of the most important is this: Developers don't like performing repetitive tasks. When we discover a task we have to do over and over again, we tend to invent a way to automate it. My latest repetitive task is generating screenshots for my mobile apps, prior to submitting them to the Apple App Store. The technique I outline in this post applies equally to Android, but the problem originated with the App Store. So that is my focus.
As I have written previously, I created a modest mobile game called Bravo!. It's written in TypeScript using the Ionic Framework. I recently upgraded it to Ionic 4 and replaced Cordova with Capacitor. It went pretty well, and I described the experience in another post. Once I finished, the next step was to submit the app to the Google Play and Apple App Stores. The Google submission went smoothly, but Apple rejected the new binary because I did not provide screenshots for the newer, larger iPhones.
In the past, I had always created these screenshots by running the app in the iOS simualtor, navigating to each page I wanted to show, and manually taking a screenshot. It occurred to me that there should be a way to automate this task. I also figured that the images don't need to be 100% pixel perfect for the App Store, and that a close approximation would probably do.
Fortunately Ionic/Angular apps include "out-of-the-box" support for everything I would need:
- Automated page navigation, provided by Protractor.
- Screen capture, also provided by Protractor.
- Mobile emulation, provided by Chrome.
It seemed like it should be a pretty simple task to put these things together and automate a screeshot of every page I want to display.
TLDR: If you're intersted in the final solution, my page object and protractor configuration files are shown below in their entirety.
Automate page navigation
First, I needed to determine whether I could launch to a specific page in my mobile app. That was easy enough, as Protractor gives you that almost free of charge. Here is the initial test code to launch my app's default screen and make sure its title is correct.
  describe('default screen', () => {
    beforeEach(() => {
      return page.navigateTo('/home');
    });
    it('should have a title saying Bravo', async () => {
      const title = await page.getPageOneTitleText();
      expect(title).toEqual('Bravo!');
    });
  });
And this is the code behind the page object that supports that navigation.
  navigateTo(destination) {
    return browser.get(destination);
  }
Screen capture
Next, could I take a screen capture of every page I navigate to? That, too, only required a few minutes of web searching to find the answer. Protractor's browser object has a method called takeScreenshot(), which returns a Promise<string>. The contents of the string when the promise resolves is the image data in PNG format, encoded with Base64. All that was left was to write the data to a local file. This code, which I added to my page object class, accomplishes that.
async takeScreenshot(destination: any) {
  const png = await browser.takeScreenshot();
  const deviceName = await this.getDeviceName();
  const fileName = `${deviceName}${destination}.png`.replace(/\//g, '-',);
  this.writeScreenShot(png, fileName);
}

async getDeviceName() {
  const config = await browser.getProcessedConfig();
  const capabilities = config.capabilities || {};
  const chromeOptions = capabilities.chromeOptions || { mobileEmulation: { device: 'browser' } };
  const mobileEmulation = chromeOptions.mobileEmulation || { device: 'browser' };
  const deviceName = mobileEmulation.device || mobileEmulation.deviceName || 'unknown';
  console.log('Test Device:', deviceName);

  return deviceName;
}

// abstract writing screen shot to a file
writeScreenShot(data, filename) {
  var stream = fs.createWriteStream(filename);
  stream.write(new Buffer(data, 'base64'));
  stream.end();
}
The takeScreenshot() function tells the browser to do its thing, and then retrieves the testing device name.
The getDeviceName() function grabs the Protractor configuration for the currently-executing test, and digs deep into it for the device name. The device name and the requested page (i.e, the destination parameter) are combined to generate a filename.
That filename, and the image data, are then sent to the writeScreenShot() function. Shout out to ng-book for providing that solution.
Granted, there is no error handling, or even a callback when it's done. It seems to do the right thing, and it will not be used as production code.
Here is the modified navigateTo() function.
  async navigateTo(destination) {
    await browser.get(destination);
    await this.takeScreenshot(destination);
  }
Now, any time one of my tests navigates to a page, Protractor will ask Chrome to take a screenshot, which will then be written to the root folder of my project. The image file's name will be a combination of the emulated device and the page being rendered.
At this point, you are probably curious about that emulated device.
Mobile Device Emulation
Finally, I needed to make sure my screenshots were of the appropriate size and appearance. Again, finding this information only took a few minutes, though I did run into one issue. Not all of the phones I need to screenshot are there.
You can get a list of all of the built-in named devices by opening the Chrome Developer Tools, then opening the Settings panel. Once there, click Devices on the left side.
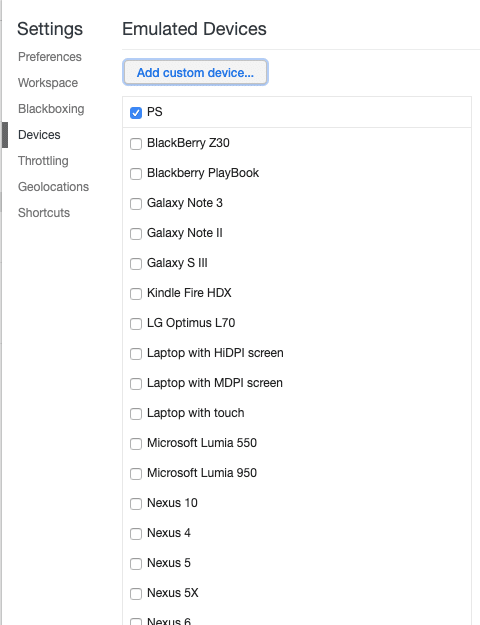
Any device listed here can be used by Protractor when driving Chrome as the test browser. Two of the three device sizes needed to submit to the App Store are already there.
- iPhone 6/7/8 Plus
- iPad Pro
Configuring Protractor to use these devices during tests is as simple as adding some JSON inside of protractor.conf.js, inside of the exports.config object. If this object already has a capabilities field, simply replace that with the multiCapabilities array, as shown below. Make sure you keep the existing capabilities object and add it to the multiCapabilities array.
  multiCapabilities: [
    {
      browserName: 'chrome',
      chromeOptions: {
        mobileEmulation: {
          'deviceName': 'iPhone 6/7/8 Plus'
        }
      }
    }, {
      browserName: 'chrome',
      chromeOptions: {
        mobileEmulation: {
          'deviceName': 'iPad Pro'
        }
      }
    }]
Unfortunately, the iPhone Xr is not one of the default devices in Chrome's database. That was remedied by creating a custom device with the appropriate capabilities and resolution.
According to Apple, the iPhone Xr has a pixel resolution of 1242 x 2688. However, it has a pixel ratio of 3.0. The Device Pixel Ratio (or dpr) is the relationship between a device's physical resolution to its logical resolution. That's a fancy way of saying that iPhone Xr reports itself as 414 x 896 pixels, but in reality the hardware is 1242 x 2688 (each measurment multiplied by its dpr).
That is a long-winded way of saying that those are the values I need to provide to Protractor under its chromOptions. Whereas for the other two phones, I simply needed to provide their names, for this one I need to create a custom device, and specify its metrics also.
browserName: 'chrome',
    chromeOptions: {
      args: ['--user-agent="Mozilla/5.0 (iPhone; CPU iPhone OS 8_0 like Mac OS X) AppleWebKit/600.1.3 (KHTML, like Gecko) Version/8.0 Mobile/12A4345d Safari/600.1.4"'],

      mobileEmulation: {
        "device": 'iPhone Xr',
        "deviceMetrics": {
          "width": 414,
          "height": 896,
          "pixelRatio": 3.0
        }
      }
    }
  }
I got the args by copying the settings from an iPhone X, and then providing the deviceMetrics for the iPhone Xr.
The Results
Once I had all of my devices specified in protractor.conf.ts, the only thing left was to create a test for each page, which simply navigated to that page. Once there, the screenshot would be taken and written automatically.
The results were excellent. I ended up with a folder full of images at the appropriate sizes.

From there, all I had to do was upload them to iTunes Connect, which I did successfully.
Conclusion
If you got this far, I hope you enjoyed it, and I hope that are able to use this information to your advantage.
This took me a few more hours than I expected, but I am pleased with the result.
I feel that more and more apps will end up as Progressive Web Apps (PWAs), and that jumping through these hoops with Apple will no longer be necessary. However, there will always be some who want their hybrid apps in the App Store. That will require screenshots, and maybe this post will make that less of a burdensome chore.
Below are the complete protractor.conf.js and app.po.ts files. Use them as you see fit.
protractor.conf.js
// Protractor configuration file, see link for more information
// https://github.com/angular/protractor/blob/master/lib/config.ts

const { SpecReporter } = require('jasmine-spec-reporter');

exports.config = {
  allScriptsTimeout: 11000,
  specs: [
    './src/**/*.e2e-spec.ts'
  ],
  multiCapabilities: [
    {
      browserName: 'chrome',
      chromeOptions: {
        mobileEmulation: {
          'deviceName': 'iPhone 6/7/8 Plus'
        }
      }
    }, {
      browserName: 'chrome',
      chromeOptions: {
        mobileEmulation: {
          'deviceName': 'iPad Pro'
        }
      }
    }, {
      browserName: 'chrome',
      chromeOptions: {
        mobileEmulation: {
          'deviceName': 'Galaxy S5'
        }
      }
    }, {
      browserName: 'chrome',
      chromeOptions: {
        args: ['--user-agent="Mozilla/5.0 (iPhone; CPU iPhone OS 8_0 like Mac OS X) AppleWebKit/600.1.3 (KHTML, like Gecko) Version/8.0 Mobile/12A4345d Safari/600.1.4"'],

        mobileEmulation: {
          "device": 'iPhone Xr',
          "deviceMetrics": {
            "width": 414,
            "height": 896,
            "pixelRatio": 3.0
          }
        }
      }
    }],
  directConnect: true,
  baseUrl: 'http://localhost:4200/',
  framework: 'jasmine',
  jasmineNodeOpts: {
    showColors: true,
    defaultTimeoutInterval: 30000,
    print: function () { }
  },
  onPrepare() {
    require('ts-node').register({
      project: require('path').join(__dirname, './tsconfig.e2e.json')
    });
    jasmine.getEnv().addReporter(new SpecReporter({ spec: { displayStacktrace: true } }));
  }
};
app.po.ts
import { browser, by, element } from 'protractor';
import * as fs from 'fs';

export class AppPage {
  async navigateTo(destination) {
    await browser.get(destination);
    await this.takeScreenshot(destination);
  }

  async takeScreenshot(destination: any) {
    const png = await browser.takeScreenshot();
    const deviceName = await this.getDeviceName();
    const fileName = `${deviceName}${destination}.png`.replace(/\//g, '-',);
    this.writeScreenShot(png, fileName);
  }

  async getDeviceName() {
    const config = await browser.getProcessedConfig();
    const capabilities = config.capabilities || {};
    const chromeOptions = capabilities.chromeOptions || { mobileEmulation: { device: 'browser' } };
    const mobileEmulation = chromeOptions.mobileEmulation || { device: 'browser' };
    const deviceName = mobileEmulation.device || mobileEmulation.deviceName || 'unknown';
    console.log('Test Device:', deviceName);

    return deviceName;
  }

  // abstract writing screen shot to a file
  writeScreenShot(data, filename) {
    var stream = fs.createWriteStream(filename);
    stream.write(new Buffer(data, 'base64'));
    stream.end();
  }

  getTitle() {
    return browser.getTitle();
  }

  getPageOneTitleText() {
    return element(by.tagName('app-instructions')).element(by.deepCss('ion-title')).getText();
  }
}
References
Feedback Appreciated
Do you have any comments or questions? Did I make any mistakes in this post? Let me know on Twitter. I'm @walkingriver.

Top comments (0)