Group Policy Management Editor'ün Dosya Yapısının İncelenmesi
Group Policy Nedir?
Group Policy, Active Directory ortamında bulunan kullanıcı ve bilgisayarların konfigürasyonlarını kontrol etmemizi sağlayan Windows yönetim özelliğidir.
Group Policy ile bütün birimler, siteler ve domainler tek ve merkezi bir yerden kontrol edilebilinir. Bu özellik tek tek bütün bilgisayarların konfigürasyonu yapılmadığı için zaman kazandırır.
Group Policy Management Editor Nedir?
Group Policy Management Editor, kullanıcıların diğer bilgisayar ve kullanıcıların konfigürasyon politikalarını değiştirmesini sağlayan Windows yönetici aracıdır.
Kullanıcı ve Bilgisayar olarak ikiye ayrılır.
Dosya Yapısının İncelenmesi
Group Policy Management Editor oluşturulurken " C:\Windows\PolicyDefinitions" dizininin altındaki ".admx" uzantılı dosyalar ve dil dizininin altındaki ".adml" uzantılı dosyalar kullanılır.
Yapılan değişiklikler "C:\Windows\SYSVOL\domain\Policies{uniqueId}" dizininin altındaki "Machine" ve "Users" dizinlerindeki "Registry.pol" dosyasına kaydedilir.
".admx" Uzantılı Dosyaların İncelenmesi
<?xml version="1.0" encoding="utf-8"?>
<!--  (c) 2006 Microsoft Corporation  -->
<policyDefinitions xmlns:xsd="http://www.w3.org/2001/XMLSchema" xmlns:xsi="http://www.w3.org/2001/XMLSchema-instance" revision="1.0" schemaVersion="1.0" xmlns="http://schemas.microsoft.com/GroupPolicy/2006/07/PolicyDefinitions">
  <policyNamespaces>
    <target prefix="diskquota" namespace="Microsoft.Policies.DiskQuota" />
    <using prefix="windows" namespace="Microsoft.Policies.Windows" />
  </policyNamespaces>
  <resources minRequiredRevision="1.0" />
  <categories>
    <category name="DiskQuota" displayName="$(string.DiskQuota)">
      <parentCategory ref="windows:System" />
    </category>
  </categories>
  <policies>
    <policy name="DQ_Enable" clientExtension="{3610eda5-77ef-11d2-8dc5-00c04fa31a66}" class="Machine" displayName="$(string.DQ_Enable)" explainText="$(string.DQ_Enable_Help)" key="Software\Policies\Microsoft\Windows NT\DiskQuota" valueName="Enable">
      <parentCategory ref="DiskQuota" />
      <supportedOn ref="windows:SUPPORTED_Win2k" />
      <enabledValue>
        <decimal value="1" />
      </enabledValue>
      <disabledValue>
        <decimal value="0" />
      </disabledValue>
    </policy>
    <policy name="DQ_Enforce" clientExtension="{3610eda5-77ef-11d2-8dc5-00c04fa31a66}" class="Machine" displayName="$(string.DQ_Enforce)" explainText="$(string.DQ_Enforce_Help)" key="Software\Policies\Microsoft\Windows NT\DiskQuota" valueName="Enforce">
      <parentCategory ref="DiskQuota" />
      <supportedOn ref="windows:SUPPORTED_Win2k" />
      <enabledValue>
        <decimal value="1" />
      </enabledValue>
      <disabledValue>
        <decimal value="0" />
      </disabledValue>
    </policy>
    <policy name="DQ_Limit" class="Machine" displayName="$(string.DQ_Limit)" explainText="$(string.DQ_Limit_Help)" presentation="$(presentation.DQ_Limit)" key="Software\Policies\Microsoft\Windows NT\DiskQuota">
      <parentCategory ref="DiskQuota" />
      <supportedOn ref="windows:SUPPORTED_Win2k" />
      <elements>
        <decimal id="DQ_LimitValue" clientExtension="{3610eda5-77ef-11d2-8dc5-00c04fa31a66}" valueName="Limit" required="true" maxValue="1000" />
        <enum id="DQ_LimitUnits" clientExtension="{3610eda5-77ef-11d2-8dc5-00c04fa31a66}" valueName="LimitUnits" required="true">
          <item displayName="$(string.DQ_UnitsKB)">
            <value>
              <decimal value="1" />
            </value>
          </item>
          <item displayName="$(string.DQ_UnitsMB)">
            <value>
              <decimal value="2" />
            </value>
          </item>
          <item displayName="$(string.DQ_UnitsGB)">
            <value>
              <decimal value="3" />
            </value>
          </item>
          <item displayName="$(string.DQ_UnitsTB)">
            <value>
              <decimal value="4" />
            </value>
          </item>
          <item displayName="$(string.DQ_UnitsPB)">
            <value>
              <decimal value="5" />
            </value>
          </item>
          <item displayName="$(string.DQ_UnitsEB)">
            <value>
              <decimal value="6" />
            </value>
          </item>
        </enum>
        <decimal id="DQ_ThresholdValue" clientExtension="{3610eda5-77ef-11d2-8dc5-00c04fa31a66}" valueName="Threshold" required="true" maxValue="1000" />
        <enum id="DQ_ThresholdUnits" clientExtension="{3610eda5-77ef-11d2-8dc5-00c04fa31a66}" valueName="ThresholdUnits" required="true">
          <item displayName="$(string.DQ_UnitsKB)">
            <value>
              <decimal value="1" />
            </value>
          </item>
          <item displayName="$(string.DQ_UnitsMB)">
            <value>
              <decimal value="2" />
            </value>
          </item>
          <item displayName="$(string.DQ_UnitsGB)">
            <value>
              <decimal value="3" />
            </value>
          </item>
          <item displayName="$(string.DQ_UnitsTB)">
            <value>
              <decimal value="4" />
            </value>
          </item>
          <item displayName="$(string.DQ_UnitsPB)">
            <value>
              <decimal value="5" />
            </value>
          </item>
          <item displayName="$(string.DQ_UnitsEB)">
            <value>
              <decimal value="6" />
            </value>
          </item>
        </enum>
      </elements>
    </policy>
    <policy name="DQ_LogEventOverLimit" clientExtension="{3610eda5-77ef-11d2-8dc5-00c04fa31a66}" class="Machine" displayName="$(string.DQ_LogEventOverLimit)" explainText="$(string.DQ_LogEventOverLimit_Help)" key="Software\Policies\Microsoft\Windows NT\DiskQuota" valueName="LogEventOverLimit">
      <parentCategory ref="DiskQuota" />
      <supportedOn ref="windows:SUPPORTED_Win2k" />
      <enabledValue>
        <decimal value="1" />
      </enabledValue>
      <disabledValue>
        <decimal value="0" />
      </disabledValue>
    </policy>
    <policy name="DQ_LogEventOverThreshold" clientExtension="{3610eda5-77ef-11d2-8dc5-00c04fa31a66}" class="Machine" displayName="$(string.DQ_LogEventOverThreshold)" explainText="$(string.DQ_LogEventOverThreshold_Help)" key="Software\Policies\Microsoft\Windows NT\DiskQuota" valueName="LogEventOverThreshold">
      <parentCategory ref="DiskQuota" />
      <supportedOn ref="windows:SUPPORTED_Win2k" />
      <enabledValue>
        <decimal value="1" />
      </enabledValue>
      <disabledValue>
        <decimal value="0" />
      </disabledValue>
    </policy>
    <policy name="DQ_RemovableMedia" clientExtension="{3610eda5-77ef-11d2-8dc5-00c04fa31a66}" class="Machine" displayName="$(string.DQ_RemovableMedia)" explainText="$(string.DQ_RemovableMedia_Help)" key="Software\Policies\Microsoft\Windows NT\DiskQuota" valueName="ApplyToRemovableMedia">
      <parentCategory ref="DiskQuota" />
      <supportedOn ref="windows:SUPPORTED_Win2k" />
    </policy>
  </policies>
</policyDefinitions>
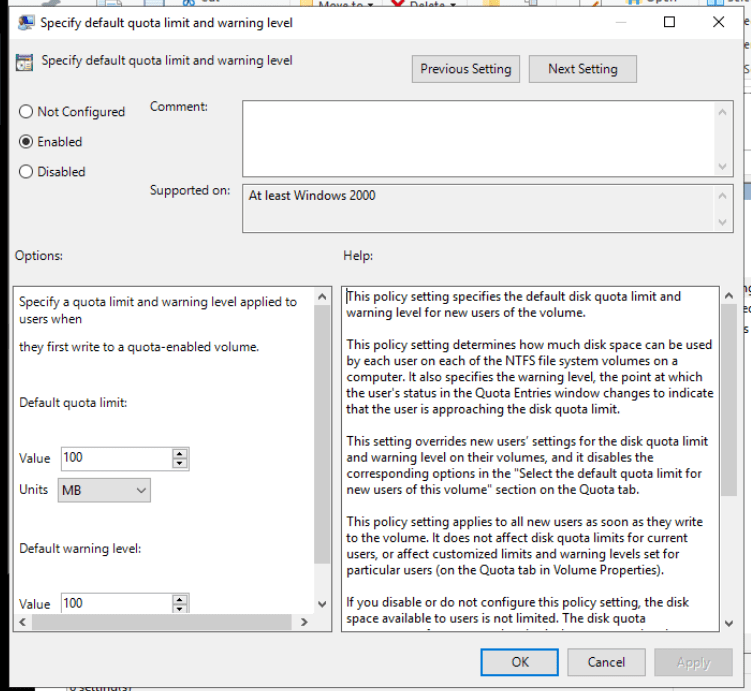
Yukarıda gördüğünüz "DiskQuota.admx" dosyasındandaki "policy/elements" altındaki tag'ler ile "Options" kısmı oluşturulmaktadır. Bu kısmda oluşacak girdi tipleri, girdilerin özellikleri gibi bilgiler bulunur. İstenilen ayarlar "key" ve "valueName" ile bulunabilinir. Bazı "policy" tag'lerinin altında elements bulunmamaktadır. Bu durumda "Options" kısmı oluşturulmaz. Alınan değer üste bulunan "Not Configured", "Enabled" yada "Disabled" butonları ile belirlenir.
".adml" Uzantılı Dosyaların İncelenmesi
<?xml version="1.0" encoding="utf-8"?>
<!--  (c) 2006 Microsoft Corporation  -->
<policyDefinitionResources xmlns:xsd="http://www.w3.org/2001/XMLSchema"
      xmlns:xsi="http://www.w3.org/2001/XMLSchema-instance" revision="1.0" schemaVersion="1.0"
      xmlns="http://schemas.microsoft.com/GroupPolicy/2006/07/PolicyDefinitions">
      <displayName>enter display name here</displayName>
      <description>enter description here</description>
      <resources>
            <stringTable>
                  <string id="DiskQuota">Disk Quotas</string>
                  <string id="DQ_Enable">Enable disk quotas</string>
                  <string id="DQ_Enable_Help">This policy setting turns on and turns off disk quota management on all NTFS volumes of the computer, and prevents users from changing the setting.

                        If you enable this policy setting, disk quota management is turned on, and users cannot turn it off.

                        If you disable the policy setting, disk quota management is turned off, and users cannot turn it on.

                        If this policy setting is not configured, disk quota management is turned off by default, but administrators can turn it on.

                        To prevent users from changing the setting while a setting is in effect, the system disables the "Enable quota management" option on the Quota tab of NTFS volumes.

                        Note: This policy setting turns on disk quota management but does not establish or enforce a particular disk quota limit. To specify a disk quota limit, use the "Default quota limit and warning level" policy setting. Otherwise, the system uses the physical space on the volume as the quota limit.

                        Note: To turn on or turn off disk quota management without specifying a setting, in My Computer, right-click the name of an NTFS volume, click Properties, click the Quota tab, and then click "Enable quota management."</string>
                  <string id="DQ_Enforce">Enforce disk quota limit</string>
                  <string id="DQ_Enforce_Help">This policy setting determines whether disk quota limits are enforced and prevents users from changing the setting.

                        If you enable this policy setting, disk quota limits are enforced. If you disable this policy setting, disk quota limits are not enforced. When you enable or disable this policy setting, the system disables the "Deny disk space to users exceeding quota limit" option on the Quota tab so administrators cannot make changes while the setting is in effect.

                        If you do not configure this policy setting, the disk quota limit is not enforced by default, but administrators can change the setting.

                        Enforcement is optional. When users reach an enforced disk quota limit, the system responds as though the physical space on the volume were exhausted. When users reach an unenforced limit, their status in the Quota Entries window changes, but they can continue to write to the volume as long as physical space is available.

                        Note: This policy setting overrides user settings that enable or disable quota enforcement on their volumes.

                        Note: To specify a disk quota limit, use the "Default quota limit and warning level" policy setting. Otherwise, the system uses the physical space on the volume as the quota limit.</string>
                  <string id="DQ_Limit">Specify default quota limit and warning level</string>
                  <string id="DQ_Limit_Help">This policy setting specifies the default disk quota limit and warning level for new users of the volume.

                        This policy setting determines how much disk space can be used by each user on each of the NTFS file system volumes on a computer. It also specifies the warning level, the point at which the user's status in the Quota Entries window changes to indicate that the user is approaching the disk quota limit.

                        This setting overrides new users’ settings for the disk quota limit and warning level on their volumes, and it disables the corresponding options in the "Select the default quota limit for new users of this volume" section on the Quota tab.

                        This policy setting applies to all new users as soon as they write to the volume. It does not affect disk quota limits for current users, or affect customized limits and warning levels set for particular users (on the Quota tab in Volume Properties).

                        If you disable or do not configure this policy setting, the disk space available to users is not limited. The disk quota management feature uses the physical space on each volume as its quota limit and warning level.

                        When you select a limit, remember that the same limit applies to all users on all volumes, regardless of actual volume size. Be sure to set the limit and warning level so that it is reasonable for the range of volumes in the group.

                        This policy setting is effective only when disk quota management is enabled on the volume. Also, if disk quotas are not enforced, users can exceed the quota limit you set. When users reach the quota limit, their status in the Quota Entries window changes, but users can continue to write to the volume.</string>
                  <string id="DQ_LogEventOverLimit">Log event when quota limit is exceeded</string>
                  <string id="DQ_LogEventOverLimit_Help">This policy setting determines whether the system records an event in the local Application log when users reach their disk quota limit on a volume, and prevents users from changing the logging setting.

                        If you enable this policy setting, the system records an event when the user reaches their limit. If you disable this policy setting, no event is recorded. Also, when you enable or disable this policy setting, the system disables the "Log event when a user exceeds their quota limit" option on the Quota tab, so administrators cannot change the setting while a setting is in effect.

                        If you do not configure this policy setting, no events are recorded, but administrators can use the Quota tab option to change the setting.

                        This policy setting is independent of the enforcement policy settings for disk quotas. As a result, you can direct the system to log an event, regardless of whether or not you choose to enforce the disk quota limit.

                        Also, this policy setting does not affect the Quota Entries window on the Quota tab. Even without the logged event, users can detect that they have reached their limit, because their status in the Quota Entries window changes.

                        Note: To find the logging option, in My Computer, right-click the name of an NTFS file system volume, click Properties, and then click the Quota tab.</string>
                  <string id="DQ_LogEventOverThreshold">Log event when quota warning level is exceeded</string>
                  <string id="DQ_LogEventOverThreshold_Help">This policy setting determines whether the system records an event in the Application log when users reach their disk quota warning level on a volume.

                        If you enable this policy setting, the system records an event. If you disable this policy setting, no event is recorded. When you enable or disable this policy setting, the system disables the corresponding "Log event when a user exceeds their warning level" option on the Quota tab so that administrators cannot change logging while a policy setting is in effect.

                        If you do not configure this policy setting, no event is recorded, but administrators can use the Quota tab option to change the logging setting.

                        This policy setting does not affect the Quota Entries window on the Quota tab. Even without the logged event, users can detect that they have reached their warning level because their status in the Quota Entries window changes.

                        Note: To find the logging option, in My Computer, right-click the name of an NTFS file system volume, click Properties, and then click the Quota tab.</string>
                  <string id="DQ_RemovableMedia">Apply policy to removable media</string>
                  <string id="DQ_RemovableMedia_Help">This policy setting extends the disk quota policies in this folder to NTFS file system volumes on removable media.

                        If you disable or do not configure this policy setting, the disk quota policies established in this folder apply to fixed-media NTFS volumes only. Note: When this policy setting is applied, the computer will apply the disk quota to both fixed and removable media.</string>
                  <string id="DQ_UnitsEB">EB</string>
                  <string id="DQ_UnitsGB">GB</string>
                  <string id="DQ_UnitsKB">KB</string>
                  <string id="DQ_UnitsMB">MB</string>
                  <string id="DQ_UnitsPB">PB</string>
                  <string id="DQ_UnitsTB">TB</string>***".adml"***
            </stringTable>
            <presentationTable>
                  <presentation id="DQ_Limit">
                        <text>Specify a quota limit and warning level applied to users when</text>
                        <text>they first write to a quota-enabled volume.</text>
                        <text></text>
                        <text>Default quota limit:</text>
                        <text></text>
                        <decimalTextBox refId="DQ_LimitValue" defaultValue="100" spinStep="10">Value</decimalTextBox>
                        <dropdownList refId="DQ_LimitUnits" noSort="true" defaultItem="1">Units</dropdownList>
                        <text></text>
                        <text>Default warning level:</text>
                        <text></text>
                        <decimalTextBox refId="DQ_ThresholdValue" defaultValue="100" spinStep="10">Value</decimalTextBox>
                        <dropdownList refId="DQ_ThresholdUnits" noSort="true" defaultItem="1">Units</dropdownList>
                  </presentation>
            </presentationTable>
      </resources>
</policyDefinitionResources>
Dikkat ettiyseniz ".admx" uzantılı dosyalarda editörde görmüş olduğunuz yazılar bulunmamaktadır. Bu yazılar seçilen dile göre oluşturulmuş olan ".adml" dosyalarında bulunur. ".adml" dosyasında bizim inceleyeceğimiz kısım "resources" tag'i altında bulunan tag'lerdir. "enum" gibi girdilerde "stringTable" altındaki "string"ler, "id" ler aracılığıyla bulunabilir ve ilgili kısmıdaki değerin karşılığı olan görsel ad olarak gösterilebilir(Örneğin "GB" olarak gördüğünüz giridnin karşılığı aslında "2" değeridir).
"presentationTable" altındaki "presentation" tagi bize options kısmındaki yazıları ve girdilerdeki bazı özellikleri belirtmektedir. İstenilen "presentation" id'ye göre seçilir ve refId'ler ".admx" uzantılı dosyalardaki id'ler ile eşleştirilerek "Options" kısmı oluşturulur.
"Registry.pol" Dosyasının İncelenmesi
"Registry.pol" dosyası yaptığımız değişikliklerin kaydedildiği dosyadır. Bu dosyadan her "Unique Id" için "Machine" ve "User" dosyaları altında birer adet bulunur. "Registry.pol" dosyası binrary formatında okunulması önerilse de basitçe "NotePad" kullanarak açıp okumayı deneyebilirsiniz.
b'PReg\x01\x00\x00\x00[\x00S\x00o\x00f\x00t\x00w\x00a\x00r\x00e\x00\\\x00P\x00o\xDataDirector00l\x00i\x00c\x00i\x00e\x00s\x00\\\x00M\x00i\x00c\x00r\x00o\x00s\x00o\x00f\x00t\x00\\\x00W\x00i\x00n\x00d\x00o\x00w\x00s\x00\\\x00W\x00i\x00n\x00d\x00o\x00w\x00s\x00 \x00S\x00e\x00a\x00r\x00c\x00h\x00\x00\x00;\x00D\x00a\x00t\x00a\x00D\x00i\x00r\x00e\x00c\x00t\x00o\x00r\x00y\x00\x00\x00;\x00\x01\x00\x00\x00;\x00\n\x00\x00\x00;\x00m\x00e\x00t\x00e\x00\x00\x00]\x00[\x00S\x00o\x00f\x00t\x00w\x00a\x00r\x00e\x00\\\x00P\x00o\x00l\x00i\x00c\x00i\x00e\x00s\x00\\\x00M\x00i\x00c\x00r\x00o\x00s\x00o\x00f\x00t\x00\\\x00W\x00i\x00n\x00d\x00o\x00w\x00s\x00 \x00N\x00T\x00\\\x00D\x00i\x00s\x00k\x00Q\x00u\x00o\x00t\x00a\x00\x00\x00;\x00L\x00i\x00m\x00i\x00t\x00\x00\x00;\x00\x04\x00\x00\x00;\x00\x04\x00\x00\x00;\x00d\x00\x00\x00]\x00[\x00S\x00o\x00f\x00t\x00w\x00a\x00r\x00e\x00\\\x00P\x00o\x00l\x00i\x00c\x00i\x00e\x00s\x00\\\x00M\x00i\x00c\x00r\x00o\x00s\x00o\x00f\x00t\x00\\\x00W\x00i\x00n\x00d\x00o\x00w\x00s\x00 \x00N\x00T\x00\\\x00D\x00i\x00s\x00k\x00Q\x00u\x00o\x00t\x00a\x00\x00\x00;\x00L\x00i\x00m\x00i\x00t\x00U\x00n\x00i\x00t\x00s\x00\x00\x00;\x00\x04\x00\x00\x00;\x00\x04\x00\x00\x00;\x00\x01\x00\x00\x00]\x00[\x00S\x00o\x00f\x00t\x00w\x00a\x00r\x00e\x00\\\x00P\x00o\x00l\x00i\x00c\x00i\x00e\x00s\x00\\\x00M\x00i\x00c\x00r\x00o\x00s\x00o\x00f\x00t\x00\\\x00W\x00i\x00n\x00d\x00o\x00w\x00s\x00 \x00N\x00T\x00\\\x00D\x00i\x00s\x00k\x00Q\x00u\x00o\x00t\x00a\x00\x00\x00;\x00T\x00h\x00r\x00e\x00s\x00h\x00o\x00l\x00d\x00\x00\x00;\x00\x04\x00\x00\x00;\x00\x04\x00\x00\x00;\x00d\x00\x00\x00]\x00[\x00S\x00o\x00f\x00t\x00w\x00a\x00r\x00e\x00\\\x00P\x00o\x00l\x00i\x00c\x00i\x00e\x00s\x00\\\x00M\x00i\x00c\x00r\x00o\x00s\x00o\x00f\x00t\x00\\\x00W\x00i\x00n\x00d\x00o\x00w\x00s\x00 \x00N\x00T\x00\\\x00D\x00i\x00s\x00k\x00Q\x00u\x00o\x00t\x00a\x00\x00\x00;\x00T\x00h\x00r\x00e\x00s\x00h\x00o\x00l\x00d\x00U\x00n\x00i\x00t\x00s\x00\x00\x00;\x00\x04\x00\x00\x00;\x00\x04\x00\x00\x00;\x00\x01\x00\x00\x00]\x00[\x00S\x00o\x00f\x00t\x00w\x00a\x00r\x00e\x00\\\x00P\x00o\x00l\x00i\x00c\x00i\x00e\x00s\x00\\\x00M\x00i\x00c\x00r\x00o\x00s\x00o\x00f\x00t\x00\\\x00W\x00i\x00n\x00d\x00o\x00w\x00s\x00 \x00N\x00T\x00\\\x00D\x00i\x00s\x00k\x00Q\x00u\x00o\x00t\x00a\x00\x00\x00;\x00E\x00n\x00a\x00b\x00l\x00e\x00\x00\x00;\x00\x04\x00\x00\x00;\x00\x04\x00\x00\x00;\x00\x00\x00\x00\x00]\x00'
Editorde değişiklik yaptıktan sonra dosyayı ikilik(binrary) formatında okutmayı denediğinizde yukarıdaki yazıya benzer bir yazı ile karşılaşacaksınız. İlk başta karışık gelse de okuması kolay bir formatta yazılmıştır.
Dosya "PReg\x01\x00\x00\x00" ifadesi ile başlar. Sonrasında "[]" içerisinde değerler yazılır. Aralıklara "\x00" biti konulur.
[\x00S\x00o\x00f\x00t\x00w\x00a\x00r\x00e\x00\\\x00P\x00o\x00l\x00i\x00c\x00i\x00e\x00s\x00\\\x00M\x00i\x00c\x00r\x00o\x00s\x00o\x00f\x00t\x00\\\x00W\x00i\x00n\x00d\x00o\x00w\x00s\x00\\\x00W\x00i\x00n\x00d\x00o\x00w\x00s\x00 \x00S\x00e\x00a\x00r\x00c\x00h\x00\x00\x00;\x00D\x00a\x00t\x00a\x00D\x00i\x00r\x00e\x00c\x00t\x00o\x00r\x00y\x00\x00\x00;\x00\x01\x00\x00\x00;\x00\n\x00\x00\x00;\x00m\x00e\x00t\x00e\x00\x00\x00]
Yazısı kaydedilen ilk değeri ifade etmektedir. Bu ifadede köşeli parentezleri atıp noktalı virgülle ayırıp "\x00"ları attığımızda:
- Software\Policies\Microsoft\Windows\Windows Search
- DataDirectory
- \x01
- \n
- mete
Değerlei ortaya çıkar. İlk başta "NotePad" ile dosyası açtıysanız bu yazılara benzer yazılar görmüş olmalısınız. Ancak "\x01" yada "\n" gibi ifadeleri muhtemelen görememişsinizdir. Bunun nedeni "NotePad"'in bu karakterleri kullanıcının anlayacağı şekilde yorumlamaya çalışmasıdır. Şimdi bu değleri inceleyelim.
"Registry.pol" dosyasında her değer "\x00" byte'ı ile başlar. "Software\Policies\Microsoft\Windows\Windows Search" değeri politikamızın anahtarıdır. Bu anahtar aracılığı ile bu değerin hangi dizinde olduğu belirtilir.
"DataDirectory" değeri politikamızın id'sidir. Bu id aracılığıyla ".admx" ve ".adml" dosyalarındaki bize gerekli kısımları alabiliriz.
"\x01" veri tipini ifade eder. Ancak bu değeri tek başına bu şekilde almak değer 255'i geçince bizi hataya götürür. Tam sayı değerler dörder bit olarak okunmalıdır. "\x01\x00\x00\x00" şeklinde soldan sağa okuduğumuzda değerin ASCII karşılığında denk gelen sayıyı aldığımızda "1" değeri çıkar. Bu bize değer tipinin "REG_BINRARY" olduğunu gösterir(Karakter tipleri hakkında daha ayrıntılı bilgi için bu yazıyı okuyun.).
"\n\x00\x00\x00" değeri bize kaydedilen değerin boyutunu ifade eder. ASCII'de karşılığı "10"dur.
Son olarak "mete" değeri kaydedilen değerdir. Eğer karakter tipi "REG_BINRARY" değil "REG_DWORD" olsaydı karakter tipi yada boyutu gibi okumaya çalışacaktık.
Durum Değişiklikleri
Yaptığınız ayarı "Enabled" yada "Disabled" durumundan "Not Configured" durumuna getirip tekrar "Registry.pol" dosyasını okuduğunuzda o değerin silinmiş olduğunu görürsünüz. Bunun nedeni konfigüre edilmemiş ve varsayılan değerinde bulunan politikalarının kaydedilmemesidir.
"Disabled" durumunda da politika dosyaya yazılır. Ancak id'nin başına "\x00*\x00*\x00d\x00e\x00l\x00." ifade eklenir ve kaydedilen değer yerine boşluk yazılır. Tekrar "Enable" durmuna getirildiğinde "**del" ifadesi kalkar ve istenilen değer yazılır.

Top comments (0)