


Experiment Description: The device terminal will continuously collect light data and uploads it to the cloud for monitoring, and also uploads the status of the current LED (street light). The status of the LED will be turned on and off based on the light value.
For example, the LED turns on when the light value falls below the light threshold we set (at night) and turns off the LED when the light is above the (daytime) light threshold. In addition, the cloud can remotely control the LED light off, to achieve a remote control role.
1. Create RT-Thread Engineering
- Hardware:BearPi
- Software:RT-Thread Opensource IoT operating system
- IDE:RT-Thread Studio V1.1.0
RT-Thread has provides 200+ software packages for developers. In this case we need to use BH1750 package, OneNet package, at_device package, cjson package, webclient package, pahomqtt package.
How to quickly add packages by using the RT-Thread Studio IDE, please refer to HERE.
2. Application Code
2.1 Test the Function.
int onenet_upload_example(void)
{
  rt_thread_t tid;

  /* onenet Initialization */
  onenet_mqtt_init();

  /* Binding led command to respond the callback function.*/
  onenet_set_cmd_rsp_cb(onenet_ledcmd_rsp_cb);

  /* Create an onenet data upload task.  */
  tid = rt_thread_create("onenet_upload",
           onenet_upload_entry,
              RT_NULL,
              2048,
              10,
              5);
  if (tid)
    rt_thread_startup(tid);

  return 0;
}
MSH_CMD_EXPORT(onenet_upload_example, send data to OneNET cloud cycle);
First, initialize the onenet, the initialization interface is provided on the onenet package.
Then Register a callback function via y onenet_set_cmd_rsp_cb, which is represented by onenet_ledcmd_rsp_cb, and when the led command is issued by onenet, the callback function performs the relevant operation on LED.
Third, create a thread for onenet data upload.
Finally, the function is exported as a command so that we can enter theonenet_upload_examplecommand on the command line.
2.2 LED command responds the callback function.
static void onenet_ledcmd_rsp_cb(uint8_t *recv_data, size_t recv_size, uint8_t **resp_data, size_t *resp_size)
{
    char res_buf[20] = {0};
    char recv_buf[5] = {0};

    LOG_D("recv data is %.*s\n", recv_size, recv_data);

    if (!strncmp((char*)recv_data, "ledon", 5))
    {
        rt_pin_write(SC1_LED_PIN, SC1_LED_ON);
        rt_snprintf(res_buf, sizeof(res_buf), "led is on");
        rt_kprintf("led is on\n");
    }
    else if(!strcmp((char*)recv_data, "ledoff", 5))
    {
        rt_pin_write(SC1_LED_PIN, SC1_LED_OFF);
        rt_snprintf(res_buf, sizeof(res_buf), "led is off");
        rt_kprintf("led is off\n");
    }
    else
    {
        rt_kprintf("ledcmd ERROR!\n");
    }

    /* user have to malloc memory for response data */
    *resp_data = (uint8_t *) rt_malloc(strlen(res_buf));

    strncpy((char *)*resp_data, res_buf, strlen(res_buf));

    *resp_size = strlen(res_buf);
}
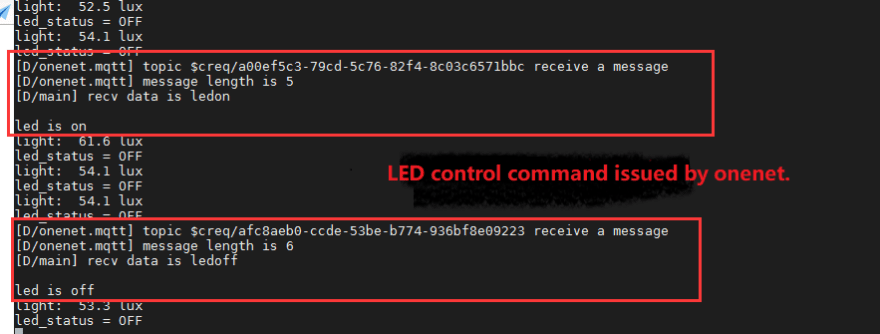
After we receive the command from onenet, the required action is placed here. For example, when our device receives a ledon string, turn on the LED and print a prompt. Finally, the led is on message is answered to onenet.
2.3 Uploading data.
/* Upload date to onenet */
static void onenet_upload_entry(void *parameter)
{
    rt_device_t dev = RT_NULL;
    struct rt_sensor_data data;
    rt_size_t res;
    char led_status = SC1_LED_OFF;
    char send_buf[32] = {0};

    /* Set the pin of the highlighted LED to output mode. */
    rt_pin_mode(SC1_LED_PIN, PIN_MODE_OUTPUT);

    /* Looking up bh1750 sensor */
    dev = rt_device_find("li_bh1750");
    if (dev == RT_NULL)
    {
        rt_kprintf("Can't find device:li_bh1750\n");
        return;
    }

    /* Open bh1750 in read-only mode. */
    if (rt_device_open(dev, RT_DEVICE_FLAG_RDONLY) != RT_EOK)
    {
        rt_kprintf("open device failed!");
        return;
    }

    while (1)
    {
        /* Read a data from the sensor. */
        res = rt_device_read(dev, 0, &data, 1);
        if (1 != res)
        {
            rt_kprintf("read data failed!size is %d", res);
        }
        else
        {
            rt_kprintf("light:%4d.%d lux\n", data.data.light / 10, data.data.light % 10);
            rt_sprintf(send_buf,"%4d.%d", data.data.light / 10, data.data.light % 10);
        }

        /* The highlight LED light automatically turns on and off according to the light value. */
        if (data.data.light / 10 <= 40)
        {
            rt_pin_write(SC1_LED_PIN, SC1_LED_ON);
            led_status = SC1_LED_ON;
            rt_kprintf("led_status = ON\n");
        }
        else
        {
            rt_pin_write(SC1_LED_PIN, SC1_LED_OFF);
            led_status = SC1_LED_OFF;
            rt_kprintf("led_status = OFF\n");
        }

        /* Upload light date to onenet */
        if (onenet_mqtt_upload_string("light", (const char*)send_buf) < 0)
        {
            LOG_E("upload has an error, stop uploading");
            break;
        }

        /* Upload the status of the highlight led light to onenet.  */
        if (onenet_mqtt_upload_string("led_status", (const char*)ledsta_str[led_status]) < 0)
        {
            LOG_E("upload has an error, stop uploading");
            break;
        }

        rt_thread_delay(rt_tick_from_millisecond(3 * 1000));
    }
    rt_device_close(dev);
}
This is our upload task: read the light value collected by the BH1750 sensor and upload it to the onenet via the onenet_mqtt_upload_string interface.
At the same time, the status of the LED is automatically turned on/off according to the result of the light value, and the status of LED is transmitted to onenet via the onenet_mqtt_upload_string interface.
3. OneNET
3.1 Create a web application.

Experiment Result


DEMO Presentation Video, please visit RT-Thread YouTube channel.
Thanks to RT-Thread community developer #ZhengNL created and contributed this project.
RT-Thread Contact Info:

Top comments (0)