
In today's digital landscape, web applications prioritize user access security and responsible data management. Often, users seek swift access to a program without creating and managing a new account. Meanwhile, app proprietors compel user registration for the purpose of monitoring and obtaining feedback. To access these statistics, users must sign up with their email addresses. Integrating user authentication services such as Google Login has become an increasingly common and convenient way to achieve this balance.
Prerequisites
Before proceeding with this tutorial, you should have a solid understanding of React and basic knowledge of npm, Node.js, etc.
Create A React Project
Begin by creating a React project using the following command:
npx create-react-app google-react-app
Installing Dependencies
To utilize the Google login package, first install it. To install the package, run the command below:
$ npm install @react-oauth/google@latest
After installation, our application will be wrapped with the <GoogleOAuthProvider> and we will provide our google web client ID at a later stage. This will enable our entire React application to access the GoogleAuth provider at one time.
Inside our index.js file, we'll wrap the application as follows:
import React from 'react';
import ReactDOM from 'react-dom/client';
import App from './App';
import { GoogleOAuthProvider } from '@react-oauth/google';
const root = ReactDOM.createRoot(document.getElementById('root'));
root.render(
  <GoogleOAuthProvider clientId='//Google Client ID'>
  <React.StrictMode>
    <App />
  </React.StrictMode>
  </GoogleOAuthProvider>
);
The module, like every other installed package in React, must be imported before it can be utilized. So, head to the App.js file in your React app, and paste the code below:
import { GoogleLogin } from '@react-oauth/google';
import './App.css';
function App() {
const responseMessage = (response) => {
console.log(response);
};
const errorMessage = (error) => {
console.log(error);
};
return (
<div className='App' >
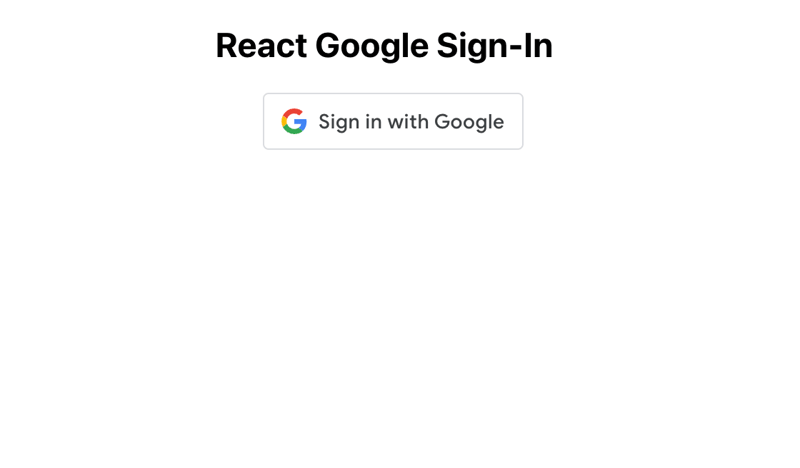
<h2>React Google Sign-In</h2>
<GoogleLogin
className="sign"
onSuccess={credentialResponse => {
console.log(credentialResponse);
}}
onError={() => {
console.log('Login Failed');
}}
/> </div>
);
}
export default App;
From the code provided above, we imported the GoogleLogin module from @react-oauth/google and used it in our component. Next, we define functions to handle both response and error messages from the sign-in process and render a Google Sign-In button. The button triggers these functions and logs the responses or errors to the console.
Our App seems ready but we cannot initate a sign-in with google OAuth without create a google client id for our App, and that’s what we’ll be doing next.
Setting up Google Sign-In
To use Google Sign-In, we need to install the @react-oauth/google package, Google's new Identity Services SDK, which enables us to add Google login functionality to our React project. To make our Google Sign-In page fully functional, we first need to set up our project on Google Cloud and obtain our credentials.
Obtaining a Google OAuth Client ID
What is a Client ID?
A Google Client ID (or ClientID) is a unique identifier that is assigned to an application/user. It is used to authenticate clients and servers using OAuth (Auth 2.0).
To get a Google Client ID, open the Google Cloud Console, and start a new project. For this tutorial, we'll name the project "GoogleReact Sign-In," but you can choose any name you prefer.
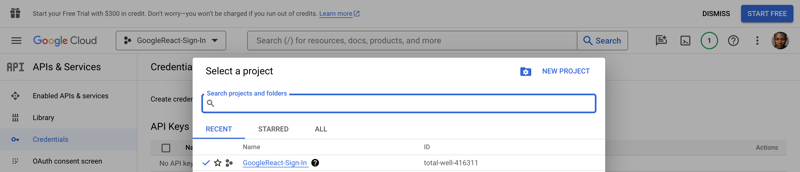
After creating the project, navigate to the Credentials section in the API and Services menu. Here, you will find a dashboard where your current project name should be visible in the top-left corner, close to the Google Cloud logo.

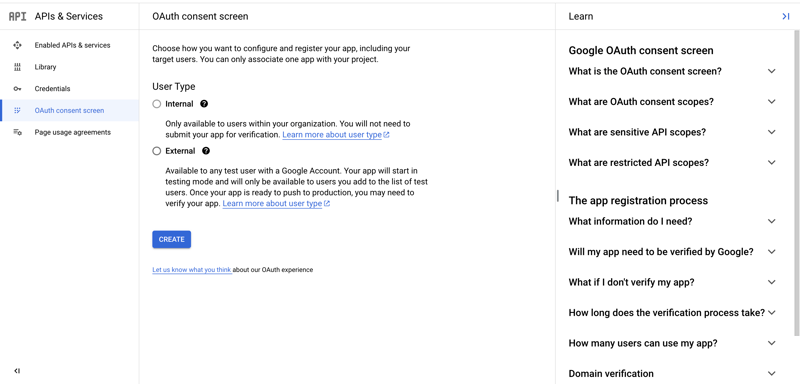
Now, before you create your credentials, let's go over to the OAuth consent screen to set up the consent screen.
Set up a Google Sign-In Consent Screen.
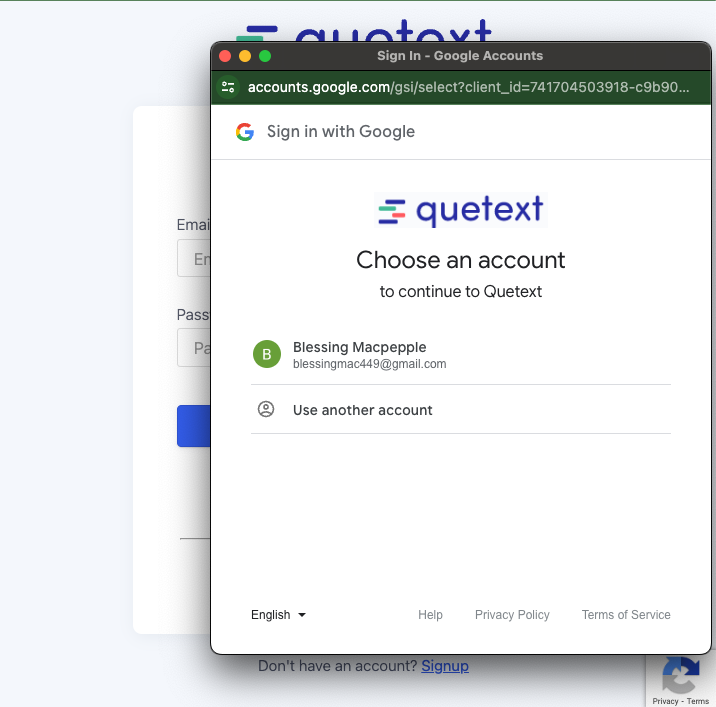
The consent screen, as the name implies, is a page that requires the user to log in via an external or third party library. This popup informs the user that they are leaving your app's root page and granting access to a third-party page. example of a Google Sign-In consent screen shown below
Simply put, when you utilize OAuth 2.0 for authorization, your app asks the user to authorize one or more scopes of access using their Google account. Scopes of access include any information or activities that your app is authorized to access or do on the user's account.
To set up the Google consent page for your React app, navigate to the "OAuth consent screen" tab on the left-hand menu of your Google Cloud Console.
Once in this tab, select “external” the only option allowed unless you are using a Google-verified company or application, then click the “Create” button to generate your consent screen.
Next, under the same page, Provide a name for your application and an email address to receive updates on the status of the project.
You can leave the remaining needs and options blank for now, but if you have the details available, you can add them during this phase.
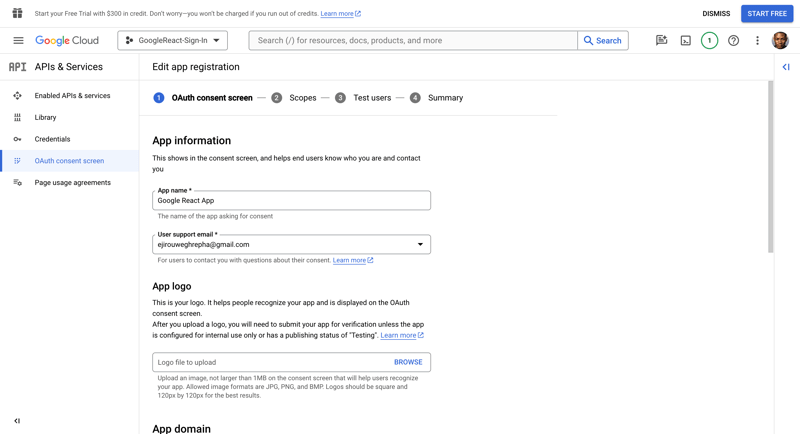
For the time being, you can skip the remaining registration sections. Simply scroll down in each section, click Save, and then return to the dashboard once completed.
After designing the OAuth consent page, we must publish the app before we experiment with it or ensuring that authentication works. By default, its state is “Testing," and after publishing, it is moved to production.
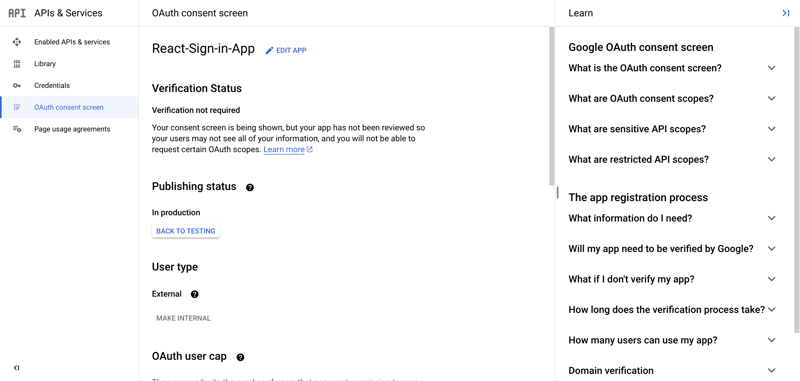
Once you've marked your app as "In production," it will be accessible to everyone with a Google account.
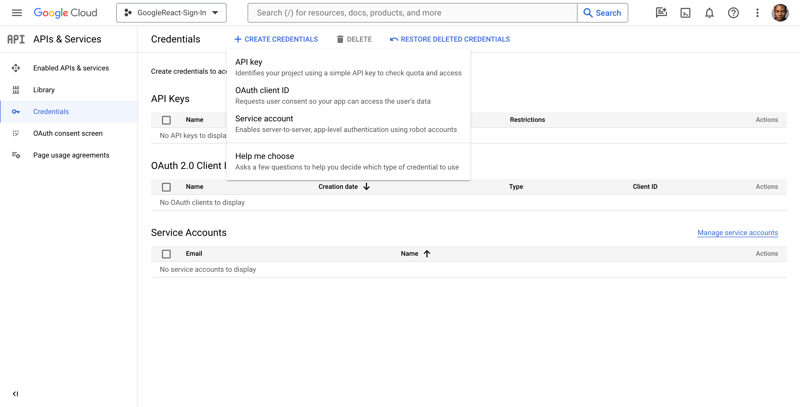
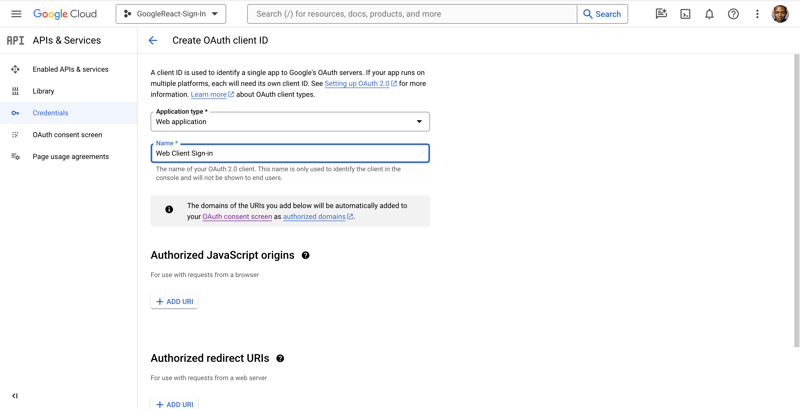
Generate your web client ID.
Now, we’ll go back to the Credential’s option to access the page where you can create your web client ID.
On the screen, select CREATE CREDENTIALS at the top of the page, and then click the OAuth client ID.
You will be asked to choose an application type as we have below. Go for Web application If you are following these steps for React (we are using the Google client ID for web).
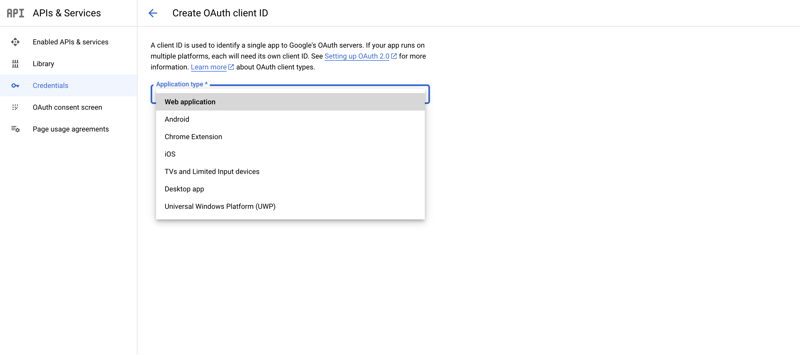
Next, we'll pick a name for our client ID to identify or specify the specific ID link to a single app, this name is used. To distinguish between web, iOS, and Android IDs, we can put "Web ID," "Android ID," "iOS ID," and so on in their naming conventions:
Following that, we'll introduce two types of URLs: authorized JavaScript origins and authorized redirect URLs.
The “Authorized JavaScript origins URL” is the URL that your application logs in from. For React developers, it’s localhost (localhost:3000) or your hosted URL if you’ve hosted your app.
The “Authorized redirect URL” is the link that Google will return the user to after you’ve successfully logged them in. For instance, you might return them to your original link or redirect them to a different link. You’ll need to add the URL here.
Add the following URLs to the authorized javaScript origins and authorized redirect URLs: http://localhost:3000 and http://localhost, respectively:
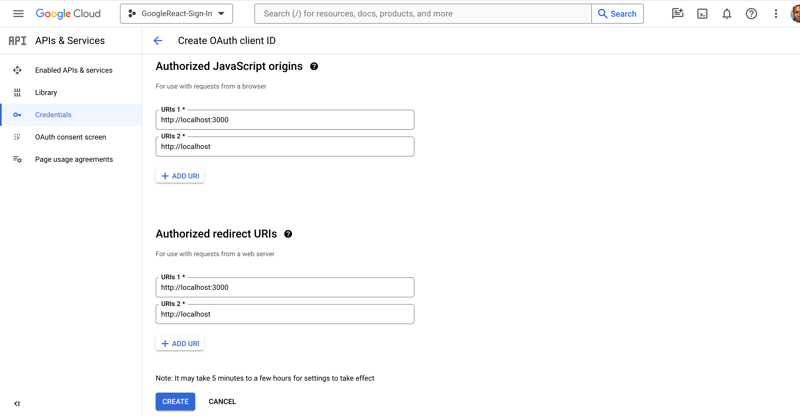
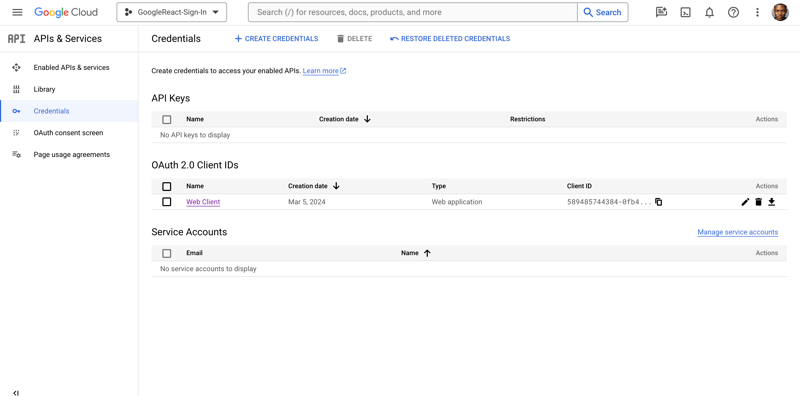
To create a web client ID, you will need to click the “CREATE” button. You will be returned to the homepage, where you can view your freshly created credentials. To copy your new web client ID, hit the Copy icon.
Now that we've successfully built our web client ID, we'll go into our React app and integrate the Google login.
Implementing Google OAuth into the React App
Inside our index.js file, we'll add the clientId and it’s value which was created earlier on below:
import React from 'react';
import ReactDOM from 'react-dom/client';
import App from './App';
import { GoogleOAuthProvider } from '@react-oauth/google';
const root = ReactDOM.createRoot(document.getElementById('root'));
root.render(
  <GoogleOAuthProvider clientId='589485744384-0fb486jrn0oi8sts047cucnkp86d5f2s.apps.googleusercontent.com'>
  <React.StrictMode>
    <App />
  </React.StrictMode>
  </GoogleOAuthProvider>
);
If you test this code in your browser, here's how it looks:
Although it looks same, but when you click the Sign in with Google button, a consent page or popup will appear, as shown below:
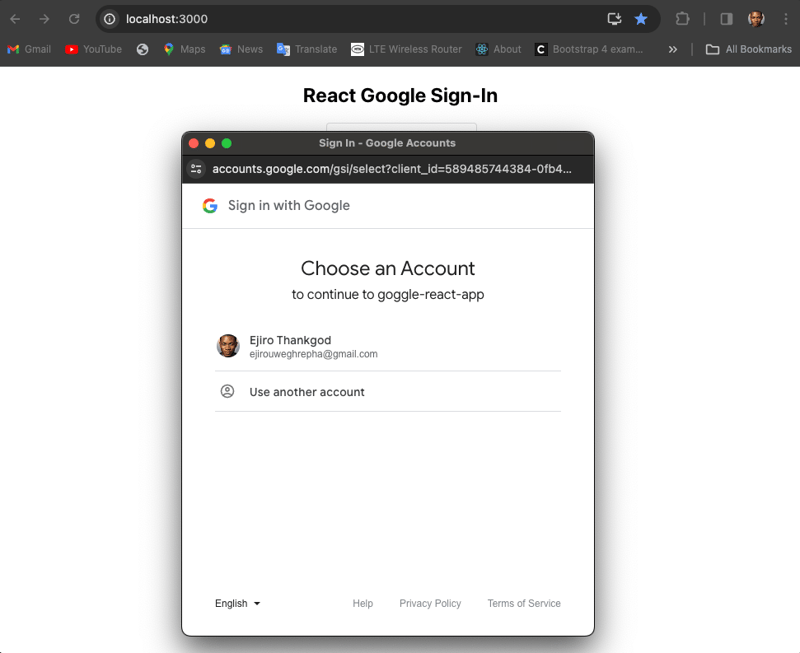
To establish a user profile within our application, let's move one step ahead and gather information from the user email. The app will redirect the user to the homepage and then display their email, name, and image.
Create a user login based on the user's Google account.
You can access the user's profile, which includes their name, email address, image, access token and so on when you integrate Google login into your app. In order to create a user profile, we will use the user's email information.
Let's replace this code with the following in our app.js component:
//App.js//
import { jwtDecode } from "jwt-decode";
import {GoogleLogin } from '@react-oauth/google';

function App() {
      ....
  return (

<div className='App' >
      <h2>React Google Sign-In</h2>
            <GoogleLogin
            className="sign"
  onSuccess={credentialResponse => {
    const details= jwtDecode(credentialResponse.credential);
    console.log(details);
    console.log(credentialResponse);
  }}
  onError={() => {
    console.log('Login Failed');
  }}
/>    </div>
  );
}
export default App;
We installed a jwt-decode library to decode the JWT (JSON Web Token) received from Google after successful sign-in. The decoded token details, such as name, email address, locale, etc., are logged into the console along with the credential response. So whenever we sign in, our details are logged in the console, just like we have below.
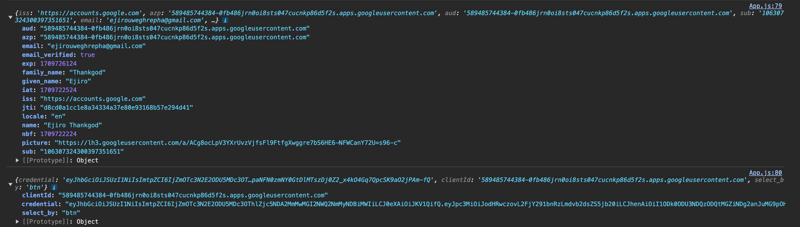
We will use this information to establish a user profile whereby we only need The profile picture, name, and email address. Yet again, we make some modifications; instead of logging the details on the console, we get them displayed on the page.
//App.js//
import { jwtDecode } from "jwt-decode";
import {GoogleLogin } from '@react-oauth/google';

function App() {
  const [userData, setUserData] = useState(null);
  return (
    <div className='App'>
      <h2>React Google Sign-In</h2>
      {!userData && (
        <GoogleLogin
          className="sign"
          onSuccess={credentialResponse => {
            const details = jwtDecode(credentialResponse.credential);
            const userData = {
              picture: details.picture,
              name: details.name,
              email: details.email
            };
            setUserData(userData);
          }}
          onError={() => {
            console.log('Login Failed');
          }}
        />
      )}
      {userData && (
        <div>
          <h3>Logged in</h3>
          <img src={userData.picture} alt="Profile" />
          <h3>Name: {userData.name}</h3>
          <p>Email: {userData.email}</p>
        </div>
      )}
    </div>
  );
}
export default App;
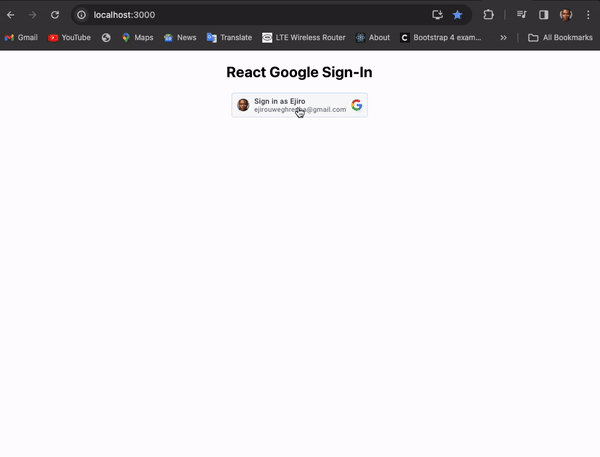
In this modified code, the userData state variable is updated with the profile picture URL, name, and email address extracted from the decoded JWT. The userData is then used to render the profile picture, name, and email address in the React app. So whenever we sign in, we get our data displayed as below.
Conclusion
Google OAuth integration in your React app can greatly improve the user experience by providing a secure and effective signing process. We've covered the essentials, such as configuring the OAuth consent page and obtaining your Google client ID, to customize the login experience and manage user sessions. By using the @react-oauth/google package, you can add advanced features like One Tap login and tailor the authentication flow to your app's specific requirements, creating a user-friendly and secure authentication experience.
Resources
- React
- OAuth Google
- JWT Decode
- GitHub Repo

Top comments (4)
Nice and simple tutorial. Thank you ❤
Thank you!
Is placing the google client ID in the client code a security risk?
use .env for storing credentials