Simple to-do lists are great for keeping track of tasks you need to make come to reality but if you’re working with a team where tasks have sub-tasks that have sub-sub-tasks and more, that’s where you especially need a project management software.
Project management apps, even simple ones like Trello, can break your project down into achievable steps and give your team a more easy workflows.
Overview
This tutorial shows how to write a Trello-like ticketing system from scratch to help you build a similar project management tool on your own.
At every step, we will consider the minimal viable product requirements and implement them.
The stack we will use is the AngularJS, Node.js and Fauna. Now that I’ve given you the overview of how the tutorials will go. Let’s get in:
Now, let’s choose:
no users, no collaboration
a single boards with lists and tickets
Let’s set up a board view that allows users to add lists and tickets. For that, we will define a page in Angular:
Then we will define the controller with some mock data we can display:

As you can see, I chose a very naive data model with the following traits:
Each ticket has a title.
Each list has a name and its tickets.
I have an array of lists. While this model might change in the future, it is too early for me to consider anything more complex.
When I think about the first functionality I would like to add which is CRUD (Create, Read, Update, Delete) for lists and tickets.
When I think about the first functionality, I would like to add something that’s known as CRUD (Create, Read, Update, Delete) for lists and tickets. I am convinced this model is sufficient, so let’s move on.
For starters, we’d want to see everything is wired correctly. So I will start with a simple page:

To verify everything is fine, simply run npm start. Thanks to the awesome simple Node.js setup, the browser should open. But alas, the text does not appear. So let’s troubleshoot it.
Yippe, we are done with that part. Now, Let’s define a default route.
The board route specifies a /board page, but the browser opened on /index.htmlfile. I can manually write /index.html#/board or simply add a default route. I prefer the latter and so we can write:

Also, let’s include a .js file
You can see the blue background color, but still no tickets. When you open the console and see an Error with the message Argument'BoardPageCtrl'is not a function, got undefined
When you add a log print console.log('initializing controller') at the top of the page, you should see that the code is not invoked.
Now that we made sure everything is wired correctly, we can move on to painting the tickets. I start the HTML by adding a div with ID matching the page’s name. This is a habit of mine as some of the CSS will be specific to this page. Also, let’s include a .js file.
You can see the blue background color, but still no tickets. When you open the console and see an Error with the message Argument'BoardPageCtrl'is not a function, got undefined.
When you add a log print console.log('initializing controller') at the top of the page, you should see that the code is not invoked.
Now that we made sure everything is wired correctly, we can move on to painting the tickets.
I start the HTML by adding a div with ID matching the page’s name. This is a habit of mine as some of the CSS will be specific to this page.
Now I would like to display a list and enable changing its name.

Next, we would like to paint the tickets for each list.

Last but not least, I want to add a button with the label Add Ticket.

The final HTML looks like this:
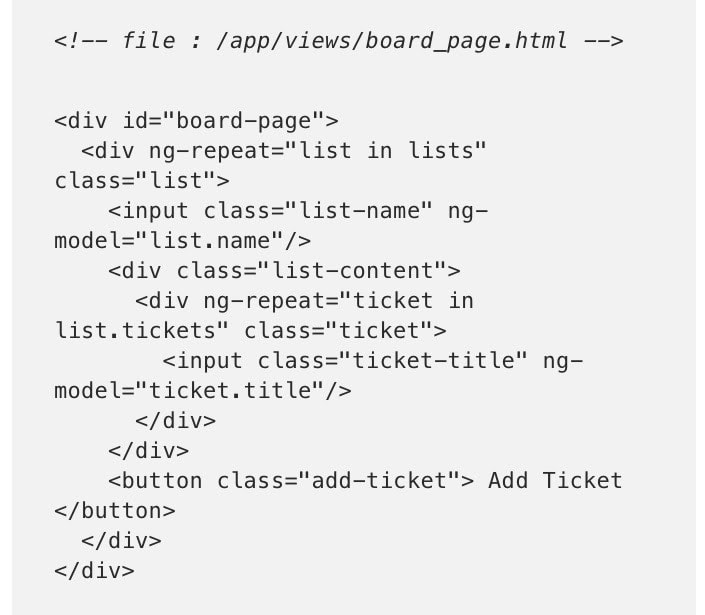
So far, everything looks awful. So it’s time to add some style.
To keep the project organized, let’s create a file named _board_page.scss (notice the naming convention I keep) and I start it with the page’s ID.

Let’s start by adding the board’s background color:

Now, let’s make the background to not be all over the page. You could use width: 100%and height: 100%, but that has some other implications we want like to avoid. So instead, let’s use absolutepositioning.
It will also resolve some scrolling issues down the road.

Next, let’s make the lists horizontal — one next to the other.

Now, let’s display the title properly and add background to the lists with some spacing:

Let’s also add padding on the #boardpage with padding:20px;
Note that I used margin-left to have spacing between the lists, but when I wanted spacing from the page, I added padding on the page.
I could have added margin-top on the lists and margin-left on the left-child to achieve the same thing.
Saying that, this is what the app should look like at this point:

Let’s add some style to each ticket:

So paying attention to small details and acquiring good practices with CSS will save you a lot of time down the road.
If you are not seeing the style changes, make sure you remembered to add an @import 'board_page'; statement to main.scss
Adding list and ticket functionality
It’s time to enable adding tickets and lists. We already have a hook for adding a ticket on the Add Ticket button but we also need some action to add a list. For now, binding it to double-click on the board sounds nice.
And in the controller, we will implement these functions:

When I click ‘Add Ticket’ repeatedly, I see the lists spills over the content area.
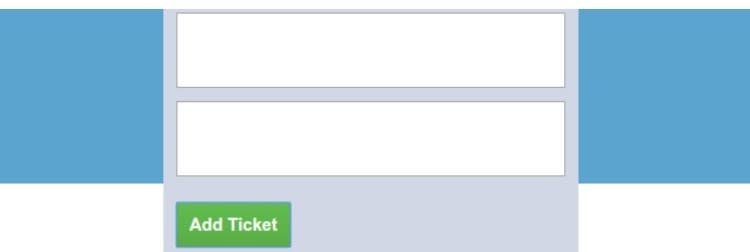
To quickly fix this, add the following css

So far, we have some pretty fair results. But Trello is very famous for its drag & drop ease and it would be a shame not to have it.
Luckily, there’s a pretty nifty Angular library called angular-drag-and-drop-lists, so I quickly add it by running bower install -S angular -drag-and-droplists. I also add a module dependency and the relevant JavaScript file to index.html

Following its instructions, let’s add some dnd attributes to the ticket div
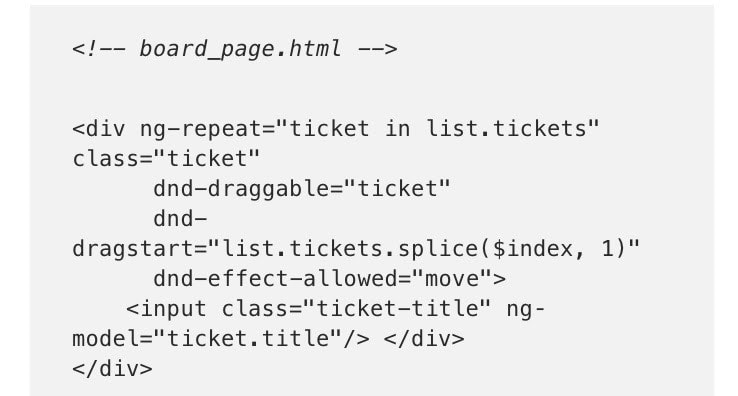
And then I eagerly go to verify if it works — and it does! But it’s ugly… So add the following style:
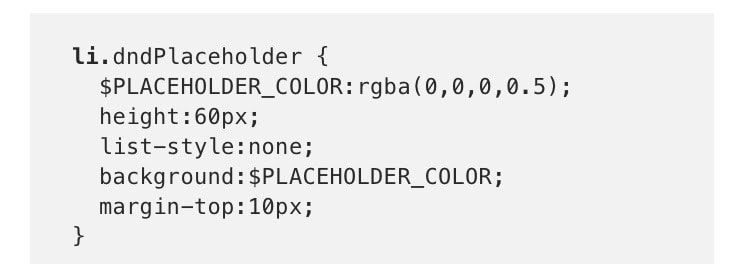
This is much better, but still, something is not smooth enough when we try to move a ticket to the bottom. The reason is that there is not enough space between the list body and the button, a quick solution is by adding:
All the code above gets us to some promising initial results:

Modelling with Fauna
Today, a software system might use a relational database for transactional data, a graph database for social identity management, and a time series database for analytics, all within the same application.
To address this issue, some databases attempt to offer a multi-model approach. These databases offer multiple modeling techniques (e.g. relational, document, graph, etc.). within the same database.
However, these systems introduce model-specific interfaces that are often distinct, and cannot be used in combination. They prevent data from being accessed using the right approach at the right time.
FaunaDB takes a different approach to this problem. The Fauna uses a multi-model approach that unifies the ability to read and write documents, with the ability to use relational, graph and other styles of data interactions within the same query language, giving developers flexibility to choose the right approach in context.
Database models have evolved over time. Let’s examine some of the current approaches available in the market.
Fauna offers the following database system:
The Relational Model
Databases built on the relational model are able to evolve with their application over time, at the cost of modeling the shape of the data in a schema.
Imagine you are building a social media app where users can post content and follow other users. The main screen of the app is the recent content from everyone the user follows.
The Document Model
In the document model, data can be stored with any structure. Typically, it is stored as it is received or presented, for ease of development. Each document is independent, with no joins, constraints, or relations between documents.
The biggest advantage of a document database is the flexibility to store data as it comes without configuring a schema first.
In our social media example, a document database would cope just fine with having different types of content to publish. Where it gets challenging is creating the individualized activity feeds.
Without support for joins or complex queries, application developers resort to stitching together the results of fan-out queries in code, adding delay and complexity to each page view. An alternative is precaching the timeline view by writing new content to it as it is published.
The Graph Model
The graph model is useful for finding patterns in relationships. If you’re optimizing container shipping it helps to be able to compare potential container routes on attributes like cost and speed, for instance in preparing for regulatory changes or in case of disruption to major shipping routes.
Graph APIs in the same context as operational and transactional data are sufficient for many use cases, even without specialized graph storage and processing.
The graph model is typically implemented to optimize fast searches, not scalability. Specialized graph databases rely on scale up infrastructure utilizing a single server with large amounts of memory to make processing large data sets feasible.
The Temporal Model
Enterprise applications need to track changes, and social applications need to present the latest updates from friends. All sorts of applications can benefit from auto-expiring records, especially with requirements like the GDPR becoming common.
Event and snapshot feeds can also be useful for updating external indexers and other integration tasks.
Implementing temporality in relational databases requires adding additional dimensions to your schema to track valid time and transaction time for each record. Recovering from mistakes, auditing change history, and querying old versions of the data are supported natively by FaunaDB’s temporal snapshot storage.
Conclusion
Choosing a database with a unified query model like FaunaDB allows you start with the relaxed constraints of the document model, but add relational constraints and graph queries as necessary.
The freedom to adapt your query model to changing requirements gives you a solid foundation for the future of your organization's data.
So, with this. I think you have learnt from this tutorial how to build a simple trello clone, commenting and also learnt modelling with Fauna.




Top comments (0)