
Unleashing the Power of AWS Application Load Balancer
AWS Cloud Hands on Lab Practice Series
Harnessing Sticky Sessions for Seamless Web Server Performance to enhance User Experience & retention.
Project Overview —
We explore into the world of load balancing by configuring an Application Load Balancer on AWS. Our goal is to seamlessly distribute incoming network traffic across multiple targets, including EC2 instances, containers, and IP addresses, spanning across different Availability Zones.
SOLUTIONS ARCHITECTURE OVERVIEW -

First Let’s understand the real world use case -
Enhanced User Experience: Sticky sessions ensure that users are consistently directed to the same backend server, providing a seamless and uninterrupted experience. For instance, in a social media application, sticky sessions can be used to maintain the user’s session state, ensuring they continue to see their personalized feed and notifications without interruption.
Session Persistence for Legacy Applications: Sticky sessions enable legacy applications that do not support distributed logins or session sharing to function in a distributed environment. For example, in a banking application, sticky sessions can be used to maintain a user’s active session throughout their online banking activities, such as transferring funds or managing accounts.
Simplified Application Architecture: By leveraging sticky sessions, there is no need for session data replication or synchronization across multiple backend servers. This simplifies the application architecture and reduces complexity. For instance, in an online gaming application, sticky sessions can be used to ensure that players stay connected to the same game server, eliminating the need for real-time data synchronization across servers.
Efficient Resource Utilization: Sticky sessions optimize resource utilization by directing subsequent requests from users to the same backend server. This reduces the overhead of session data replication and eliminates the need to retrieve session data from a shared storage or database. For example, in a healthcare application, sticky sessions can be used to maintain a doctor’s active session, allowing them to seamlessly access patient records and make updates without delays caused by data retrieval.
Compatibility with Session-based Workflows: Many workflows rely on session-based data, such as e-commerce shopping carts, form submissions, or multi-step processes. Sticky sessions ensure that session data remains intact and accessible throughout the workflow. For instance, in an online travel booking application, sticky sessions can be used to keep track of the user’s selected flights, hotel reservations, and payment information as they progress through the booking process.
Overall, AWS Application Load Balancer with sticky sessions provides benefits such as enhanced user experience, session persistence for legacy applications, simplified architecture, efficient resource utilization, and compatibility with session-based workflows. These benefits contribute to a smoother and more reliable user experience, improved application performance, and simplified maintenance of session-related data.
PREREQUISITE —
AWS Account with Admin Access.
Security Group allowing port 80 & 22 from Internet.
Download the User Data needed for this lab from my GitHub Repo.
AWS Services Usage —
AWS EC2, ALB, IAM, SG, VPC, Target Group
STEP BY STEP GUIDE -
STEP 1 :
Navigate to EC2 & click Launch instances.
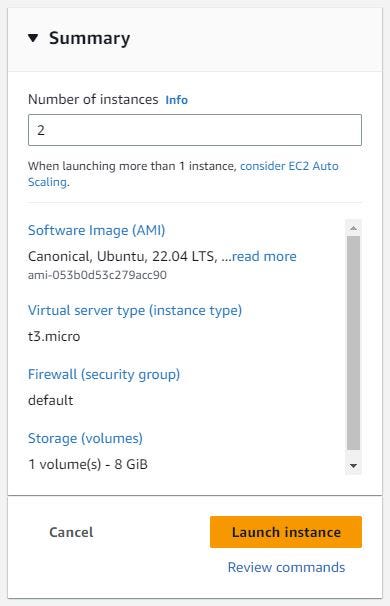
Under Name and Tags, enter “webservers”
Number of Instances = 2
Under Application and OS Images (Amazon Machine Image), select Ubuntu and Ubuntu Server 22.04 LTS.
Select t3.micro as Instance Type.
In the dropdown for Key pair (login), select Proceed without a key pair.
Click Edit and set Auto-assign Public IP to Enable in Network settings.
Click Select existing security group and select the one we created as prerequisite.
Under Advanced Details, in the User Data box, enter the following bootstrap script from my GitHub Repo.
Click Launch Instance.
STEP 2 :
Once it’s in the Running state, copy the Public IPv4 addresses.
In a new browser tab, paste in the public IP addresses we just copied.
We should see the demo page hosted on this webservers.
STEP 3 :
Create Target group & give Target group name ‘WebServerTG’
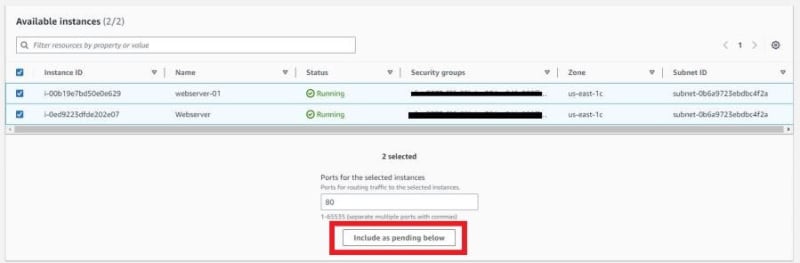
Choose a target type — Instances
Under Available instances, select both targets that are listed.
Click Include as pending below.
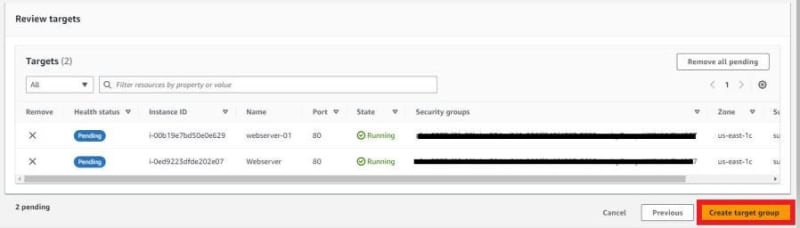
Click Create target group.


STEP 4 :
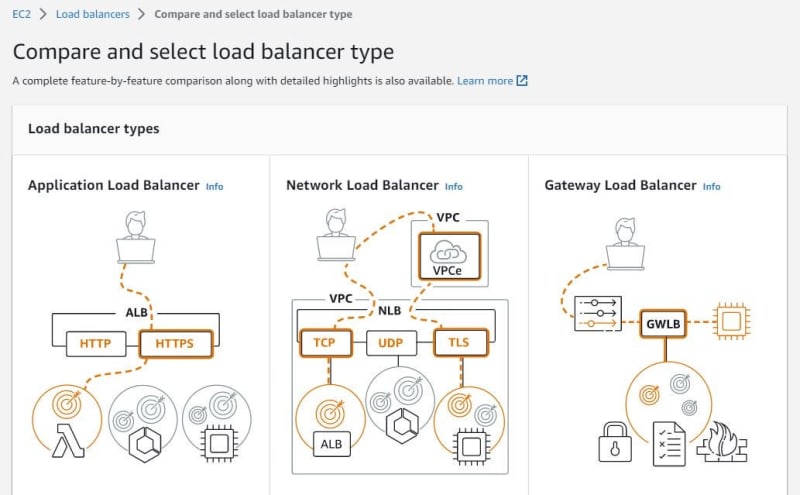
Create an Application Load Balancer.
From the Application Load Balancer card, click Create.
For Load balancer name, enter ACLOUDGUYALB.
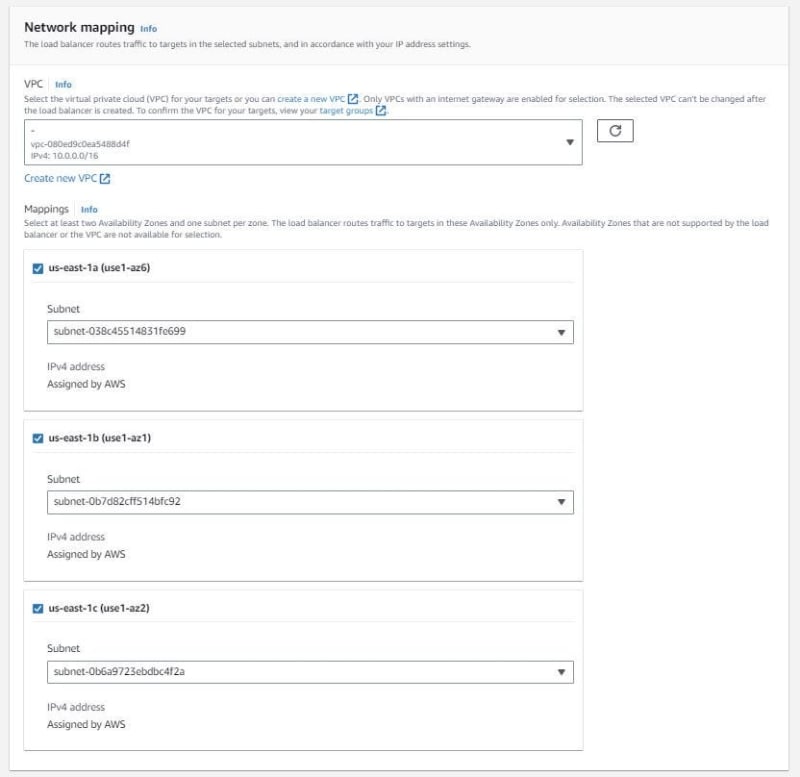
Under Network mapping, click the VPC dropdown, and select the listed VPC.
When the Availability Zones list pops up, select each one.
Under Security groups, deselect the default security group listed, and select the one from the dropdown created in prerequisite.
Ensure that the Protocol is set to HTTP and the Port is 80 under Listeners and routing.
In the dropdown, select the TargetGroup we just created in step 3 ‘WebServerTG’.
Click Create load balancer.


STEP 5 :
On the next screen, click View load balancer.
Wait a few minutes for the load balancer to finish provisioning and enter an active state.
Copy its DNS name, and paste it into a new browser tab.
We should see the load balancer demo page again. The local IP lets you know which instance you are getting response (or “load balanced”) to.
Refresh the page a few times. We should see the other instance’s local IP listed, meaning it’s successfully load balancing between the two EC2 instances.


STEP 6 :
To Enable Sticky Sessions.
Back on the EC2 > Load Balancers page, select the Listeners tab.
Click the TargetGroup link in the Rules column, which opens the target group.
Select the Attributes tab on Target Group page & click Edit.
Check the box next to Stickiness to enable it.
Leave Stickiness type set to Load balancer generated cookie.
Leave Stickiness duration set to 1 days.
Click Save changes.
Now Refresh the tab where you navigated to the load balancer’s public IP.
This time, no matter how many times you refresh, it will stay on the same instance (noted by the local IP).
- IMP NOTE — This DEMO/POC might incur some charges if kept active for long time. So please make sure to clean up the environment once done.
Congrats ! We have successfully completed the hands on Unleashing the Power of AWS Application Load Balancer.

I am Kunal Shah, AWS Certified Solutions Architect, helping clients to achieve optimal solutions on the Cloud. Cloud Enabler by choice, DevOps Practitioner having 7+ Years of overall experience in the IT industry.
I love to talk about Cloud Technology, DevOps, Digital Transformation, Analytics, Infrastructure, Dev Tools, Operational efficiency, Serverless, Cost Optimization, Cloud Networking & Security.
aws #community #builders #devops #alb #ec2 #vpc #session #loadbalancer #infrastructure #webservers #acloudguy
You can reach out to me @ acloudguy.in

Top comments (0)