For so many days I was playing with Raspberry Pi, ESP8266 and relay board to control the devices at home remotely through mobile app and digital assistants like Alexa/Google Assistant. I was able to achieve the same using Raspberry Pi and Relay control and using Alexa skill to remotely turn the devices on/off using little bit of coding in Python.
However I am not a expert in electronics and I wanted something like plug and play device which can work with existing board. Now you might be thinking that I can easily do it with Raspberry Pi/ESP8266/Arduino and relay board. Yes I agree that its not that complicated, however there are some practical issues for a guy like me who has not played with electric boards and circuits.
Issues
- Power supply The controller unit (Raspberry Pi/ESP8266/Arduino) will require continuous power supply to power itself. This can be resolved by designing a board with the power supply built-in which will work with direct power supply from the board or may be a mobile charger can power the board. However for me designing this circuit will be a tedious process, also packaging mobile charger inside the board is not practical.
- Packaging Fitting the whole assembly Raspberry Pi/Esp8266 with Relay inside the switch board with all those floating wires connecting to the pins is messy.
- Additional coding Additional coding is required for this to work with Alexa/Google Assistant. However this is trivial for me as I had done the integration with Alexa.
So then what are the options. So while watching a video on YouTube by TechBurner came across device which you can fit inside your switch board with existing manual switches. Wow, how cool is that? That's what I wanted. So then I started looking for the gadgets on Amazon and I came across two three options and based on the review I choose

Tinxy Smart Switch. It comes in various specifications I wanted to control 2 fans and 2 lights in our living room so I chose 4-Node Smart Switch. Lets look at how to connect the device in the switch board, shall we?
Installation Diagram
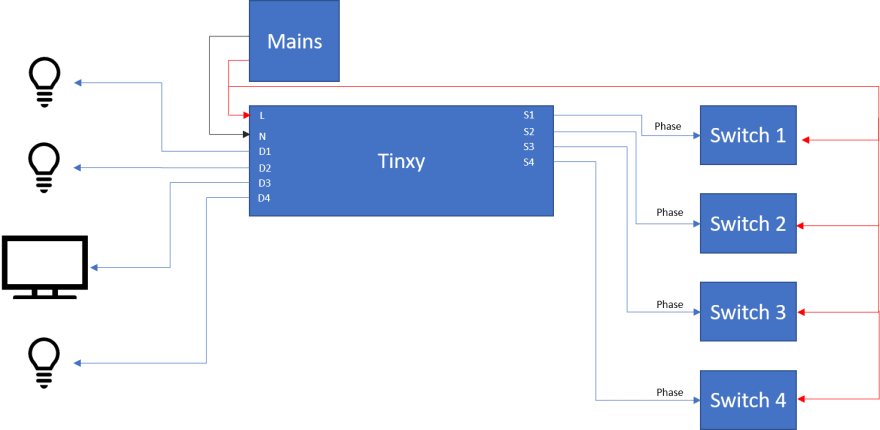
As shown in the diagram above, the installation is very simple. This can be done in 4 steps. But before that make sure you have spare red and black wires for doing the connection.
Steps
- Remove the phase wire (Wire going to your device - fan/light etc.) from the switch. This is usually located at the top of the switch.
- Attach this phase wire to the marking denoted as D1,D2,D3,D4 where D is Device 1
- From the other side of Tinxy board (Colored black) by using a piece of wire - preferably black to the switch in the same place which was removed in step 1
- Powering the device - from the wires take connection to Live and Neutral wire and connect it to the board to L - Live and N - Neutral terminal
You will see the Smart switch will switch on green light will start blinking that means the device is not connected to WiFi. At this point you need to download Tinxy app to your mobile and follow the instructions in the app to complete registraions, set WiFi credentials in the smart switch and configure the connected devices. Try switching devices on/off. Also you will notice that if the device is manually switched off it will show in the app. The other cool thing about this Smart Switch is, it converts your normal switch to two-way switch. So the position of the switch doesn't matter. How cool is that?
Connecting with Alexa
Now assuming you have completed the above steps, this step is pretty straight forward. In your Alexa app, go to Skills and search for Tinxy. Locate the Tinxy skill and proceed with the sign-in process and that's it you are good to go. You will now see all the devices which you configured in the Tinxy App, as a next step you can change the settings of the devices to rename them and add them to a group for e.g. Living room. This makes it simple for Alexa to find the right devices when you give command like 'Alexa Switch on living room light 1'.
Word of caution
- Before touching the board make sure you have a tester, to check the live/neutral wires
- Before doing the actual connections switch of the main supply
- Make sure you don't expose wires accidently as it might cause short circuit.
In the next article we will see how I connected my Smart AC to Alexa. Till then happy coding.

Top comments (0)
Some comments may only be visible to logged-in visitors. Sign in to view all comments.