
Original Post: https://compositecode.blog/2022/01/12/a-shiny-new-vuejs-v3-web-app-using-deployed-to-amplify-appsync-cognito/
No cruft, let's just start.
Prerequisites
These details plus yarn and a few other notes are available and derived from the Amplify Docs located here. What I've done is take those docs and add some specific details and information for this happy path. It includes additional references for the steps I took, and specifically what I'm running this on for this particular tutorial. As noted below, there is a section where this deviates from those steps and I get into next steps beyond the initial setup of the app, Amplify, and AppSync. I'll note that part of this tutorial, or you can navigate directly to that part with this anchor thatPartiDeviate.
You'll need the following for this specific tutorial. If you're acclimate to various OSes and their respective needs around this software, you can get this sorted yourself and it's mostly the same for each OS, but for this tutorial I'm rolling with MacOS Big Sur v11.6.2.
- Your OS, as stated mine is Big Sur for this tutorial.
- git. Probably any version released in the last decade will work just fine.
- Node.js. Probably anything since v14 would work great but this tutorial is written against v16.11.1. As of this writing the LTS is 16.13.1 and current is 17.3.0.
-
Vue.js v3. For this tutorial I'm on a version of the v3 Preview. For the CLI a quick
yarn global add @vue/clidoes the job. -
Amplify CLI. Version for this tutorial is 7.6.5. One can NPM install it with 🤙🏻
npm install -g @aws-amplify/clior get it via cURL 👍🏻curl -sL https://aws-amplify.github.io/amplify-cli/install | bash && $SHELLand of course, Windows has gotta be Windowsy with 😑curl -sL https://aws-amplify.github.io/amplify-cli/install-win -o install.cmd && install.cmd.
A few first steps that only need done once. If you've already setup your amplify cli then this isn't needed a second time.
First, get the Vue.js v3 base app skeleton running.
vue create mywhateverproject
Issuing this command will then provide prompts to select Vue.js v3 Preview (or likely just v3 when fully released, which will come along with other tooling as needed). Once this is done, following the standard steps of navigating into the directory cd myWhateverProejct , then executing the yarn command and finally yarn serve --open will open up the running web app in your default browser.
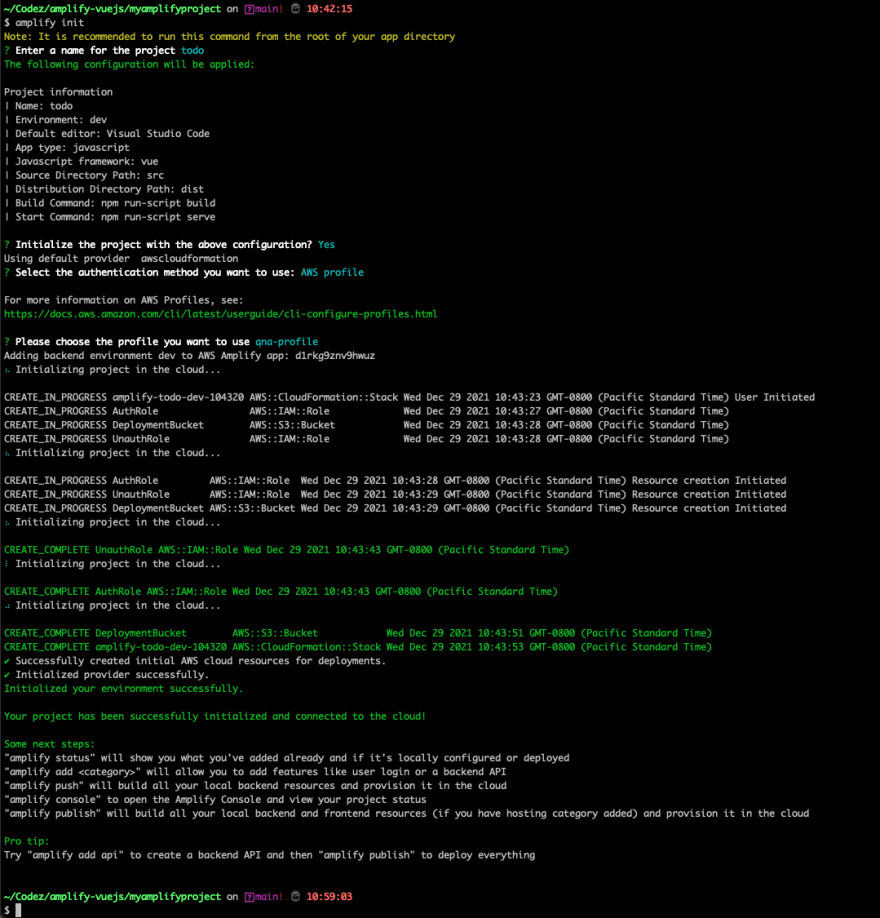
Next initialize the Vue.js App as an Amplify Project and get some defaults set and accepted. Executing amplify init and accepting the defaults will get this done. As displayed when done the Vue.js v3 App will now have multiple defaults and respective items selected.
With the core Amplify folder and settings set, adding the Amplify libraries for use in user interface components is next up.
yarn add aws-amplify @aws-amplify/ui-components
Now navigate into the src/main.js file and add the Amplify and initial configure in the code, that will do the actual initialization execution when the app launches.
This is replacing this code...
import { createApp } from 'vue'
import App from './App.vue'

createApp(App).mount('#app')
with this code.
import { createApp } from 'vue'
import App from './App.vue'
import Amplify from 'aws-amplify';
import aws_exports from './aws-exports';
import {
    applyPolyfills,
    defineCustomElements,
} from '@aws-amplify/ui-components/loader';

Amplify.configure(aws_exports);
applyPolyfills().then(() => {
    defineCustomElements(window);
});
createApp(App).mount('#app')
This completes the steps we need for a running application. To cover full stack lets cover the back end build out and schema construction. Then after that I'll delve into thatPartiDeviate. Next up is getting the Amplify elements added.
npm install aws-amplify @aws-amplify/ui-components
Before even launching I went ahead and added the back end and database, GraphQL API, and related collateral.
amplify add api

Notice in the screenshot, once I selected to edit the schema now, it simply opened the file in the editor of my choice, which is Visual Studio Code for this tutorial. Since I'm executing this from the terminal in Visual Studio Code it simply opened the file in the active editor that I'm in, win win! The file that is opened by default for the schema includes the following GraphQL schema code.
# This "input" configures a global authorization rule to enable public access to
# all models in this schema. Learn more about authorization rules here: https://docs.amplify.aws/cli/graphql/authorization-rules

input AMPLIFY { globalAuthRule: AuthRule = { allow: public } } # FOR TESTING ONLY!

type Todo @model {
    id: ID!
    name: String!
    description: String
}
For now, I'll just leave the comment, the input AMPLIFY and the Todo type just as it is. It's important to note that this schema.graphql file is located at app/amplify/backend/schema.graphql. I'll come back to this later in thatPartiDeviate.
Next I want to push the app, api, and backend to Amplify and AppSync.
amplify push
During this phase a lot of things happen. The GraphQL Schema is turned into an API and this is deployed along with the Database is deployed to DynamoDB.
To get the backend shipped, i.e. deployed to AppSync, issue the amplify push command. Again, following through with the default choices. If amplify console is issued just after this a review of the API can be made.

Ok, now it's auth time. Adding that is somewhat mind boggling minimal, just amplify add auth. For this I chose Default config, then Username for the way users sign in, and then the No, I am done option followed by issuing another amplify push, confirmed that and let it go through its process.
After this next steps included adding the following code to the App.vue file to get the initial interactions, security and related things into place for the todo app. Again, I feel it important to note that I'll be changing all of this later in the post here. But it's a solid way to start building an application and then looping back around after it is up and running, deployed before moving on to next steps.
<template>
  <amplify-authenticator>
    <div id="app">
      <h1>Todo App</h1>
      <input type="text" v-model="name" placeholder="Todo name">
      <input type="text" v-model="description" placeholder="Todo description">
      <button v-on:click="createTodo">Create Todo</button>
      <div v-for="item in todos" :key="item.id">
        <h3>{{ item.name }}</h3>
        <p>{{ item.description }}</p>
      </div>
    </div>
    <amplify-sign-out></amplify-sign-out>
  </amplify-authenticator>
</template>

<script>
import { API } from 'aws-amplify';
import { createTodo } from './graphql/mutations';
import { listTodos } from './graphql/queries';
import { onCreateTodo } from './graphql/subscriptions';

export default {
  name: 'App',
  async created() {
    this.getTodos();
    this.subscribe();
  },
  data() {
    return {
      name: '',
      description: '',
      todos: []
    }
  },
  methods: {
    async createTodo() {
      const { name, description } = this;
      if (!name || !description) return;
      const todo = { name, description };
      this.todos = [...this.todos, todo];
      await API.graphql({
        query: createTodo,
        variables: {input: todo},
      });
      this.name = '';
      this.description = '';
    },
    async getTodos() {
      const todos = await API.graphql({
        query: listTodos
      });
      this.todos = todos.data.listTodos.items;
    },
    subscribe() {
      API.graphql({ query: onCreateTodo })
        .subscribe({
          next: (eventData) => {
            let todo = eventData.value.data.onCreateTodo;
            if (this.todos.some(item => item.name === todo.name)) return; // remove duplications
            this.todos = [...this.todos, todo];
          }
        });
    }
  }
}
</script>
With this added now I could run yarn serve and check out the site. At this point I signed up just to have an account to use and added a todo item. Everything worked swimmingly at this point!
The final step before getting into a proper deviation from this todo example involves now getting the app properly published to Amplify. This is done by executing amplify add hosting. Accept Hosting with Amplify Console (Managed hosting with custom domains, Continuous deployment) and Manual deployment when prompted. Now, finally, issue the command amplify publish.
Boom, the todo app site is live!
thatPartWhereiDeviate
Now it's time to get into the nitty gritty of deviations from the easy path!
New GraphQL Schema!
My schema that I want to add is around building out collections for a number of data sets. The first one is a data set that I routinely talk about on a regular basis, and yes, it is indeed centered around trains! If you're uninterested in the trains part and schema and more interested in the changes skip down to the "Deploying The Changes" section of the post.
Alright, describing the data model that I want to have and use will start with the minimal part of just having a list of railroads. This would be a list, or more specifically a table of railroads, that we can add railroads too and collect peripheral information about them. For this table I'll add the following fields, AKA columns of data to store. I would want to collect the following for a railroad:
- railroad name
- wikipedia URI
- map URI
- peripheral details of an unstructured nature
- founding year, month, and day of the railroad
- record stamp
In addition, I want to keep a list of trains - specifically named trains - that each railroad operates. This data would include:
- train name
- active - yes / no
- peripheral details of an unstructured type
- wikipedia URI
- route map URI
- time table URI
- train URI - i.e. like a website or something that might be dedicated to the particular train.
- record stamp
Deploying The Changes
Now it is time to deploy these additional database and schema changes. One of the easiest ways to make these changes is to use Amplify Studio, which has a great section for data modeling, which in turn puts together and ensures your schema is usable. Then it will enable you to deploy that new schema with changes to the database and the active service!
Navigate to the interface from here.

Once I navigated to the interface I built out the additional tables like this.

Then just click on Save and Deploy and then Deploy on the following modal dialog and Amplify will deploy the AppSync schema changes.

With that deployed, in the same Amplify Studio interface I then clicked on the GraphQL API tab section and then on the Resource name for mywahteverproject to open up the AppSync Console.
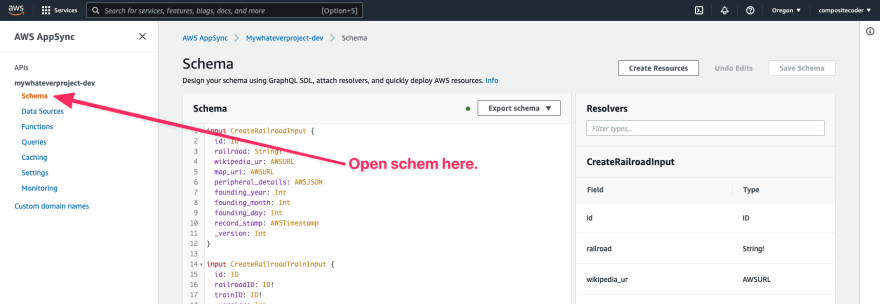
Further down in the schema toward the bottom I can then find and confirm my types are in and ready for use. The Todo type is still there, since I didn't need to really remove it yet and it acts as a good working reference. But more importantly you can see the other types and the correlative relationship that was added via the Amplify data modeling interface.
...more schema

type Todo @aws_iam
@aws_api_key {
    id: ID!
    name: String!
    description: String
    _version: Int!
    _deleted: Boolean
    _lastChangedAt: AWSTimestamp!
    createdAt: AWSDateTime!
    updatedAt: AWSDateTime!
}

type Train @aws_iam
@aws_api_key {
    id: ID!
    train_name: String!
    active: Boolean!
    peripheral_details: AWSJSON
    wikipedia_uri: AWSURL
    route_map_uri: AWSURL
    timetable_uri: AWSURL
    train_uri: AWSJSON
    record_stamp: AWSTimestamp
    _version: Int!
    _deleted: Boolean
    _lastChangedAt: AWSTimestamp!
    createdAt: AWSDateTime!
    updatedAt: AWSDateTime!
    railroads(
        railroadID: ModelIDKeyConditionInput,
        filter: ModelRailroadTrainFilterInput,
        sortDirection: ModelSortDirection,
        limit: Int,
        nextToken: String
    ): ModelRailroadTrainConnection
        @aws_iam
@aws_api_key
}

type Railroad @aws_iam
@aws_api_key {
    id: ID!
    railroad: String!
    wikipedia_ur: AWSURL
    map_uri: AWSURL
    peripheral_details: AWSJSON
    founding_year: Int
    founding_month: Int
    founding_day: Int
    record_stamp: AWSTimestamp
    _version: Int!
    _deleted: Boolean
    _lastChangedAt: AWSTimestamp!
    createdAt: AWSDateTime!
    updatedAt: AWSDateTime!
    RailroadTrains(
        trainID: ModelIDKeyConditionInput,
        filter: ModelRailroadTrainFilterInput,
        sortDirection: ModelSortDirection,
        limit: Int,
        nextToken: String
    ): ModelRailroadTrainConnection
        @aws_iam
@aws_api_key
}

...more schema
The relationship can be seen via the object connections here in the ModelRailroadTrainConnection and the keys associated.
Next steps to get this updated in the local repository from these changes that were just made out of sync via the Amplify Studio interface requires two quick commands, both of which are displayed on the screen of the GraphQL interface in the studio. It's best to get the command, as it'll have the appId already included in a copypasta option on the screen, which looks like this.
amplify pull --appId app-id-which-is-in-studio --envName dev
Executing that will get everything updated and pull in the remote GraphQL Schema to the local schema.graphql file located in the amplify/backend/api/ location. Next run this command.
amplify update api
This will update everything to synchronize things, which will also prompt me for code generation so that I can have the client side code ready for use whenever I build out the user interface later.
Next Up
Some of the things I'll cover in the next article, as I continue this effort, is what has been done with all these steps from a project perspective. As one can see, some things might be a little confusing at this point, for example the above schema shown in AppSync, but after the synchronization if you look at the schema.graphql file locally it shows this.
type Train @model @auth(rules: [{allow: public}]) {
  id: ID!
  train_name: String!
  active: Boolean!
  peripheral_details: AWSJSON
  wikipedia_uri: AWSURL
  route_map_uri: AWSURL
  timetable_uri: AWSURL
  train_uri: AWSJSON
  railroads: [RailroadTrain] @connection(keyName: "byTrain", fields: ["id"])
  record_stamp: AWSTimestamp
}

type Railroad @model @auth(rules: [{allow: public}]) {
  id: ID!
  railroad: String!
  wikipedia_ur: AWSURL
  map_uri: AWSURL
  peripheral_details: AWSJSON
  founding_year: Int
  founding_month: Int
  founding_day: Int
  record_stamp: AWSTimestamp
  RailroadTrains: [RailroadTrain] @connection(keyName: "byRailroad", fields: ["id"])
}

type Todo @model @auth(rules: [{allow: public}]) {
  id: ID!
  name: String!
  description: String
}

type RailroadTrain @model(queries: null) @key(name: "byRailroad", fields: ["railroadID", "trainID"]) @key(name: "byTrain", fields: ["trainID", "railroadID"]) @auth(rules: [{allow: public}]) {
  id: ID!
  railroadID: ID!
  trainID: ID!
  railroad: Railroad! @connection(fields: ["railroadID"])
  train: Train! @connection(fields: ["trainID"])
}
Obviously this is very different than what is shown from one place to another, so I'll discuss this and other things. So subscribe (over on the right side of the blog), follow (@adron), and you'll be updated on the next post when it's published.
SITREP (Situational Report)
Alright, what have I wrapped up so far? Here's a bullet list of the things finished:
- Vue.js App created.
- Vue.js Form put together for todo entries.
- Authentication added with Cognito.
- An AppSync GraphQL created and published.
- Additional types added to the AppSync GraphQL API.
- Updates and code regenerated for our API.
What's next to do? This is the short list, there will be after that, much more to do!
- Get the Vue.js app spified up, get some nice design put together for it, add some reasonable CSS, graphics, etc to make the interface pop. But above all, it needs to feel usable and be usable.
- Add the forms for each of the respective interfaces to manipulate the data. This could amount to lots of different things, adding navigation, routing, and other menues and the like.
- Add screens that can provide some nice reports on the data that I'm putting together. For example, it'd be nice to get a list of the actual named trains or the railroads and have their images, maps, and other respective elements shown.
...and the list goes on. Until next session, enjoy your thrashing code! 🤘🏻
References
- Getting Started with Vue.js & Amplify
- Official blog entry on the Vue.js v3 release for Amplify by William Lee.

Top comments (0)