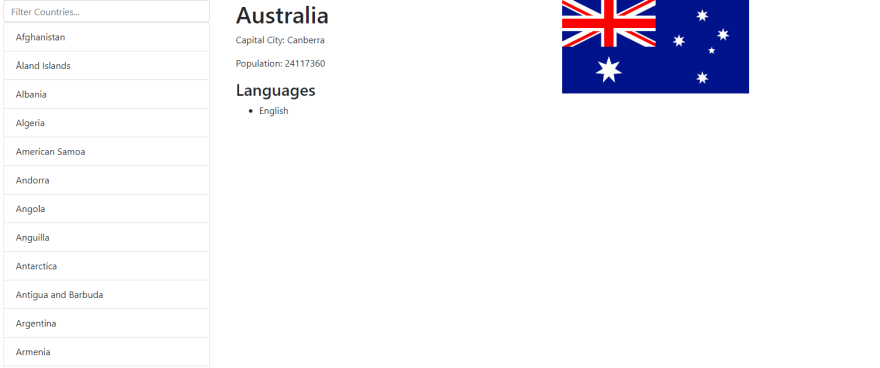
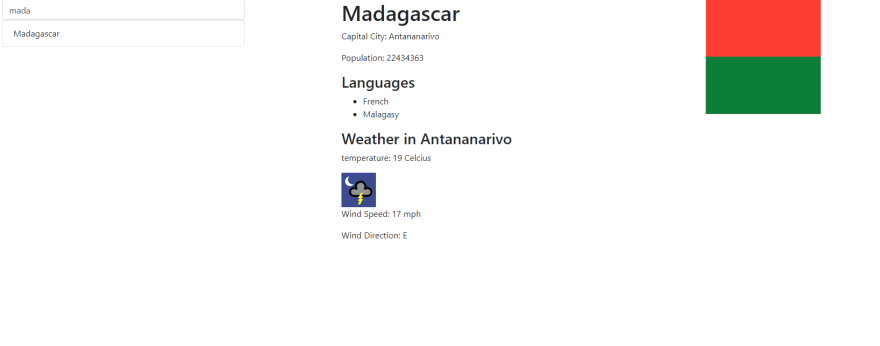
Live Demo is here: https://country-browser-azure.vercel.app/
Repo is here: https://github.com/afgonullu/country-browser
We will build a Country Browser App using React, React Bootstrap and 2 APIs, REST Countries API and Weatherstack API.
Setting Up the Project
Create a new React Project using the boilerplate provided.
npx create-react-app country-browser
After everything is finished, if we run npm start, we will see that our React app is running and a spinning React logo centered in the page.
There are a couple of files, that we won't be using. You can leave them as they are or delete them. If you want to have a clear and uncluttered structure, delete these files:
country-browser
└── src
    ├── App.css
    ├── App.test.js
    ├── logo.svg
    ├── reportWebVitals.js
    └── setupTests.js
Since we removed these files, our app will stop working properly. We need to adjust and clean up couple of stuff in index.js and app.js
import React from "react"
import ReactDOM from "react-dom"
import "./index.css"
import App from "./App"

ReactDOM.render(<App />, document.getElementById("root"))
const App = (props) => {
  return <h1>Hello World. Welcome to Country Browser</h1>
}

export default App
Also clean up the project dependencies in package.json. Should look like this:
///
...
"dependencies": {
    "react": "^17.0.1",
    "react-dom": "^17.0.1",
    "react-scripts": "4.0.1"
  },
...
///
Now if we run again using npm start, we will see our magical words on the browser. This is the starting point for our project.
Designing
On a full scale project you would want to have a complete design system. For example, Notion offers a template like this one:
For this project, we will just decide on the layout and colors.
For the layout, let's say that;
- We will use a left sidebar and list all the countries.
- Sidebar will also have a search functionality, that will help user filter the countries
- When a country is selected, Main Section will be populated according to the selected country.
As for the colors; let's go to coolors.co and pick the first random color scheme:
Let's use white as the background color and rest of the colors will be theme colors. We can check out the contrast of the colors using Webaim Contrast Checker Tool. That way we will make sure that our colors looks accessible and readable against background.
Layout and Theme Implementation
Bootstrap is a great tool and React Bootstrap library is a great tool on top of a great tool to create our UI foundation. Let's install first.
npm install react-bootstrap bootstrap
We will also install bootstrap, because we want to make simple customizations to the Bootstrap theme. Also we need to install node-sass, in order to compile Sass files.
npm install --save node-sass@4.14.1
(Node Sass has been updated to v5 and create-react-app package doesn't yet support v5. Therefore, it is important to declare the version when installing.)
After these, to test that everything is working properly let's make small modifications to our App.js file:
import "./App.scss" // custom theme for bootstrap
import { Container, Row, Col } from "react-bootstrap" // React bootstrap components

const App = (props) => {
  return (
    <Container fluid>
      <Row>
        <Col md="3">Sidebar</Col>
        <Col md="9">Main Section</Col>
      </Row>
    </Container>
  )
}

export default App
Our App.scss file looks like this:
@import "~bootstrap/scss/bootstrap";
There is only one line, where we import the bootstrap .scss file. What ever we wrote above it will customize the vanilla bootstrap. This way, we will have a proper customization and original files will stay clean.
Let's define our theme colors properly. In order to do that, We will override only bootstrap theme color definitions. It can be found in /node_modules/bootstrap/scss/_variables.scss. With everything in place, final version of App.scss looks like this:
$theme-white: #ffffff;
$cerulean-crayola: #00a7e1;
$rich-black: #00171f;
$prussian-blue: #003459;
$cg-blue: #007ea7;

$theme-colors: (
  "primary": $prussian-blue,
  "secondary": $cg-blue,
  "info": $cerulean-crayola,
  "light": $theme-white,
  "dark": $rich-black,
);

@import "~bootstrap/scss/bootstrap";
First API Call
Let's install axios.
npm install axios
Right now, I will not go over REST APIs, HTTP methods, axios or React Hooks. I would write specific blog posts about them in the future and link them here.If you feel that you need to understand them better, please do it now before proceeding.
We will use https://restcountries.eu/rest/v2/all endpoint. If we copy and paste the link to our browser, we will see the response and all kinds of information about the returning object array. This will be important when we are going to filter or manipulate the data.
Let's make a call to the API to see if we can fetch data, and log the response to the console.
...
  useEffect(() => {
    const fetchData = async () => {
      const response = await axios.get("https://restcountries.eu/rest/v2/all")

      console.log(response.data)
      setCountries(response.data)
    }

    fetchData()
  }, [])
...
If we open the console on our browser, we should see an array of 250 objects.
Ok, time to get serious. First, we need to create a state variable.
const [countries, setCountries] = useState([])
If you are unfamiliar with useState hook, again I advise you to learn about it. To summarize, useState allows to manage state in functional components in a much more flexible manner.
We will use countries variable to store the array returned from our API call. We will make the call when our app renders. Since countries will not change ever, in order to avoid making the call every time the component renders, we slightly modify useEffect hook.
Final step is to display the data on our page. map function, as well as other array functions, is a key tool when working with dynamic data. We can simply list the names of the countries in the sidebar by mapping through the countries variable.
App.js looks like below at this point:
import React, { useEffect, useState } from "react"
import axios from "axios"
import "./App.scss"
import { Container, Row, Col, ListGroup, ListGroupItem } from "react-bootstrap"

const App = (props) => {
  const [countries, setCountries] = useState([])
  useEffect(() => {
    const fetchData = async () => {
      const response = await axios.get("https://restcountries.eu/rest/v2/all")

      setCountries(response.data)
    }

    fetchData()
  }, [countries])

  return (
    <Container fluid>
      <Row>
        <Col md="3">
          <ListGroup>
            {countries.map((country) => (
              <ListGroupItem key={country.name}>{country.name}</ListGroupItem>
            ))}
          </ListGroup>
        </Col>
        <Col md="9">Main Section</Col>
      </Row>
    </Container>
  )
}

export default App
Search and Filter
Next step is adding a search and filter functionality. It requires couple of additions and changes to our code structure.
First of all, we are mapping over countries at the moment. In order to have a functional sidebar, we need to have a dynamic state, which will represent the result of the search value. Secondly, we need some UI elements and search logic implemented. Therefore we need,
- UI element, i.e. search form
- Search and filtering logic
- A state variable to store search criteria
- A state variable to store filtered countries
It is as simple as a form control element from React Bootstrap library. We used onChange, because we will implement a logic that will filter at every keystroke.
...
<Form>
  <Form.Control
    value={search}
    type="text"
    placeholder="Filter Countries..."
    onChange={handleSearch}
  />
</Form>
...
State variables are as follows:
  const [filtered, setFiltered] = useState([])
  const [search, setSearch] = useState("")
Logic is pretty straightforward. handleSearch sets the state variable search after every key stroke. Since search is changed the component is rerendered and our useEffect executes again. When it executes, it filters the countries according to the string that is held at search variable.
  useEffect(() => {
    setFiltered(
      countries.filter((country) =>
        country.name.toUpperCase().includes(search.toUpperCase())
      )
    )
  }, [countries, search])

  const handleSearch = (event) => {
    setSearch(event.target.value)
  }
Now if we run the app, we will see that search functionality works as intended. Our App.js looks like this at this stage:
import React, { useEffect, useState } from "react"
import axios from "axios"
import "./App.scss"
import {
  Container,
  Row,
  Col,
  ListGroup,
  ListGroupItem,
  Form,
} from "react-bootstrap"

const App = (props) => {
  const [countries, setCountries] = useState([])
  const [filtered, setFiltered] = useState([])
  const [search, setSearch] = useState("")

  useEffect(() => {
    const fetchData = async () => {
      const response = await axios.get("https://restcountries.eu/rest/v2/all")

      setCountries(response.data)
    }

    fetchData()
  }, [countries])

  useEffect(() => {
    setFiltered(
      countries.filter((country) =>
        country.name.toUpperCase().includes(search.toUpperCase())
      )
    )
  }, [countries, search])

  const handleSearch = (event) => {
    setSearch(event.target.value)
  }

  return (
    <Container fluid>
      <Row>
        <Col md="3">
          <Form>
            <Form.Control
              value={search}
              type="text"
              placeholder="Filter Countries..."
              onChange={handleSearch}
            />
          </Form>
          <ListGroup>
            {filtered.map((country) => (
              <ListGroupItem key={country.name}>{country.name}</ListGroupItem>
            ))}
          </ListGroup>
        </Col>
        <Col md="9">Main Section</Col>
      </Row>
    </Container>
  )
}

export default App
Showing Country Details
We want to show country details, when user clicks on any of the countries. To achieve this, first we need to add an onClick event handler to every ListGroupItem.
<ListGroupItem key={country.name} onClick={() => setDetails(country)}>
  {country.name}
</ListGroupItem>
We also need another state variable, where we can hold the content of the main section. If no country is clicked, main section should be empty. If any of the countries are clicked, then it should show relevant information to that country.
import React, { useEffect, useState } from "react"
import axios from "axios"
import "./App.scss"
import {
  Container,
  Row,
  Col,
  ListGroup,
  ListGroupItem,
  Form,
} from "react-bootstrap"

const App = (props) => {
  const [countries, setCountries] = useState([])
  const [filtered, setFiltered] = useState([])
  const [search, setSearch] = useState("")
  const [details, setDetails] = useState([])

  useEffect(() => {
    const fetchData = async () => {
      const response = await axios.get("https://restcountries.eu/rest/v2/all")

      setCountries(response.data)
    }

    fetchData()
  }, [countries])

  useEffect(() => {
    setFiltered(
      countries.filter((country) =>
        country.name.toUpperCase().includes(search.toUpperCase())
      )
    )
  }, [countries, search])

  const handleSearch = (event) => {
    setSearch(event.target.value)
  }

  return (
    <Container fluid>
      <Row>
        <Col md="3">
          <Form>
            <Form.Control
              value={search}
              type="text"
              placeholder="Filter Countries..."
              onChange={handleSearch}
            />
          </Form>
          <ListGroup>
            {filtered.map((country) => (
              <ListGroupItem
                key={country.name}
                onClick={() => setDetails(country)}
              >
                {country.name}
              </ListGroupItem>
            ))}
          </ListGroup>
        </Col>
        <Col md="9">
          {details.length === 0 ? (
            ""
          ) : (
            <Container>
              <Row className="justify-content-md-start align-items-start">
                <Col>
                  <h1>{details.name}</h1>
                  <p>Capital City: {details.capital}</p>
                  <p>Population: {details.population}</p>
                  <h3>Languages</h3>
                  <ul>
                    {details.languages.map((language) => (
                      <li key={language.name}>{language.name}</li>
                    ))}
                  </ul>
                </Col>
                <Col>
                  <img
                    src={details.flag}
                    height="auto"
                    width="320px"
                    alt="country flag"
                  />
                </Col>
              </Row>
            </Container>
          )}
        </Col>
      </Row>
    </Container>
  )
}

export default App
Add Weather Details
Let's implement a second API to show weather details in the capital. We will use Weatherstack API. In order to use it, we need to have an account. When we login, there is an API access key on the dashboard. We need that.
Create a .env file in the root folder. In this file create a key=value pair. There shouldn't be any other punctuation marks, including quotes or double quotes.
Also key should be starting with REACT_APP_. For example my .env entry looks like this:
REACT_APP_WEATHERSTACK_API_KEY=14218xxx555xxxxx78yyy26d
We cannot make the second API as we did before. On the first time, we fetch country data when app starts. It is not dynamic and there is no user interaction. On the other hand, We fetch weather data after user selects a country and we need to set the state and render UI correctly as user expects. It changes on every user input. Therefore, we need to change our approach.
We will expand what we do on user click and handle everything on a seperate method -> handleSelectCountry
const handleSelectCountry = async (country) => {
    const response = await axios.get(
      `http://api.weatherstack.com/current?access_key=${process.env.REACT_APP_WEATHERSTACK_API_KEY}&query=${country.capital}`
    )

    const weather = response.data.current

    setDetails(
      <Container>
        <Row className="justify-content-md-start align-items-start">
          <Col>
            <h1>{country.name}</h1>
            <p>Capital City: {country.capital}</p>
            <p>Population: {country.population}</p>
            <h3>Languages</h3>
            <ul>
              {country.languages.map((language) => (
                <li key={language.name}>{language.name}</li>
              ))}
            </ul>
            <h3>Weather in {country.capital}</h3>
            <p>temperature: {weather.temperature} Celcius</p>
            <img src={weather.weather_icons[0]} alt="Temp Icon" />
            <p>Wind Speed: {weather.wind_speed} mph</p>
            <p>Wind Direction: {weather.wind_dir}</p>
          </Col>
          <Col>
            <img
              src={country.flag}
              height="auto"
              width="320px"
              alt="country flag"
            />
          </Col>
        </Row>
      </Container>
    )
  }
Before, we were using details state to store country data. Now, we store the output JSX code. Before we construct the JSX, we also make an asynchronous call to weather API.
Final Result looks like this:
Although a little bit of beautification and customization is still needed, our project is done. I will share my result down below. You can try this part yourself.
Live demo of this project is available here: https://country-browser-azure.vercel.app/
Repository is available here: https://github.com/afgonullu/country-browser
I would love to hear your opinions and continue conversation. If you want to get in touch, feel free to follow me and send me a message on twitter @afgonullu


Top comments (0)