So, you have found yourself in the new paradigm that is the blockchain, and would like to jump into the newest hot topic on Stellar ecosystem: Smart Contracts with Soroban.
The Stellar Quest has been an ongoing system which awards developers knowledge about the Stellar ecosystem. The first four Stellar Quests have been about the Horizon, Stellar's API for interacting with the network. Horizon allows you to accomplish most of the stuff on the Stellar ecosystem such as Path Payments, Trade Offers, and Asset Creation.
Enter Soroban, a new smart contract framework on Stellar, which allows developers to accomplish everything Horizon can and much more. The new Stellar Quest is about getting familiar with Soroban's development environment, which is what we will jump right into.
GitPod Environment
GitPod is a development environment which supports Docker, Node.js, and much more to generate a previously configured development environment, ready to go. The GitPod is a virtual Linux machine, and is presented with a much loved VSCode environment. To get started, go to soroban-quest repository and press the "Open in GitPod" button.
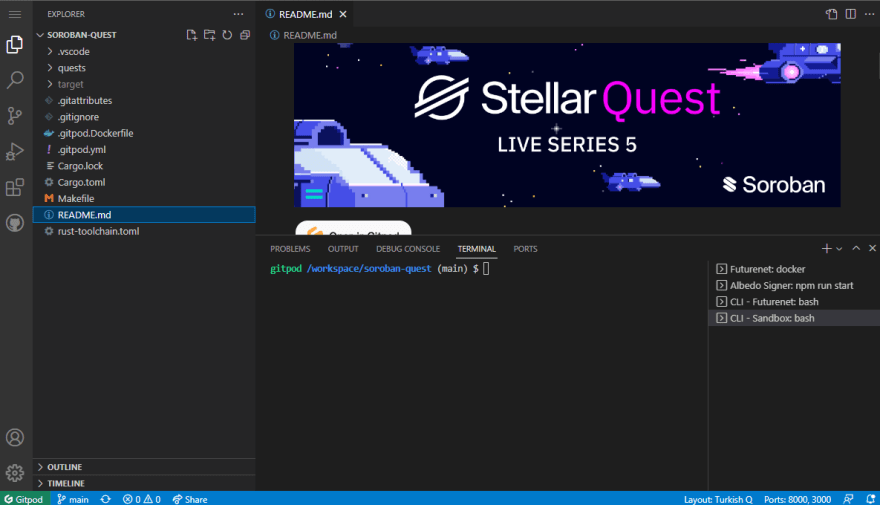
The environment will open within a VSCode web context.
This might look overwhelming at first, but let's check out the parts of the environment. At left, we see the explorer, which includes the quests and some configuration files. The most interesting part here is the "quests" directory.
We see the currently available quests, and new quests in the future. Next, we have our main panel, in which we can see the README.md file open by default.
Next, our favorite place: the terminal. At right, we can see that there are actually four different terminal pages open. Starting from the top, we see:
- Futurenet: docker - Allows us to interact with the Soroban network on Futurenet.
- Albedo Signer: npm run start - Allows us to earn the rewards from the quests!
- CLI - Futurenet: bash - Allows us to send transactions and deploy contracts to the Futurenet Soroban network. This is where we will mostly work.
- CLI - Sandbox: bash - Allows us to work on a local Soroban network for testing. No one else is allowed here!
Now that we are kind of familiar with the environment, let's start questing!
Squirtle CLI
There are two main programs we will use. The first one is sq, which stands for Squirtle (yes, actually!). sq is a CLI program created just for Stellar Quest. How handy!
Type
sq help
to your terminal to get to know more about the commands.
sq login
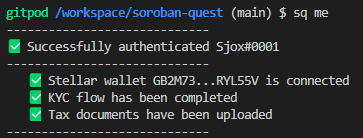
We should first use sq login to login to our Stellar Quest account. We should see four ✅s on our terminal to know that we're good to go!
After logging in, we don't need to login again if we continue to use the same GitPod workspace.
sq pull
sq pull is one of the main commands we will use before every quest. It "pulls" the new code from the soroban-quest repository so we can jump into solving quests.
sq play [index]
sq play [index] is another main command we will use on every quest. It creates an account on Futurenet, which we will use to solve the quests. Index is 1 for the first quest, 2 for the second and so on. After creating a new account, it asks if we would like to fund the account. The answer is almost always yes as creating Soroban contracts and invoking them require some Lumens.
sq fund [key]
sq fund [key] is useful when we forget to fund our account on the sq play command. The key parameter is our quest public key, which is in the form of something like GACS6G2UW226A5VJECJLJB5O772ZF47G6AOJVZ33VWHYTSJLUA6TUYQI.
sq check [index]
sq check [index] is used for checking if our solution is correct. If it is, we might get some rewards!
Soroban CLI
Soroban CLI is the heart of the Soroban Quest, and does everything required for developing Soroban smart contracts.
Type
soroban --help
to your terminal to get to know more about the commands.
soroban deploy
Allows us to deploy a Soroban contract to the Futurenet. The usage is
soroban deploy \
    --wasm <WASM> \
    --secret-key <SECRET_KEY> \
    --network-passphrase <NETWORK_PASSPHRASE> \
    --rpc-url <RPC_URL>
but since this development environment is automatically created, we only need to supply the WASM path using --wasm <WASM>. Doesn't make any sense? No worries, as it will soon enough!
Tips for interested peeps
I will try to include tidbits of information for advanced or curious developers to make use of. These stuff are definitely not required to know, but makes it easy to understand the whole concept.
The
SECRET_KEY,NETWORK_PASSPHRASE, andRPC_URLparameters are already set! Try usingecho $SOROBAN_SECRET_KEY,echo $SOROBAN_RPC_URL, and$SOROBAN_NETWORK_PASSPHRASEto see their values!
soroban invoke
Allows us to interact with contracts deployed on the Soroban network. The usage is
soroban invoke \
    --id <CONTRACT_ID> \
    --fn <FUNCTION> \
    --secret-key <SECRET_KEY> \
    --network-passphrase <NETWORK_PASSPHRASE> \
    --rpc-url <RPC_URL>
As before, we don't need to supply the --secret-key <SECRET_KEY>, --network-passphrase <NETWORK_PASSPHRASE>, and the --rpc-url <RPC_URL> arguments as they already exist. The id parameter is the address of a Soroban contract, fn is the function we would like to invoke on the Soroban contract, and arg is the arguments required for the function. We can use multiple arguments with multiple arg flags.
Other Useful Programs
We also have cargo available on the workspace, which is used for compiling the Soroban contracts. Python is also present, so we can make use of some helpful scripts for calculations and conversions.
cargo
cargo is the package manager of the Rust, like npm, and is also used for development as it has the ability to compile the contracts. We will use cargo to compile the contract codes, so that we can deploy them on Soroban.
We will use
cargo build --target wasm32-unknown-unknown --release
to compile our contracts and create the .wasm files required so that we can deploy them to the Soroban network.
Python
Since our workspace is a Linux environment, we will have access to Python and pip to install some packages. Using Python will be crucial to achieve success fast in a quest, as some conversions and tests can easily be done using Python. You can access it using
python
from your terminal.
After finishing your work with Python, you can use
quit()
to return to your Bash terminal.
Explorer
The main folder on the explorer will be the quests folder. Inside we can see all the quest files, which include README.md for the quest's purpose, STORY.md for the story of the quest, and the quest contract's source files on src.
lib.rs includes the source code of our Soroban contracts, and test.rs includes the tests for the said contract. The contracts are always correct as they are already built, but test files might contain some hints for the quests! Checking out test files is always helpful for checking out how the contract is used, so do check them out!
Finishing Thoughts
Now that we are pretty familiar with our development workspace, we can start working on some quests! Do check out my next post on how to understand and get to the solution of the "Hello World" quest, and understand even more about working with Soroban!


Top comments (1)
Hope you enjoyed this post!
If you want to support my work, you can send me some XLM at
GB2M73QXDA7NTXEAQ4T2EGBE7IYMZVUX4GZEOFQKRWJEMC2AVHRYL55VThanks for all your support!