I am making my homelab and I need to control the Noctua NF-A20 PWM chromax.black.swap 200x200mm fan from Raspberry Pi, and this is how I've done it.
Parts you need:
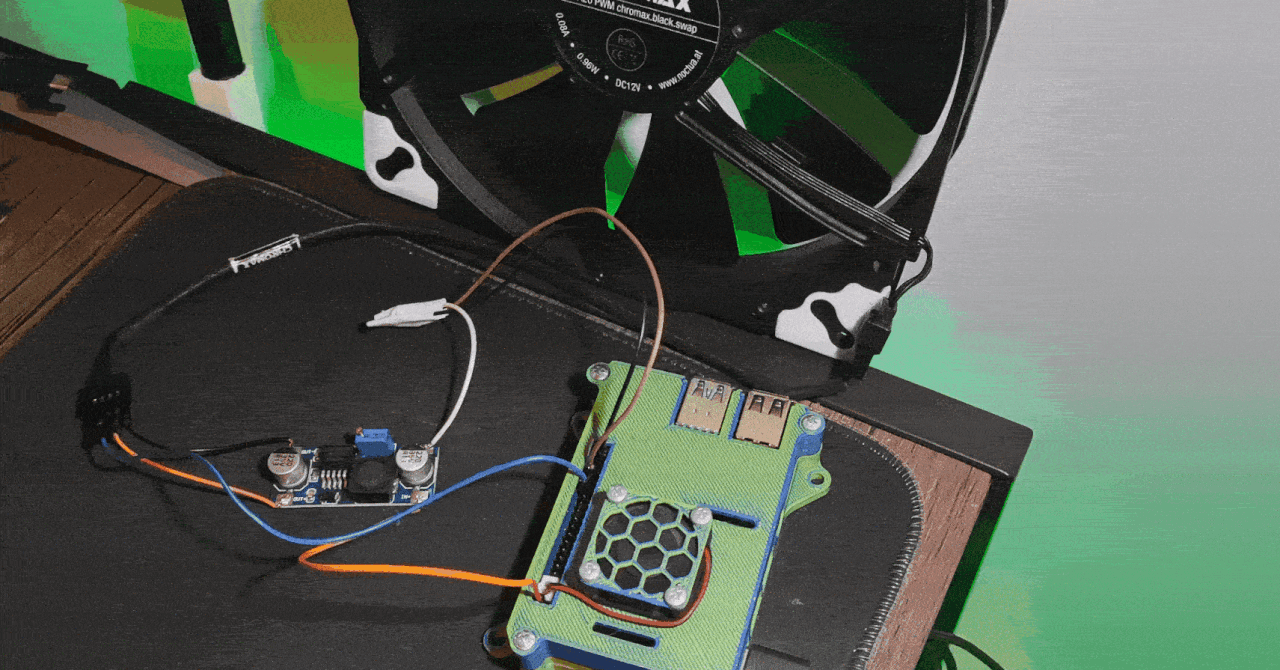
- Some Raspberry Pi
- The Noctua fan (should work with other 12V noctua fans as well)
- A multimeter
- LM2577 DC-DC Step Up Booster Converter
- NPN Transistor
- 1K Ohm Resistor
Diagram:

Let's start from the Pi:
1- Connect a wire from GPIO pin 16, or any simple gpio pin, to the 1k resistor, and then the other end of the transistor to the middle pin of the transistor.
2- A wire from the right pin of the transistor to any ground pin of the Pi. The face of the transistor is the flat one.
3- A wire from the left pin of the transistor to the "IN-" 5V negative input of the power convertor.
4- A wire from one of the 5V Pi pins (top right) to the "IN+" 5V positive input of the power convertor.
5- Important: adjust the converter to 12V or lower.
Do NOT connect the fan right now because you can permanently damage it because of high voltage.
A- Turn on the converter by connecting a ground pin from the Pi directly to the Power Converter's "IN-" connector OR by runing the code from the next section and just calling speed(fan, 100) / time.sleep(180).
B- Connect a multimeter to the converter's "OUT+" and "OUT-" and select voltage.
C- Turn the small yellow screw until the multimeter shows 12V or a bit smaller to be safe. I have mine at 11.5V.

D- When you are done disconnect the multimeter and the ground wire, or turn off the script.
The pinout from the noctua fan I found here:
https://faqs.noctua.at/en/support/solutions/articles/101000081757-what-pin-configuration-do-noctua-fans-use-

5- Wire from power convertor "OUT-" (12V negative) to noctua pin 1
6- Wire from power convertor "OUT+" (12V positive) to noctua pin 2
5- Wire from noctua pin 4 to Pi GPIO pin 12. This pin has PWM capability.
The code:
I used the code from this tutorial published on the-diy-life.com by Michael Klements (original code), and I modified it to use the transistor to turn off the fan, because the fan PWM does not scale down to 0 RPM. The minimum rotational speed is 20% (350RPM).
#!/usr/bin/env python3
import RPi.GPIO as GPIO
import time
import signal
import sys

# The Noctua PWM control actually wants 25 kHz (kilo!), see page 6 on:
# https://noctua.at/pub/media/wysiwyg/Noctua_PWM_specifications_white_paper.pdf
PWM_FREQ = 25           # [Hz] PWM frequency
FAN_PIN = 12            # BCM pin used to drive PWM fan
TRAN_PIN = 16           # NPN Transistor

def speed(fan, percent):
    print("set fan to", percent)
    if (percent < 20):
        GPIO.output(TRAN_PIN, False)
        fan.ChangeDutyCycle(20)
    else:
        GPIO.output(TRAN_PIN, True)
        fan.ChangeDutyCycle(percent)

try:
    signal.signal(signal.SIGTERM, lambda *args: sys.exit(0))
    GPIO.setwarnings(True)
    GPIO.setmode(GPIO.BCM)
    GPIO.setup(TRAN_PIN, GPIO.OUT)
    GPIO.setup(FAN_PIN, GPIO.OUT, initial=GPIO.LOW)
    fan = GPIO.PWM(FAN_PIN, PWM_FREQ)

    # do a few cycles just for testing
    speed(fan, 100)
    time.sleep(30)

    speed(fan, 50)
    time.sleep(30)

    speed(fan, 0)
    time.sleep(30)

    speed(fan, 20)
    time.sleep(30)

    speed(fan, 70)
    time.sleep(30)

    speed(fan, 100)
    time.sleep(30)

except KeyboardInterrupt:
    pass

finally:
    GPIO.cleanup()
Done. Happy tinkering !

Top comments (4)
Nice write-up.
I am about to using a 12v Noctua fan myself when I stumbled across your article.
What got me confused though, is that you connect the PWM lead directly to the Pi.
As I understand it, in the Noctua 12v fans, the PWM lead is 5v and not 3.3v.
Wouldn't this destroy the GPIO on the Pi?
Thank you.
I don't know if it fries the gpio pin.
I used it in this configuration for about 50 hours without any issues.
AI says this:
I will update this article if I make this modifications.
I was thinking in reverse. The GPIO pin is in output and shouldn't get harmed sine we're controlling the fan.
The fan's PWM is indeed 5V but the 3.3V coming from the GPIO is enough for a trigger in the fan. 😉
This is a really convoluted way to do this control.
Noctua publishes the PWM data for their fans. The PWM input is 3V3/5V0 tolerant and works best with a 25K PWM signal. The easier way to do this is to wire the boost converter to the 5V supply continuously and wire one of the four PWM GPIOs from the Pi to a 10K pull-up or pull-down resistor and to the PWM input to the fan. No need to switch the boost converter. This eliminates the startup/shutdown wear on the boost converter, transients on the power supply to the fan, and the need for the NPN transistor completely.
Some comments may only be visible to logged-in visitors. Sign in to view all comments.