Trying to learn my way around GIMP the other day led me to Sirar Salih's developer blog.
I thought it looked SO GOOD:
Helpfully, Sirar links to the original theme on his page: Hydejack, built with Jekyll and hosted on Github pages. Obviously, I had to try it myself.
Here's my working version:

For some helpful tips and a better how-to than what you'll find elsewhere, read on.
Installation
The Hydejack site gives several installation options.
I don't know much about Ruby/gems, so I didn't go that route. Going the zip file route just sounded messy, and I've been known to mix up my git clone and my git fetch.
That left installing via starter kit, which gives you a decent quick start guide in its ReadME.
I elected to start by setting up my GitHub pages site, just because it sounded the easiest, but I had to change a few of the steps:
- Fork the hydejack starter repo.
- Go to the Settings tab in your new repo. Rename the repository.
- Still in Settings, scroll down to GitHub pages.
- Set source to
master branch - Copy the URL this generates.
- Go back to the code (still in GitHub). Open the
_config.ymlfile. - Uncomment the
urlline and replace the url with your new GitHub page. - Uncomment the
baseurlline and replace with the repository name in single quotes. - Commit the changes.
- To see the site, go to the GitHub pages URL.
Running Jekyll locally
Now, I did all of this before I had my own local copy of the site. So it was satisfying to see the blog theme immediately live and hosted, but is obviously not ideal for development. Onward to setting up local development.
- Create a new directory on your computer where your project will live.
-
cdinto your new directory. - Run
git clone [YOUR_PROJECT_REPO](NOTE: I didn't have togit initin the folder before cloning, which surprised me) -
cdinto the root directory (which is where you_config.ymlfile is stored. - Run
bundle install(NOTE: this requires Bundler. If you don't already have it, rungem install bundler) - Run
bundle exec jekyll serve - To visit the site, go to localhost:4000
- To start developing, open this project directory in your code editor of choice
Now, a note about the local site: although the jekyll server continues running as you make changes in your code base, I have had to stop and restart the server for changes to take effect. I need to research more to find out if there's a way for the jekyll server to be watching for changes and update accordingly.
Digging into the development
I ran through the HydeJack Configuration page to start customizing my website, and it's great.
But, I started to notice that there were some files and folders in my GitHub repo that weren't in my local copy. What's the deal?
Well, the .gitignore file includes the _site folder. Which, you know, contains pretty much the whole site.
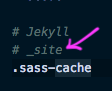
I commented out that line so that I could get into the meat of those pages.
*~*UPDATE~*~
So guys, the _site file is what gets built when you run the Jekyll server. If you try to put anything in there, it will be deleted when you build. So, keep that shiz in your .gitignore.
Resources 'n learnin
I didn't know anything about Jekyll before starting this site. And honestly, not a lot of great resources out there on it. A lot of the videos and articles I found are from 4 or 5 years ago, which makes me feel like Jekyll is a little passe?
In any case I liked this video for an intro:
Just like HydeJack is free to use, there are a bunch of other Jekyll themes out there!
Go to this link to peruse a bunch of free and paid options.
Finally, for the pared-down intro to Jekyll for blogging, check out this dev post:


Top comments (0)