Node.js is commonly used in conjunction with NoSQL databases such as MongoDB, although it also works well with relational databases such as MySQL, PostgreSQL, and others. MySQL has been around for decades and is one of the widely used relational database management systems (RDBMS). The world's most open-source database is an ideal RDBMS for both small and large applications.
This tutorial will explore how to build a REST API with Express and MySQL by creating a simple database for adding, updating, and removing todos. You can follow along by cloning the GitHub repository for this project. Let's get started!
Prerequisites
This tutorial is a hands-on demonstration. Be sure you have the following in place before getting started:
All the demonstrations will use Ubuntu 20.04 with Node 14 LTS. It also works for other operating systems and other versions of Linux.
What is REST?
REST (Representational State Transfer) is a software architectural style that developers established to assist in creating and developing the World Wide Web's architecture. REST specifies a set of criteria on how the architecture of an Internet-scale distributed hypermedia system, such as the Web, should operate. It is one of the various ways applications, servers, and websites may communicate data and services. It generally provides the rules for how developers working with data and services represent elements through the API. Other programs may appropriately request and receive the data and services that an API makes accessible.
Why use REST?
REST has several unique characteristics that make it one of the top software architectural styles extensively employed by software engineers.
- It is lightweight: REST APIs use the HTTP standard. Thus you can use XML, JSON, HTML, and other data formats. REST APIs are, therefore, quick and lightweight, making them an excellent choice for developing mobile applications, internet of things devices, and other applications.
- It is independent: The separation of client and server in a REST API makes it independent. The REST protocol separates the data storage and the user interface from the server, making it easy for developers to collaborate in building a project.
- It is scalable and flexible: REST APIs are scalable and flexible to use due to the separation of the client and the server, allowing developers to integrate REST APIs without any extra effort simply.
- It is stateless: Calls are made to REST independently, and each of these calls contains all the data to complete the request.
- It has a uniform interface that allows independent evolution of the application without having the application's services or models and actions tightly coupled to the API layer itself.
- It is a layered architectural system that builds a hierarchy that helps create a more scalable and modular application.
Overview of MySQL databases
MySQL is an open-source relational database management system (RDBMS). It is the most popular database system used with PHP. MySQL is a fully-managed database service used to deploy cloud-native applications. HeatWave, an integrated, high-performance query accelerator, boosts MySQL performance by 5400x.
MySQL is developed, distributed, and supported by Oracle Corporation with the following features.
- The data in a MySQL database lives in tables that consist of columns and rows.
- MySQL is a database system that runs on a server.
- MySQL is ideal for both small and large applications.
- MySQL is a very fast, reliable, and easy-to-use database system. It uses standard SQL.
- MySQL compiles on several platforms.
Creating a Node.js application
Now that we have explored what REST is all about, and had a quick overview of the MySQL database, let's dive into creating our RESTFul application. First, we need to create a folder for our project with the command below:
mkdir rest-with-mysql && cd rest-with-mysql
The above command will create a rest-with-MySQL folder and change the directory to the folder. Next, we'll initialize a new node.js project with the command below:
npm init -y
The above command will initialize a new Node.js project, skipping all the prompts for the project details. The command will also create a package.json file in our project's root directory, which will record all the essential metadata about our project. You can decide to go through the prompts to enter the project details by removing the flag from the command.
Next, we'll install the dependencies we require for our project.
npm install express MySQL cors
The above command will take a little while to complete, but we'll have Express, MySQL, and Cors installed at the end. Finally, let's look at our project structure. At the end of this tutorial, our project structure will look like this:

Setting up the Express server
Now that we have our dependencies installed let's put them to work by first setting up our express server.
Create an app.js file and add the following code snippet below to it. We'll import the following:
- Express: To create our server.
- Cors: To allow and redirect request resources.
- Router: This is where our API routes will be defined later in the sections.
- AppError and errorHandler: These are our global error handler functions. We will create them later.
const express = require("express");
const cors = require("cors");
const router = require("./routes");
const AppError = require("./utils/appError");
const errorHandler = require("./utils/errorHandler");
….
Next, we create an app instance from express, using the express.json() middleware in our app to parse the URL encoded body. Finally, we make our API router middleware listen to incoming requests to the URL specified.
Then, we check for URLs missing from our endpoints and throw a 404 error to the user if they're accessed. The global error handler will handle this (we will create it in subsequent sections).
app.use(api, router);

app.all("*", (req, res, next) => {
 next(new AppError(`The URL ${req.originalUrl} does not exists`, 404));
});
app.use(errorHandler);
...
Finally, we will configure our application to listen to port 3000.
const PORT = 3000;
app.listen(PORT, () => {
 console.log(`server running on port ${PORT}`);
});

module.exports = app;
Setup and connect to MySQL
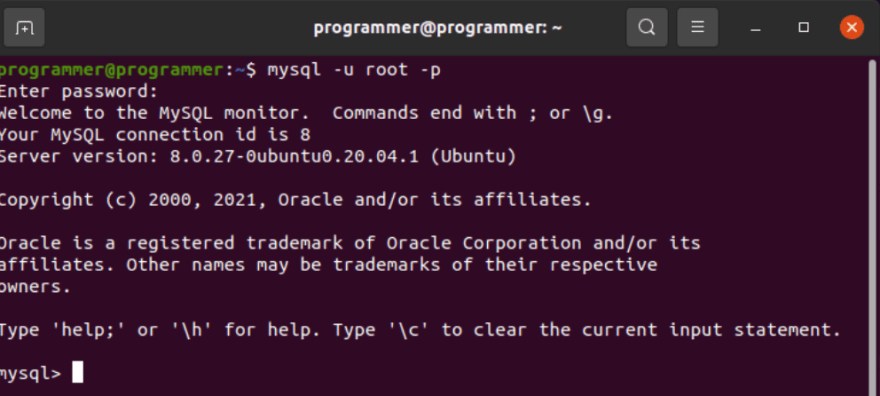
Now, we have our Express server set up. Let's go ahead and set up our MySQL Database. First, we'll open our MySQL shell with the command below:
//On Windows
MySQL

//Ubuntu
mysql -u root -p
The above command will prompt for your root password.

Enter the password and press the Enter key to continue. If everything goes well, you should see a similar output to the screenshot below on your terminal.

Next, execute the SQL statements below on your MySQL shell to create our todos database.
CREATE DATABASE todos
Then, execute the command below to create our todolist table. The table will have an id, name, status, date_created fields. The id filed will be the primary key of our table.
CREATE TABLE todolist(id int NOT NULL AUTO_INCREMENT,
name varchar(50) NOT NULL,
status varchar(50),
date_created DATETIME DEFAULT CURRENT_TIMESTAMP ON UPDATE CURRENT_TIMESTAMP,
PRIMARY KEY (id));
Next, create services folder in our project root directory. In the services folder, create a db.js file and add the following code snippets below to it.
const mysql = require('mysql');
const conn = mysql.createConnection({
 host: "localhost",
 user: "root",
 password: "1234",
 database: "todos",
});

conn.connect();

module.exports = conn;
The above code will connect to our MySQL database using the MySQL createConnection method. The createConnection method takes the host, username, password, and database name as required parameters.
Creating application controllers
We have successfully connected our MySQL database. Let's proceed to create the routes for our application.
In our project root directory, create a controllers folder, then create an index.js file in the controllers folder.
First, we'll import our global error handler and our MySQL database connection.
const AppError = require("../utils/appError");
const conn = require("../services/db");
Next, we'll create our getAllTodos handler to fetch all the todos in our database. This handler will use the MySQL query method, which takes an SQL query and a callback function as parameters. If an error occurs during the operation, we'll return the error to the user using the AppError class. Then, we return the data to the user when the operation runs successfully with a 200 status code.
exports.getAllTodos = (req, res, next) => {
 conn.query("SELECT * FROM todolist", function (err, data, fields) {
   if(err) return next(new AppError(err))
   res.status(200).json({
     status: "success",
     length: data?.length,
     data: data,
   });
 });
};
Next, we'll create our createTodo handler to add new todos to our database. Then we check if the client is sending an empty form and return a 404 error message.
Then, we get the todo name from the request body and set the status of each todo created to pending by default. Using the query mysql method, we create an insert query to add the todo to our database.
exports.createTodo = (req, res, next) => {
 if (!req.body) return next(new AppError("No form data found", 404));
 const values = [req.body.name, "pending"];
 conn.query(
   "INSERT INTO todolist (name, status) VALUES(?)",
   [values],
   function (err, data, fields) {
     if (err) return next(new AppError(err, 500));
     res.status(201).json({
       status: "success",
       message: "todo created!",
     });
   }
 );
};
Next, we create a getTodo handler to get our todos by IDs. First, we'll check if the id is specified in the request parameter, then return an error to the client if none was found.
We’ll execute an SQL statement to get todo whose id is on the request parameter and return it to the client.
exports.getTodo = (req, res, next) => {
 if (!req.params.id) {
   return next(new AppError("No todo id found", 404));
 }
 conn.query(
   "SELECT * FROM todolist WHERE id = ?",
   [req.params.id],
   function (err, data, fields) {
     if (err) return next(new AppError(err, 500));
     res.status(200).json({
       status: "success",
       length: data?.length,
       data: data,
     });
   }
 );
};
Next, we’ll create our updateTodo handler to update our todos, this time will modify the todo whose id is in the request parameter to be completed.
exports.updateTodo = (req, res, next) => {
 if (!req.params.id) {
   return next(new AppError("No todo id found", 404));
 }
 conn.query(
   "UPDATE todolist SET status='completed' WHERE id=?",
   [req.params.id],
   function (err, data, fields) {
     if (err) return next(new AppError(err, 500));
     res.status(201).json({
       status: "success",
       message: "todo updated!",
     });
   }
 );
};
Finally, we’ll create a** deleteTodo** handler to delete a todo from our database. We’ll execute a delete statement to delete a todo whose id is the request parameter.
exports.deleteTodo = (req, res, next) => {
 if (!req.params.id) {
   return next(new AppError("No todo id found", 404));
 }
 conn.query(
   "DELETE FROM todolist WHERE id=?",
   [req.params.id],
   function (err, fields) {
     if (err) return next(new AppError(err, 500));
     res.status(201).json({
       status: "success",
       message: "todo deleted!",
     });
   }
 );
}
Creating global error handlers
Now, let's quickly create our global error handlers. To get started, create a utils folder in our project root directory. Then, create an appError.js and errorHandler.js files. Add the following code snippet below to the appError.js file.
class AppError extends Error {
 constructor(msg, statusCode) {
   super(msg);

   this.statusCode = statusCode;
   this.error = `${statusCode}`.startsWith('4') ? 'fail' : 'error';
   this.isOperational = true;

   Error.captureStackTrace(this, this.constructor);
 }
}
module.exports = AppError;
The above code creates an AppError class that extends the built-in Error class. We'll then pass the error message and status to the Error class constructor. Then we'll check what type of error occurred in our application with the start of the status code, and add the error to the error stack trace.
Next, open the errorHandler.js file and add the code snippet below:
module.exports = (err, req, res, next) => {
 err.statusCode = err.statusCode || 500;
 err.status = err.status || "error";
 res.status(err.statusCode).json({
   status: err.status,
   message: err.message,
 });
};
The above code will check for possible errors in our application and send the corresponding error and status code to the client without breaking our application.
Creating application routes
In our project root directory, create a routes folder, then create an index.js file, and add the following code snippet below to it.
const express = require("express");
const controllers = require("../controllers");
const router = express.Router();

router.route("/").get(controllers.getAllTodos).post(controllers.createTodo);
router
 .route("/:id")
 .get(controllers.getTodo)
 .put(controllers.updateTodo)
 .delete(controllers.deleteTodo);
module.exports = router;
The above code creates a router object from the express router class. Then we make the following routes in our application.
- Get Route: to get all the todos in our database.
- Post Route: to add a new todo to our database
- Get Route: to get a todo by its id
- Put Route: to update a todo by the id
- Delete Route: to delete a todo by the id.
Then we export the router object.
View Data with Arctype
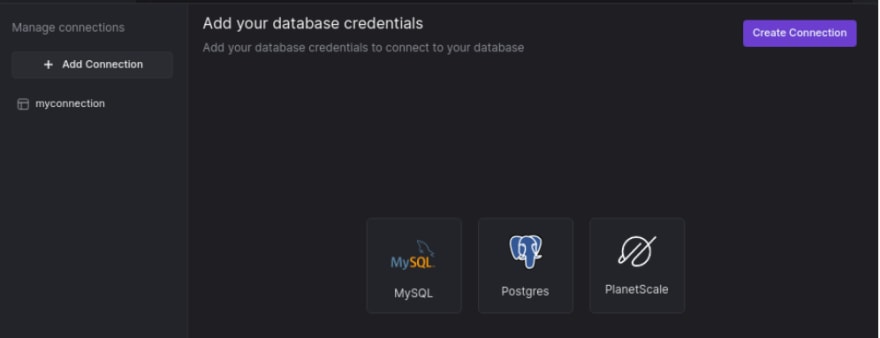
Now we've created all our routes. Let's now connect to Arctype to visualize the data in our database. To do that, we need to download Arctype from the official website. Get Arctype downloaded and installed, and then connect your database to it. When you launch the Arctype, click on MySQL to create a connection - follow this guide if you need help.

Then, we’ll add our connection credentials and press the save button.
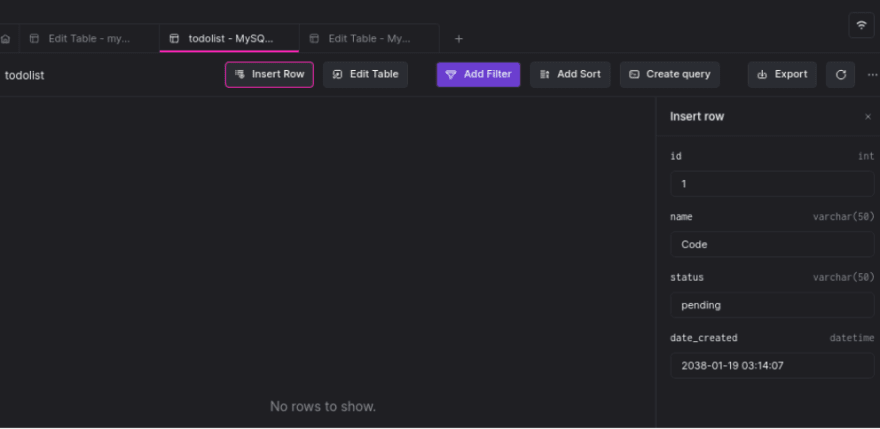
We have successfully connected to our database. You should see our database tables on the right-hand side of the Arctype dashboard. Click on the todolist table to run some queries on our database on Arctype.
We can add a new record to our database by clicking on the Insert row tab.
We can also edit and query our database table using Arctype... and more.
Conclusion
You now understand how to build a REST API using the Express framework—install the Express Node.js package, create a MySQL database, and create a simple to-do application. That's all it takes!
Perhaps you can learn more on how to use MySQL with Node.js here. Feel free to reach out on Twitter if you have any questions!


Latest comments (0)