Since I've been working in WPF a lot, it's jumped out at me how many features are conspicuously missing. The feature I'll talk about today is color picking. I'll start with the final dialog box, since I'll be referring to it later:
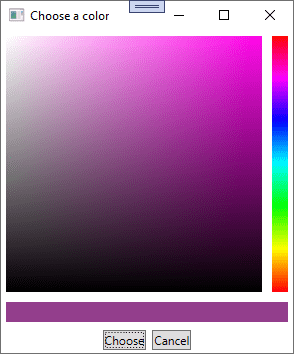
Computer color is a three-dimensional space, not least because there are three colors of filters in your monitor. The simpler color space is the colors of those filters—red, green, and blue—but it's also the hardest to work with. For normal use, we typically use a different three-dimensional space, of hue, saturation, and value.
Hue is your position on the rainbow, so values of hue go through red-orange-yellow-green-blue-violet. Saturation is the "whiteness" of your color, and value is the "blackness." When picking HSV colors, the standard is to have a two-dimensional selector (a rectangle) and a one-dimensional selector (a line). I followed Gimp's example, with saturation and value as the 2D selection, and hue as the 1D. Refer to the above image to see what I mean: you pick a hue in the small box on the right, then the big box on the left shows you all possible saturation-value combinations for that hue.
The first thing we need, then, is functions to convert between RGB and HSV colors:
let inline hsv_to_rgb h s v =
    let i = int (h * 6.) % 6
    let f = h * 6. - System.Math.Floor(h * 6.)

    let v = v * 255.
    let p = byte (v * (1. - s))
    let q = byte (v * (1. - f * s))
    let t = byte (v * (1. - (1. - f) * s))
    let v = byte v

    if (i = 0) then (v, t, p)
    else if (i = 1) then (q, v, p)
    else if (i = 2) then (p, v, t)
    else if (i = 3) then (p, q, v)
    else if (i = 4) then (t, p, v)
    else (v, p, q)

let inline rgb_to_hsv r g b =
    let v = max r <| max g b
    let delta = float (v - (min r <| min g b))

    let s = if v = 0uy then 0. else delta / (float v)

    let h =
        if s = 0. then 0.
        else
            if r = v then (float g - float b) / delta
            else if g = v then 2. + (float b - float r) / delta
            else 4. + (float r - float g) / delta
    let h = if h < 0. then h + 6. else h
    (h / 6., s, (float v) / 255.)
Here, HSV is three floats in the range [0, 1], while RGB is three bytes (so the range is [0, 255]). Hue gets scaled out to six, for the three primary (red, green, blue) and three secondary (yellow, cyan, magenta) colors, but to me it makes more sense for everything to be in the same range outside these functions.
Now we get into WPF weirdness. As far as I can tell, Brushes are really not configurable. While there is a LinearGradientBrush, the linear gradient is in RGB space. The only real answer I could find to make a hue spectrum is to make an image. You could make this by hand if you want, and Gimp or Photoshop will probably help you out, but we can also just do this in code.
let hue_gradient =
    let bitmap = new System.Windows.Media.Imaging.WriteableBitmap(1, 360, 96., 96., System.Windows.Media.PixelFormats.Pbgra32, null)
    let colors = [|
            for i in 0u .. 359u ->
                let y = 359u - i
                let i = y / 60u
                let h = ((y % 60u) * 255u) / 60u

                if i = 0u then
                    (h <<< 8) ||| (255u <<< 16) ||| (255u <<< 24)
                else if i = 1u then
                    (255u <<< 8) ||| ((255u - h) <<< 16) ||| (255u <<< 24)
                else if i = 2u then
                    h ||| (255u <<< 8) ||| (255u <<< 24)
                else if i = 3u then
                    255u ||| ((255u - h) <<< 8) ||| (255u <<< 24)
                else if i = 4u then
                    255u ||| (h <<< 16) ||| (255u <<< 24)
                else
                    (255u - h) ||| (255u <<< 16) ||| (255u <<< 24)
        |]
    bitmap.WritePixels(System.Windows.Int32Rect(0, 0, 1, 360), colors, 4, 0, 0)
    bitmap.Freeze()
    new System.Windows.Media.ImageBrush(bitmap)
There's a lot of things to say about this function. The image this produces is 1 pixel wide and 360 pixels tall. This is just following the convention that hue is a circle, and there are 360° in a circle, but you could make it bigger if you need more color resolution.
The calculations here are really just an integer-only reformulation of hsv_to_rgb above, except that saturation and value are always 1. The other big thing here is, this writes out one pixel at a time: the type of colors is uint32[]. In F#, ||| is the bitwise-or operator, and <<< is the bitshift-left operator.
This brings us to the issue that most computers eat eggs from the little end: "A little-endian system, in contrast, stores the least-significant byte at the smallest address" (from Wikipedia). Least significant means highest value, hence the pixel ordering in memory is in fact ARGB, for a pixel format called BGRA. Meaning, if a color byte is not shifted, that's the blue channel, then an 8-bit shift is green, 16 bits is red, and 24 bits is alpha.
hue_gradient is an ImageBrush, so it can be used as the Fill of a rectangle. We still need a callback, but that'll only make sense in the context of saturation and value.
This is where things get a bit mathematical. The box for saturation and value needs to be updated whenever a new hue is selected, but generating a new image on every mouse move event wouldn't be great. It turns out, we can do this entirely with alpha blending.
The way RGBA transparency works is quite simple:
blended_color =
    foreground_alpha * foreground_color +
        (1 - foreground_alpha) * background_color
Looking back at the HSV to RGB conversion, we had,
let v = v * 255.
let p = byte (v * (1. - s))
let q = byte (v * (1. - f * s))
let t = byte (v * (1. - (1. - f) * s))
let v = byte v
p, q, and t are used to set color channels: q and t for secondary channels, and p is for an "unused" channel. For example, in the case where we're moving from red to yellow, the RGB color is (v, t, p): v, pure value, sets the amount of red, while "leftover" hue (f) is combined with saturation and value to set yellow, while just saturation and value set blue.
The more important point here is, this looks a lot like the equation for alpha blending. I worked this all out numerically, so I don't have a full derivation here (exercise for the reader?), but it turns out you can make a saturation-value selector by overlaying three Brushes on top of each other, from bottom to top:
- A SolidColorBrush, which contains an HSV color of the form (H, 1, 1)—we'll call this the
color_background_brush - A LinearGradientBrush, which goes horizontally from the RGBA color (255, 255, 255, 255) to (255, 255, 255, 0)—that is, opaque white to transparent white
- A LinearGradientBrush, which goes vertically from the RGBA color (0, 0, 0, 0) to (0, 0, 0, 255)—that is, transparent black to opaque black, also note the alpha values are reversed here since in WPF going down is an increase in y, in other words, we want this brush to be opaque at the bottom
When a new color is selected, we just have to update the SolidColorBrush to the new hue, and the whole SV color space is updated automatically. Or if that's too mystical for you, it gets updated by fragment composition in the rendering pipeline.
Now all that's left is a couple events:
    let mutable (h, s, v) = (0., 1., 1.)
    let mutable (r, g, b) = hsv_to_rgb h s v

    let hue_bar_drag _ (args: System.Windows.Input.MouseEventArgs) =
        if args.LeftButton = System.Windows.Input.MouseButtonState.Pressed then
            h <- 1. - args.GetPosition(hue_bar).Y / (float color_box_height)
            let (r', g', b') = hsv_to_rgb h 1. 1.
            color_background_brush.Color <- System.Windows.Media.Color.FromRgb(r', g', b')
            let (r', g', b') = hsv_to_rgb h s v
            r <- r'
            g <- g'
            b <- b'
            color_preview_brush.Color <- System.Windows.Media.Color.FromRgb(r, g, b)
    hue_bar.MouseLeftButtonDown.AddHandler(hue_bar_drag)
    hue_bar.MouseMove.AddHandler(hue_bar_drag)

    let sv_bar_drag _ (args: System.Windows.Input.MouseEventArgs) =
        if args.LeftButton = System.Windows.Input.MouseButtonState.Pressed then
            s <- args.GetPosition(value_mask).X / (float color_box_height)
            v <- 1. - args.GetPosition(value_mask).Y / (float color_box_height)
            let (r', g', b') = hsv_to_rgb h s v
            r <- r'
            g <- g'
            b <- b'
            color_preview_brush.Color <- System.Windows.Media.Color.FromRgb(r, g, b)
    value_mask.MouseLeftButtonDown.AddHandler(sv_bar_drag)
    value_mask.MouseMove.AddHandler(sv_bar_drag)
color_box_height, of course, is just the size (in pixels) of the hue and saturation-value selection boxes. I've got it set to 256 in the above image.
After this you just have to configure the UI as you'd like it: color_preview_brush is a SolidColorBrush applied to the rectangle along the bottom, which displays the currently selected color. You'll need to use a Grid to properly overlay color_background_brush (or rather, a Rectangle with that as its Fill) with the saturation and value masks. You could also add a few Lines or Circles to show the positions of the selected color if you're so inclined. But you know, I'm not going to tell you how to make your dialog boxes. Finally, the constantly-updated (r, g, b) values are the return.
Anyway, that's how you can make a color picker dialog. I mean sure you could download a library for it, but isn't it more interesting figuring out how they work?

Top comments (0)