Note: Checkout my github repo for the whole example
If you have html forms on your website, it is quite likely that sooner or later you will receive spam. Bot interactions with your website not only result in spam emails or unwanted content, but it also spoils your user-traffic analytics. Recaptcha challenges help differentiate humans from bots so you can filter out unwanted traffic from your webpage.
In this blog, I try to explain how you can integrate Google Recaptcha v3 with your website to protect from spam and abuse. You can use this technique to integrate recaptcha even with site builders such as Shopify.
Google reCAPTCHA v3 is documented here, so I will not go into the details of what it is and how it differs from v2. Instead, I will dive right into the code required on front-end and back-end for you to integrate it with your website.
Front-End (Website)
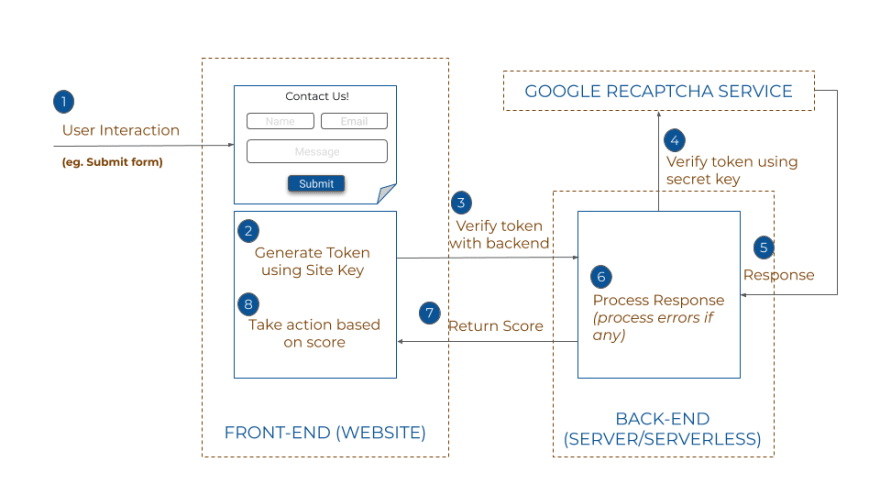
As shown in the diagram above, your web-page must generate a token using the site key provided by Google when you register your website for reCaptcha.
The code below shows you can generate a token on a user action like form submit.
Note: Don't forget to import the reCaptcha library as mentioned here. Make sure you put in your site key in the last part (render=) of the import
Note the variable 'apiString' in the code above. This is your backend endpoint which we will create as described below.
Back-end (Server/Serverless)
The last step is to verify the token generated by your front-end. This needs to be done on the back-end since Google does not allow this verify call to be executed by front-end. If you have an express server, you could create a new route for this or an even simpler approach (or so I would claim) is to use a serverless function (like Firebase function/Google Cloud function/AWS Lambda). In this example, I use a firebase function
Deploying Firebase Functions
Firebase functions is pretty well-documented by Google, so I won't go into details here. But once you deploy the above function to your project using firebase deploy, you will get an api end point such as:
https://us-central1-APP-ID.cloudfunctions.net/YOUR_FUNCTION_NAME
Use this as the apiString variable in the front-end code above to make calls to your function with the generated token as the parameter.
You can find some very basic front-end/backend code along with a puppeteer test in my repo here. Try it out and let me know your thoughts!


Top comments (1)
Some comments may only be visible to logged-in visitors. Sign in to view all comments.