
June 27, 2024: This blog post uses Amplify Gen 1, if you're starting a new Amplify app I recommend trying out Gen 2!
In this tutorial, we'll be talking about authorization and how to implement it with AWS Amplify's DataStore. First, let's get on the same page with what authorization and authentication are:
Authorization - Different users have different actions that they can perform. Authentication - making sure someone is who they say they are, for example through making them enter a password.
Please note that I work as a Developer Advocate on the AWS Amplify team, if you have any feedback or questions about it, please reach out to me or ask on our discord - discord.gg/amplify!
This tutorial will be bypassing teaching React and AWS Amplify - check out this React tutorial and this Amplify Admin UI tutorial if you're new to either. You'll also need to know React Router.
I created a repo with some starter code in order to get to the relevant pieces of the tutorial. Go ahead and clone it down if you want to follow along. Run npm i within the cloned directory to get all the needed packages installed.
We'll be building a blogging platform with a frontend and backend authentication system with admin roles and certain actions restricted to content's creators. We'll first have blogs -- similar to Medium publications or Blogger blogs. Only admin users will be able to create new blogs, though anybody can view a list of the blogs. Blogs will have posts within them that anyone can view, but only the person who created the blog will be able to update or delete blogs.
Create a Blog using the Admin UI
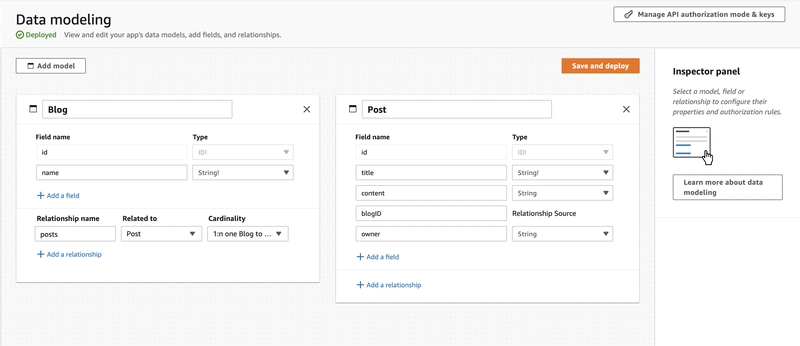
First, we'll need to create the data models for our app. You can go to the Amplify Sandbox in order to get started. We'll create two models, a Blog and a Post. The Blog will be a publication that has a collection of Posts attached to it. The Blog will just have a name, and then Blog will have a title, and content. All fields will be strings, I also made name and title required fields. There will also be a 1:n relationship between the two models.
Now, go ahead and deploy your data models by following the guided process the Admin UI offers. Once it deploys, go into the Admin UI and create a few blogs and a few posts.
Then, we'll add authentication. In the Admin UI, click on "Authentication" tab and then configure auth. I deployed with the default options.
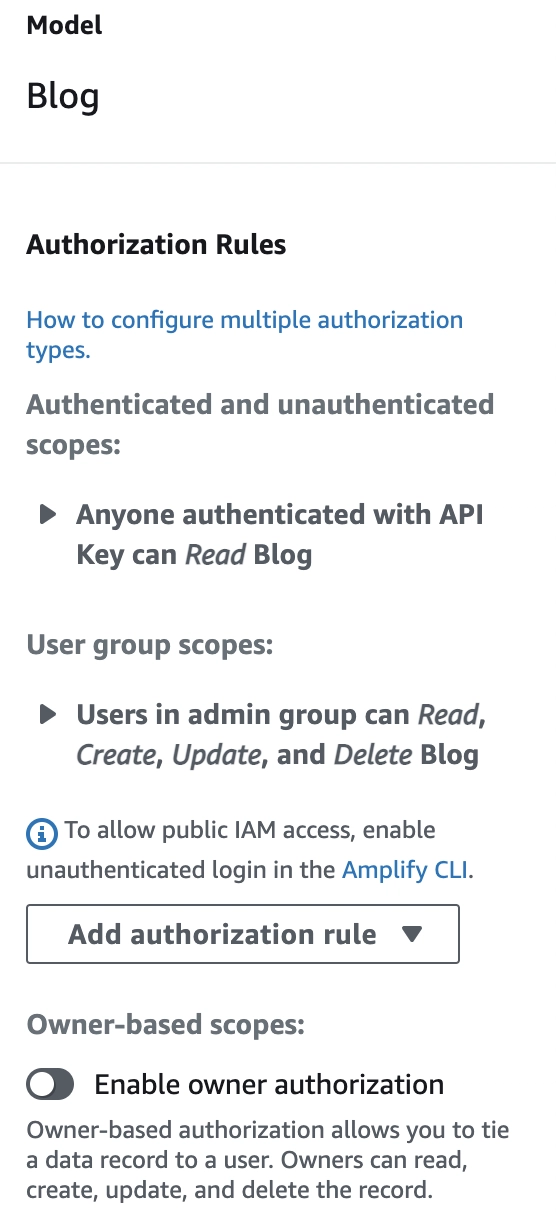
Once your authentication is deployed, add in authorization rules. First, click on the Blog model and on the right-hand panel, configure authorization. Uncheck create, update, and delete from under "Anyone authenticated with API Key can..." -- we'll allow anyone to view a blog but only admins to mutate them. Then, click the add an authorization rule dropdown. From here click "Create new" under "Specific Group", and name your group "admin". Allow admin users to perform all actions.
Now we'll configure authorization for posts. Select that model, and again change the permissions for "Anyone authenticated with API Key" to "Read" a post. Then toggle the "Enable owner authorization" to the on state. Under "Deny other authenticated users to perform these operations on an owner’s record:" select "Update" and "Delete" -- we want anyone to be able to read a post, but only the post's owner should be able to mutate existing posts. We also need to allow someone to be able to create posts! Under "add authorization rule" and then "Any signed-in users authenticated using" and then choose "Cognito".

Back in your code's directory, run Amplify pull with your app id -- you can find this command under "local setup instructions" in the Admin UI. If you're not using the cloned repository from above, install the Amplify JavaScript and React libraries.
$ npm i aws-amplify @aws-amplify/ui-react
You'll also need to configure Amplify in your index.js file so that your frontend is linked to your Amplify configuration. You'll also need to configure multi-auth within this step.
import Amplify, { AuthModeStrategyType } from 'aws-amplify'
import awsconfig from './aws-exports'

Amplify.configure({
  ...awsconfig,
  DataStore: {
    authModeStrategyType: AuthModeStrategyType.MULTI_AUTH
  }
})
Implement Authentication
First, we'll need to implement authentication for our site so that users can log in and different accounts can perform different actions. I created a <SignIn> component with a route to it. Then, add the withAuthenticator higher order component to implement a user authentication flow!
// SignIn.js

import { withAuthenticator } from '@aws-amplify/ui-react'
import React from 'react'

import { Link } from 'react-router-dom'

function SignIn () {
  return (
    <div>
      <h1>Hello!</h1>
      <Link to='/'>home</Link>
    </div>
  )
}

+ export default withAuthenticator(SignIn)
Then, we'll load all the blogs on to the home page of the app. I'm starting with the following code that will implement different routes for my app. If you're using the cloned boilerplate, you'll already have this in your code. You'll also want to create React components for BlogPage, PostPage, and BlogCreate -- these can just be empty components for now.
import './App.css'

import { Auth } from 'aws-amplify'
import { DataStore } from '@aws-amplify/datastore'
import { useEffect, useState } from 'react'
import { Switch, Route, Link } from 'react-router-dom'

import BlogPage from './BlogPage'
import PostPage from './PostPage'
import BlogCreate from './BlogCreate'
import SignIn from './SignIn'

import { Blog } from './models'

function App () {
  const [blogs, setBlogs] = useState([])

  return (
    <div className='App'>
      <Switch>
        <Route path='/sign-in'>
          <SignIn />
        </Route>
        <Route path='/blog/create'>
          <BlogCreate isAdmin={isAdmin} />
        </Route>
        <Route path='/blog/:name'>
          <BlogPage user={user} />
        </Route>
        <Route path='/post/:name'>
          <PostPage user={user} />
        </Route>
        <Route path='/' exact>
          <h1>Blogs</h1>
          {blogs.map(blog => (
            <Link to={`/blog/${blog.name}`} key={blog.id}>
              <h2>{blog.name}</h2>
            </Link>
          ))}
        </Route>
      </Switch>
    </div>
  )
}

export default App
In the <App> component, first import the Blog model.
import { Blog } from './models'
Then, create a useEffect which will be used to pull data to that component.
// create a state variable for the blogs to be stored in
const [blogs, setBlogs] = useState([])

useEffect(() => {
  const getData = async () => {
    try {
      // query for all blog posts, then store them in state
      const blogData = await DataStore.query(Blog)
      setBlogs(blogData)
    } catch (err) {
      console.error(err)
    }
  }
  getData()
}, [])
Then, we'll want to fetch the current user if there is one. We'll also want to check and see if that user is an admin.
const [blogs, setBlogs] = useState([])
+ const [isAdmin, setIsAdmin] = useState(false)
+ const [user, setUser] = useState({})

useEffect(() => {w
  const getData = async () => {
    try {
      const blogData = await DataStore.query(Blog)
      setBlogs(blogData)
      // fetch the current signed in user
+ const user = await Auth.currentAuthenticatedUser()
      // check to see if they're a member of the admin user group
+ setIsAdmin(user.signInUserSession.accessToken.payload['cognito:groups'].includes('admin'))
+ setUser(user)
    } catch (err) {
      console.error(err)
    }
  }
  getData()
}, [])
Finally, we'll want to render different information depending if the user is signed in or not. First, if the user is signed in, we'll want to show a sign out button. If they're logged out, we'll want to give them a link to the sign in form. We can do this with the following ternary:
{user.attributes
  ? <button onClick={async () => await Auth.signOut()}>Sign Out</button>
  : <Link to='/sign-in'>Sign In</Link>}
You can also add this snippet to make it so that admin users have a link to create a new blog.
{isAdmin && <Link to='/blog/create'>Create a Blog</Link>}
I added both lines to the home route for my site.
  <Route path='/' exact>
    <h1>Blogs</h1>
+ {user.attributes
+ ? <button onClick={async () => await Auth.signOut()}>Sign Out</button>
+ : <Link to='/sign-in'>Sign In</Link>}
+ {isAdmin && <Link to='/blog/create'>Create a Blog</Link>}
    {blogs.map(blog => (
      <Link to={`/blog/${blog.name}`} key={blog.id}>
        <h2>{blog.name}</h2>
      </Link>
    ))}
  </Route>
Here is the completed code for the App component.
Blog Page
Now, we'll implement the component that shows one blog. We'll first query to get the blog's information, then get the posts attached to it. In my app, I used React Router to create blog detail pages for each blog that follow the url pattern /blog/:blogName. I'll then use the :blogName to get all of that blog's information.
I'll start with a page that renders each post. I'll also add a button to create a new post, but only if there's a user:
import { DataStore } from 'aws-amplify'
import { useEffect, useState } from 'react'
import { useParams, Link } from 'react-router-dom'

import { Post, Blog } from './models'

export default function BlogPage ({ user }) {
  const { name } = useParams()

  const createPost = async () => {
  }

  return (
    <div>
      <h1>{name}</h1>
      {user && <button onClick={createPost}>create new post</button>}
      {
        posts.map(post => (
          <h2 key={post.id}>
            <Link to={`/post/${post.title}`}>
              {post.title}
            </Link>
          </h2>)
        )
    }
    </div>
  )
}
Then, I'll add this useEffect in order to load all the posts.
// body of BlogPage component inside BlogPage.js
  const [blog, setBlog] = useState({})
  const [posts, setPosts] = useState([])
  useEffect(() => {
    const getData = async () => {
      // find the blog whose name equals the one in the url
      const data = await DataStore.query(Blog, p => p.name('eq', name))
      setBlog(data[0].id)
      // find all the posts whose blogID matches the above post's id
      const posts = await DataStore.query(Post, p => p.blogID('eq', data[0].id))
      setPosts(posts)
    }
    getData()
  }, [])
Let's also add functionality to the "create new post" button that allows you to create a new post on click! The owner field will autopopulate with the current logged in user.
const createPost = async () => {
   const title = window.prompt('title')
   const content = window.prompt('content')

   const newPost = await DataStore.save(new Post({
      title,
      content,
      blogID: blog.id
    }))
}
Final code for the BlogPage component.
Blog Create
Let's also make it so that people can create a new blog. Inside of the <BlogCreate> component. First, create a standard React form that will allow a user to create a new blog.
import { DataStore } from 'aws-amplify'
import { useState } from 'react'

import { Blog } from './models'

export default function BlogCreate ({ isAdmin }) {
  const [name, setName] = useState('')

  const createBlog = async e => {
    e.preventDefault()
  }

    return (
      <form onSubmit={createBlog}>
        <h2>Create a Blog</h2>
        <label htmlFor='name'>Name</label>
        <input type='text' id='name' onChange={e => setName(e.target.value)} />
        <input type='submit' value='create' />
      </form>
    )
}
Now, implement the createBlog function by adding the following:
const createBlog = async e => {
  e.preventDefault()
  // create a new blog instance and save it to DataStore
  const newBlog = await DataStore.save(new Blog({
    name
  }))
  console.log(newBlog)
}
Finally, add a conditional around the form - we only want to render it if the user is an admin!
  if (!isAdmin) {
    return <h2>You aren't allowed on this page!</h2>
  } else {
    return (
      <form>
       ...
      </form>
    )
  }
Here's this component all together.
Post Page
Last component to implement! This one's the post detail page. We'll implement an edit form so that content owners can edit their posts. First, create a React form for the post. We'll again use React Router to send the name of the post to the component.
import { DataStore } from 'aws-amplify'
import { useEffect, useState } from 'react'
import { useParams, Link } from 'react-router-dom'

import { Post } from './models'

export default function PostPage ({ user }) {
  const { name } = useParams()

  const [post, setPost] = useState([])
  const [title, setTitle] = useState('')
  const [content, setContent] = useState('')

  const handleSubmit = async e => {
    e.preventDefault()
  }
  return (
    <div>
      <h1>{name}</h1>
      <form onSubmit={handleSubmit}>
        <label>Title</label>
        <input type='text' value={title} onChange={e => setTitle(e.target.value)} />
        <label>Content</label>
        <input type='text' value={content} onChange={e => setContent(e.target.value)} />
        <input type='submit' value='update' />
      </form>
    </div>
  )
}
Then we'll create a useEffect that will get the information about the post from DataStore and render it in the form. Note that this won't work well if you have two posts with the same name! In a larger-scale app you'd want to have some differentiator in the urls for each post.
useEffect(() => {
  const getData = async () => {
    const posts = await DataStore.query(Post, p => p.title('eq', name))
    setPost(posts[0])
    setTitle(posts[0].title)
    setContent(posts[0].content)
  }
  getData()
}, [])
Then, we'll need to implement the handleSubmit. We'll want to copy the original post, update the needed attributes and save them to DataStore.
const handleSubmit = async e => {
  e.preventDefault()
  await DataStore.save(Post.copyOf(post, updated => {
    updated.title = title
    updated.content = content
  }))
}
Finally, within the return, we'll only want to render the form if the user owns the post. Outside the form, add the following conditional to only render it if the post owner is that user! Amplify automatically creates the owner field for us. Every time that you create a new post, it will be populated for you too!
 {user.attributes && (post.owner === user.attributes.email) && (
   <form onSubmit={handleSubmit}>
   ...
   </form>
 )}
Here's the component's final code.
Conclusion
In this post, we use Amplify's DataStore multi-auth to implement different permissions based on the user's role and ownership of content. You could keep extending this with more forms, styling, and data rendering. I'd love to hear your thoughts on this app and this new Amplify feature!

Top comments (3)
This is an actually great article, not the usual copy-paste-refrase-over-million-times type. Maybe it would be interesting to put near the hosting part all the financial part also, to give some extra numbers to see the whole picture and how viable it is (or not).
I absolutely love AWS Amplify. In fact I'm building my own platform to sell my courses on with it 💪 You can follow the progress here.
Great article.