In this article, I am going to discuss how to set up a MySQL instance on AWS RDS using Cloud Formation templates. In my previous article, How to configure an Amazon RDS environment for MySQL, I have provided a detailed walkthrough of how to set up a MySQL instance on Amazon. You can use the AWS console to provide all the information required for setting up the instance and then use it. However, in this article, we will discuss an automated way of achieving the same functionalities using Cloud Formation templates.
What is a CloudFormation template?
In order to start writing the templates, we first need to understand what cloud formation is all about. AWS offers Cloud Formation as a cloud service that enables AWS customers to write the desired state of any infrastructure as a code and then use it to deploy resources to AWS. It allows us to create a resource or a group of resources by following simple configuration templates. For example, if you want to deploy a web application on an EC2 instance that will also use an RDS database, you can simply combine both the resources into one stack and write the code for setting up the instances. Once you run, it will create both the EC2 and the RDS instance and also deploy your web application.
Figure 1 – CloudFormation Template on AWS Console
The components of a cloud formation template are as follows:
- A JSON or YAML file in which the resources will be defined as a template
- A stack can be a combination of multiple resources that needed to be set up as a part of the application. For e.g., EC2 and RDS
- A changeset can be used to view a list of operations to be performed by the stack
- A stack set also can be considered as a managed group of stacks that be reproduced or replicated
Out of the above, we will mainly focus on the JSON/YAML template and the stack in this article. The templates support a wide range of resources on AWS. To get an exhaustive list please follow this link.
Writing the JSON or YAML template file
One of the main challenges that we face while writing a template for the first time is what contents should be included in it. To ease that AWS provides a lot of template samples that can be easily found on the official documentation. Once you find the template required to create a necessary resource, you can use it to create your own template. The template can either be created using JSON or YAML and converted from one to another as well. On a personal note, I prefer writing the templates using YAML as it helps me keep away from the curly braces and commas and keeps the document cleaner. However, you are free to choose any option between JSON and YAML.
For this exercise, let us try to spin up a MySQL instance on RDS and we will write the code in YAML. In order to set up a MySQL database using cloud formation, we would need the following items.
- Resource Name – The name of the resource you are going to set up.
- Resource Type – The type of the resource.
- Resource Properties – The database name, username, and password to connect to.
- The database Engine – MySQL, SQL Server, PostgreSQL, etc.
- Storage Type – The storage type to be used.
- Public Accessibility – Weather the database should have public access or not.
- Allocated Memory – The memory that should be allocated to the database instance.
- AWS Region – The region in which the instance is to be created.
Now that we have some points with us, let us go ahead and start by writing the template file.
https://gist.github.com/aveek22/a188b02abde65479bbba2deba5ec90d6
Figure 2 – The template file for creating MySQL instance on RDS
As you can see in the figure above, the structure of the file is divided into two parts. In the first part, we have defined a few parameters that will be used by the resource definitions in the second part while creating the resources on AWS. You can use the same script on your machine to create an instance on your AWS account.
Setting up the stack on the console
Now that we have created our template for MySQL, it’s time we set it up to see if everything runs well. Head over to the AWS console and search for Cloud Formation on the search bar. Click on Create Stack and upload the template file from your local. Click Next once done.
Figure 3 – Creating the stack from the template
On the next page, you will be asked to provide the parameters that were defined in the cloud formation template. Go ahead and provide the necessary details and click Next.
Figure 4 – Stack Parameters provided
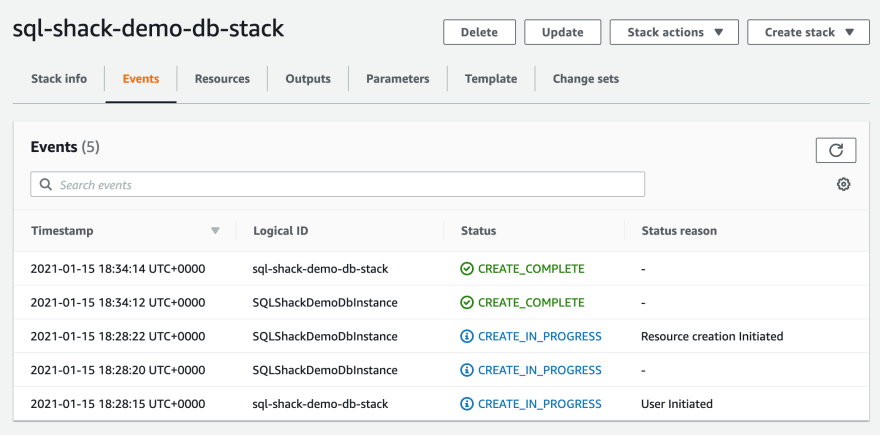
Review the stack changes and parameters and click on Create Stack on the last page. The stack creation will start. It might take some time to create all the resources before they are available to use. In the meantime, you can click on the Reload button to check if all the events have been created successfully.
Figure 5 – Stack Creation in progress
As you can see on the timestamps, it took me around 6 minutes after which the resources were available and were also visible on the console. Navigate to the Resources tab and click on the Physical ID of the resource. This will take you to the RDS console.
Figure 6 – Stack Created Successfully
Connecting the MySQL database
Once you are in the RDS console, you can get the hostname for the database instance and use it to connect to the database. Grab the endpoint from the console and use it to connect.
Figure 7 – MySQL instance details on RDS
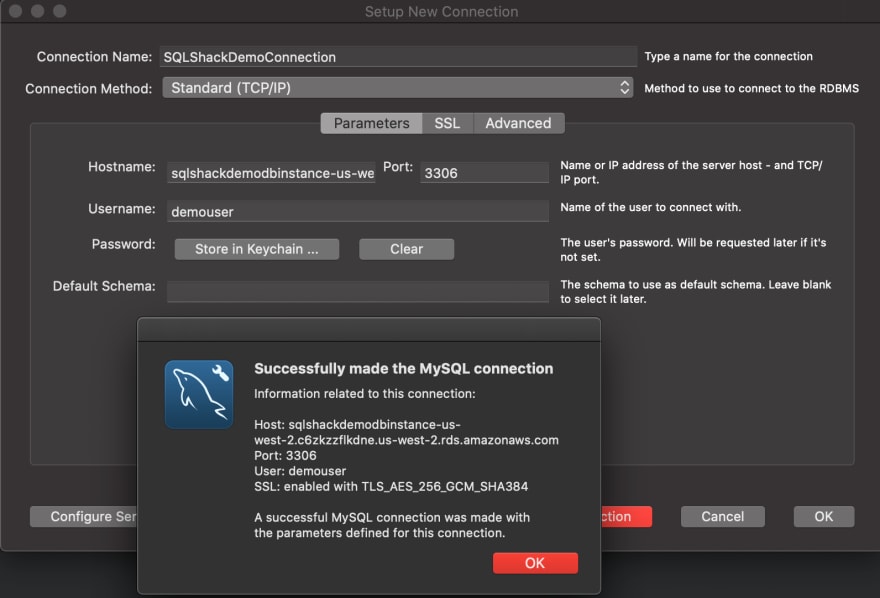
Let us now head over to MySQL Workbench and try connecting to the hostname with the credentials that we have provided earlier. Use the hostname, username, and password to connect to the instance.
Figure 8 – Connecting to the MySQL instance using MySQL Workbench
As you can see in the figure above, we have successfully connected to the database instance on RDS. Let us now run some queries and see if it works.
Figure 9 – Executing scripts in the MySQL Workbench
As you can see in the figure above, we have been able to connect to the database instance and execute queries. With this, you are able to write your own cloud formation template and spin up any other resources like the SQL Server or PostgreSQL database.
Removing the resources
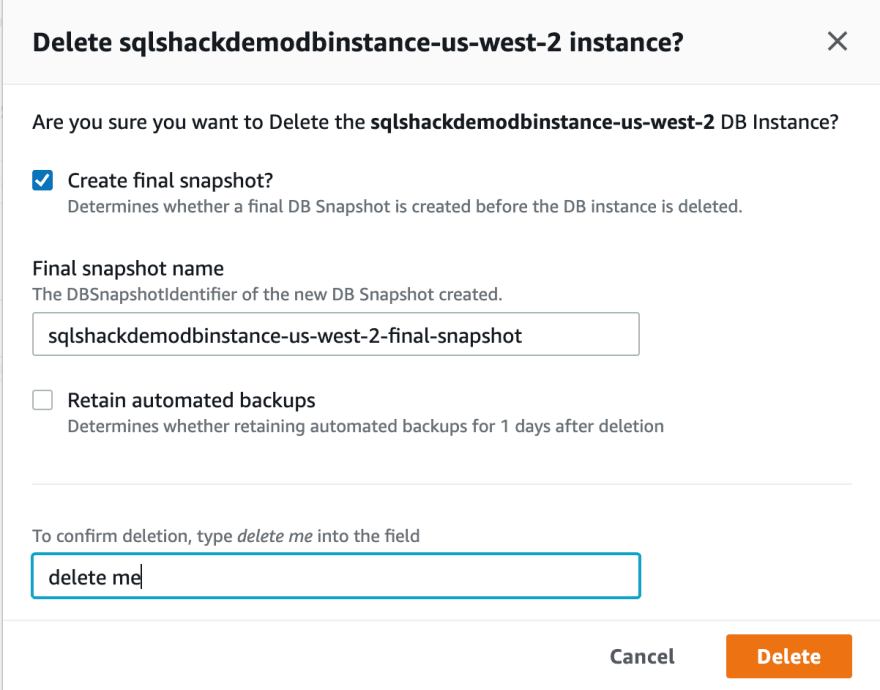
If you are performing this as an exercise, I would recommend removing the resources that we have created as it will incur some charges. You can navigate to the RDS console and then select the instance and click on Delete to remove the resources permanently.
Figure 10 – Deleting the resources created
Once the resources have been deleted successfully, you can check in the console once again if there are any instances running just to avoid adding unnecessary billing costs.
Conclusion
In this article, we have discussed in detail how to set up a MySQL database instance in an AWS RDS environment and automate it using the Cloud Formation template. This way if setting up resources on the cloud is also known as infrastructure-as-code service where you can set up the entire infrastructure as code and then use it in various environments. These templates can be used not only to deploy database instances but also other infrastructures within the AWS such as EC2, Lambda, RedShift, etc. To learn more about the cloud formation templates, you can view the sample templates available on the official website.


Top comments (0)