Hello Everyone, in this article we will
- Add Docker support to .net core web API application using visual studio.
- How to debug your application, running the image through container.
- Create the latest image of application for release.
- Publish image in to Docker Hub.
Prerequisites:
- Visual studio
- Docker installed
- .net core SDK
- Docker Hub account
Hope you guys are ready with prerequisites before starting further steps. Lets get started.
Create .net core web API project using below command and open in visual studio.
dotnet new webapi -n WhetherForecastAPI
Verify the web app is created properly by running the application and navigating to the below route.Once done you will be able to see whether report as response.
https://localhost:{host number}/weatherforecast
OK, now we have our web app ready let us add docker support to our app.
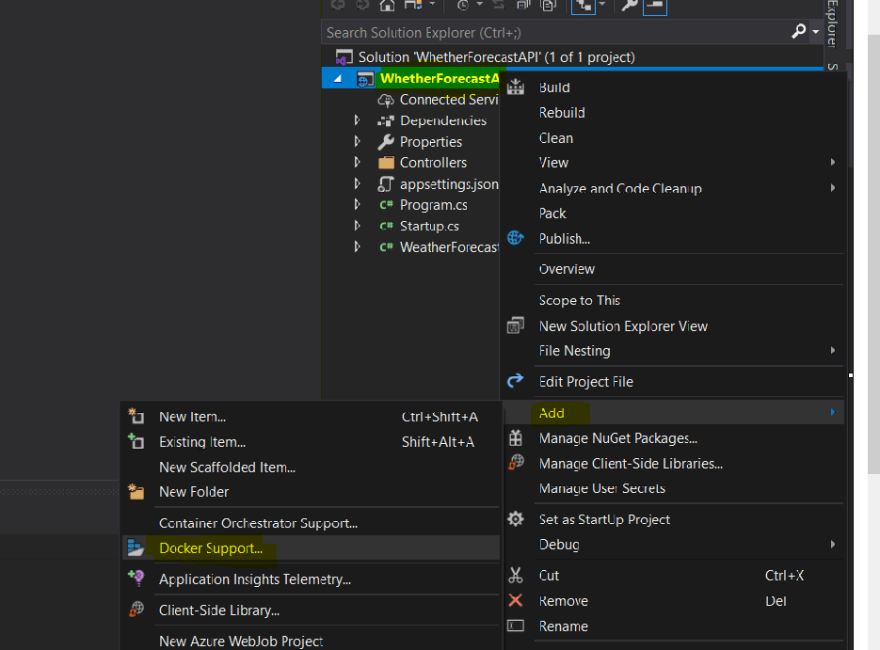
Right-Click on the project WhetherForecastAPI then click on add select Docker Support.
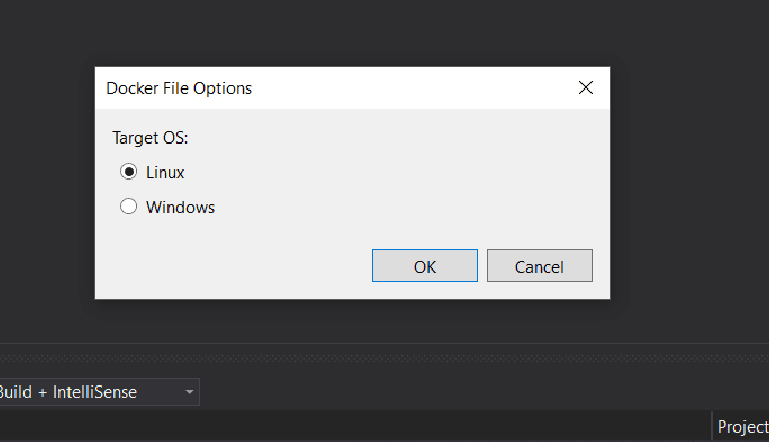
As soon as you click on docker support visual studio will ask docker file option select based on your current docker container OS
Once you add docker support to your project visual studio is going to add two new file in solution i.e Dockerfile and .dockerignore.
Along with the package reference "Microsoft.VisualStudio.Azure.Containers.Tools.Targets"
Now that we have added docker support to application.
Developer will not create image directly in first go and publish it.
They will make changes in their code several times by debugging. Hence in next step we are going to see how we can debug our app.
It is as simple as we debug our regular application.Select Solution configuration as debug and Docker in place IIS Express as shown in the below image.
Once we run, visual studio will create the image of an application and runs that image in a local container.Application will run in your browser just put the break point and debug as normal application.
As of now our application will be running as image which is tagged ad
dev for example whetherforecastapi: dev
Once you are done with your changes, next step is to create a latest image of an application for release. In order to that select Release from Solution configuration as shown in below image.
As soon as you run the application latest image will be created and which is ready to publish.
Run below command to see the created image.
docker images
As mentioned in prerequisite you should have docker hub account. Login to that account and create repository in Docker Hub.
Login in command line to tag that repository to your image and push that image to docker hub.
docker login
To tag your image to docker hub repository
docker tag whetherforecastapi {repository/name}
Publish your image to docker hub
docker push {repository/name}
Note: Replace {repository/name} with the newly created repository name.
Yes, We have successfully pushed the image in to docker hub and if we made our repository as public then anybody can access that by pulling that image.
Hope you guys enjoyed it.


Top comments (0)