AWS Control Tower Overview & set up
Introduction
AWS Control Tower offers the easiest way to set up and govern a secure, multi-account AWS environment.
It establishes a landing zone that is based on best-practices blueprints, and it enables governance using guardrails we can choose from a pre-packaged list. The landing zone is a well-architected, multi-account baseline that follows AWS best practices. Guardrails implement governance rules for security, compliance, and operations.
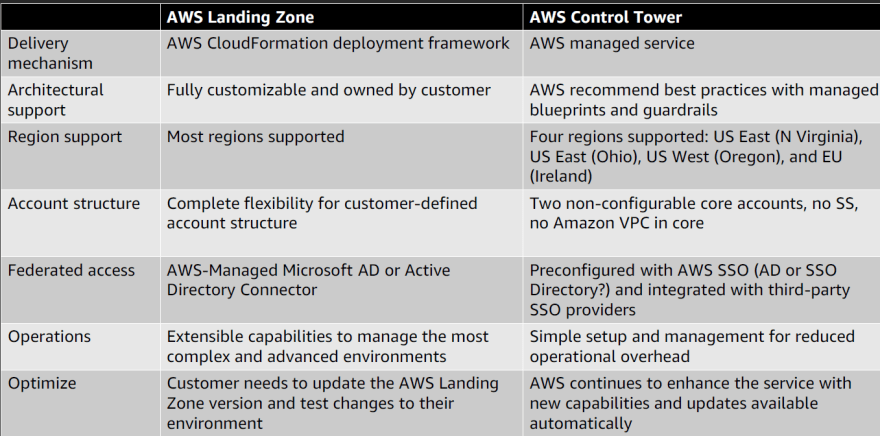
AWS Control Tower is an AWS native service providing a pre-defined set of blueprints and guardrails to help us implement a landing zone for AWS accounts. AWS Landing Zone is an AWS solution offered through AWS Solution Architect, Professional Services, or AWS Partner Network (APN) Partners that provides a fully configurable, customer-managed landing zone implementation. We can use either AWS Control Tower or the Landing Zone solution to create a foundational AWS environment based on best-practices blueprints implemented through AWS Service Catalog.
AWS Control Tower is designed to provide an easy, self-service setup experience and an interactive user interface for ongoing governance with guardrails. While AWS Control Tower automates creation of a new landing zone with predefined blueprints (e.g., IAM Identity Center for directory and access), the AWS Landing Zone solution provides a configurable setup of a landing zone with rich customization options through custom add-ons (such as Active Directory or Okta Directory) and ongoing modifications through a code deployment and configuration pipeline.
AWS Control Tower is a service that helps us to set up and manage governance rules for security, operations, and compliance at scale across all our organizations and accounts in the AWS Cloud.
AWS Control Tower orchestrates the capabilities of several other AWS services, including AWS Organizations, AWS Service Catalog, and AWS IAM Identity Center (successor to AWS Single Sign-On), to build a landing zone.
Features of AWS Control Tower
Landing zone – A landing zone is a well-architected, multi-account environment that's based on security and compliance best practices. It is the enterprise-wide container that holds all of our organizational units (OUs), accounts, users, and other resources that you want to be subject to compliance regulation. A landing zone can scale to fit the needs of an enterprise of any size.
Guardrails – A guardrail is a high-level rule that provides ongoing governance for our overall AWS environment. It's expressed in plain language. Two kinds of guardrails exist: preventive and detective.
Three categories of guidance apply to these two kinds of guardrails: mandatory, strongly recommended, or elective.
Account Factory – An Account Factory is a configurable account template that helps to standardize the provisioning of new accounts with pre-approved account configurations. AWS Control Tower offers a built-in Account Factory that helps automate the account provisioning workflow in our organization.
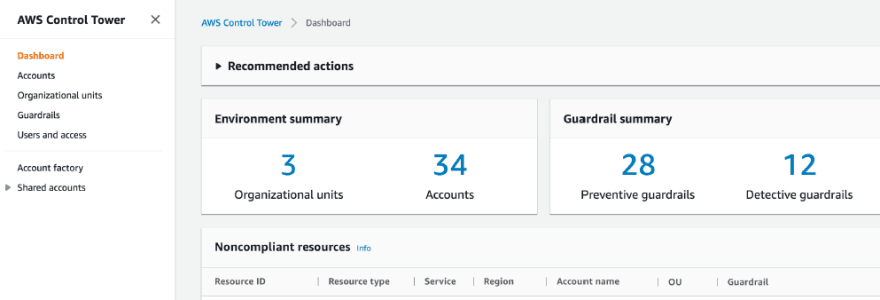
*Dashboard *– The dashboard offers continuous oversight of our landing zone to our team of central cloud administrators. We can use the dashboard to see provisioned accounts across our enterprise.
Structure of an AWS Control Tower Landing Zone
Root – The parent that contains all other OUs in your landing zone.
Security OU – This OU contains the Log Archive and Audit accounts. These accounts often are referred to as shared accounts. When we launch our landing zone, we can choose customized names for these shared accounts, and we have the option to bring existing AWS accounts into AWS Control Tower for security and logging. However, these cannot be renamed later, and existing accounts cannot be added for security and logging after initial launch.
Sandbox OU – The Sandbox OU is created when you launch your landing zone, if you enable it. This and other registered OUs contain the enrolled accounts that your users work with to perform their AWS workloads.
*IAM Identity Center directory *– This directory houses your IAM Identity Center users. It defines the scope of permissions for each IAM Identity Center user.
IAM Identity Center users – These are the identities that your users can assume to perform their AWS workloads in your landing zone.
Set Up AWS Control Tower
We can set up an AWS Control Tower landing zone in an existing organization, or we can start by creating a new organization that contains our AWS Control Tower landing zone.

Pre-requisites to setting up control tower for the first time:
Sign up for AWS (create AWS account)
https://portal.aws.amazon.com/billing/signup
Follow the online instructions to complete the account creation.
Sign in as an Administrator user
https://console.aws.amazon.com/iam
- Create IAM account and sign in if the IAM account is not created before.
- Create AWS Identity and Access Management (IAM) user and grant that user full access.
Set up MFA
We have to enable multi-factor authentication (MFA) for our account.
Prerequisites steps for setting up AWS Control Tower
• Sign in to the AWS management console with administrator user credentials.
• Access AWS Control Tower console at https://console.aws.amazon.com/controltower
• Verify that we selected our desired home Region.
• Choose Set up landing zone.
• Follow the instructions in the console, accepting all the default values (email address for our account, a log archive account, and an audit account).
• Confirm our choices and choose Set up landing zone.
• AWS Control Tower takes time (about 30 to 45 minutes) to set up all of the resources in your landing zone
Prerequisites: Automated pre-launch checks
Before setting up the landing zone by AWS Control Tower, it automatically runs a series of pre-launch checks in our account. There's no action required on our part for these checks, which ensure that your management account is ready for the changes that establish our landing zone.
By default, all accounts are subscribed to these services.
AWS Control Tower runs:
The existing service limits for the AWS account must be sufficient for AWS Control Tower to launch.
The AWS account must be subscribed to the following AWS services:
• Amazon Simple Storage Service (Amazon S3)
• Amazon Elastic Compute Cloud (Amazon EC2)
• Amazon SNS
• Amazon Virtual Private Cloud (Amazon VPC)
• AWS CloudFormation
• AWS CloudTrail
• Amazon CloudWatch
• AWS Config
• AWS Identity and Access Management (IAM)
• AWS Lambda
Step 1: Create our shared account email addresses
In order to set up our landing zone with new shared accounts, AWS Control Tower requires two unique email addresses that aren't already associated with an AWS account. Each of these email addresses will serve as a collaborative inbox -- a shared email account -- intended for the various users in our enterprise that will do specific work related to AWS Control Tower.
If we are setting up AWS Control Tower for the first time, and if we are bringing existing security and log archive accounts into AWS Control Tower, we can enter the current email addresses of the existing AWS accounts.
The email addresses are required for:
*Audit account *– This account is for our team of users that need access to the audit information made available by AWS Control Tower. We can also use this account as the access point for third-party tools that will perform programmatic auditing of your environment to help us audit for compliance purposes.
Log archive account – This account is for our team of users that need access to all the logging information for all of your enrolled accounts within registered OUs in our landing zone.
These accounts are set up in the Security OU when we create our landing zone. As a best practice, AWS recommends that when we perform actions in these accounts, we should use an IAM Identity Center user with the appropriately scoped permissions.
Key items to configure during setup
• We can select our top-level OU names during setup, and you also can change OU names after we set up our landing zone. By default, the top-level OUs are named Security and Sandbox.
• During setup, we can select customized names for the shared accounts that AWS Control Tower creates, called log archive and audit by default, but we cannot change these names after setup. (This is a one-time selection.)
• During setup, we can optionally specify existing AWS accounts for AWS Control Tower to use as audit and log archive accounts. If we plan to specify existing AWS accounts, and if those accounts have existing AWS Config resources, we must delete the existing AWS Config resources before you can enrol the accounts into AWS Control Tower. (This is a one-time selection.)
• If we are setting up for the first time, or if we are upgrading to landing zone version 3.0, we can choose whether to allow AWS Control Tower to set up an organization-level AWS CloudTrail trail for our organization, or you can opt out of trails that are managed by AWS Control Tower and manage your own CloudTrail trails. We can opt into or opt out of organization-level trails that are managed by AWS Control Tower any time you update your landing zone.
• We can optionally set a customized retention policy for our Amazon S3 log bucket and log access bucket, when we set up or update your landing zone.
Configuration choices that cannot be undone
• We cannot change your home Region after you've set up your landing zone.
• If we are provisioning Account Factory accounts with VPCs, VPC CIDRs can't be changed after they are created.
Step 2. Configure and launch your landing zone
Before we launch our AWS Control Tower landing zone, determine the most appropriate home Region.
Changing our home Region after we deployed our AWS Control Tower landing zone
requires decommissioning as well as the assistance of AWS Support. This practice is not
recommended.
AWS Control Tower has no APIs or programmatic access for launching our landing zone. To configure and launch your landing zone in the console, perform the following series of steps.
Prepare: Navigate to the AWS Control Tower console
Open a web browser, and navigate to the AWS Control Tower console at https://console.aws.amazon.com/controltower
In the console, verify that you are working in your desired home Region for AWS Control Tower. Then choose Set up your landing zone.
Step 2a. Review pricing and select your AWS Regions
Do check whether we have correctly designated the AWS Region that we select for our home Region. After we deployed AWS Control Tower, we can't change the home Region.
In our setup process, we can add any additional AWS Regions that we require. We can add more Regions at a later time, if needed, and we can remove Regions from governance.
To select additional AWS Regions to govern
• The panel shows us the current Region selections. Open the dropdown menu to see a list of additional Regions available for governance.
• Check the box next to each Region to bring into governance by AWS Control Tower. Our home Region selection is not editable.
To deny access to certain Regions
In order to deny access to AWS resources and workloads in certain AWS Regions, select Enabled in the section for the Region deny guardrail. By default, the setting for this guardrail is Not enabled.
Step 2b. Configure your organizational units (OUs)
If we accept the default names of these OUs, there's no action we need to take for setup to continue.
To change the names of the OUs, enter the new names directly in the form field.
• Foundational OU – AWS Control Tower relies upon a Foundational OU that is initially named the Security OU. We can change the name of this OU during initial setup and afterward, from the OU details page.
This Security OU contains your two shared accounts, which by default are called the log
archive account and the audit account.
• Additional OU – AWS Control Tower can set up one or more Additional OUs.
If Additional OU is intended for development projects, we can name it as SandboxOU.
If we already have an existing OU in AWS Organizations, you may see the option to skip setting up an Additional OU in AWS Control Tower.
Step 2c. Configure our shared accounts, logging, and encryption
Here, the panel shows the default selections for the names of our shared
AWS Control Tower accounts. These accounts are an essential part of our landing zone. Do not move or delete these shared accounts.
We can choose customized names for the audit and log archive accounts during setup. Alternatively, we have a one-time option to specify existing AWS accounts as our shared accounts.
We must provide unique email addresses for our log archive and audit accounts, and we can verify the email address that we previously provided for our management account. Choose the Edit button to change the editable default values.
About the shared accounts
• *The management account *– The AWS Control Tower management account is part of the Root level. The management account allows for AWS Control Tower billing. The account also has administrator permissions for our landing zone. We cannot create separate accounts for billing and for administrator permissions in AWS Control Tower.
The email address shown for the management account is not editable during this phase of setup. It is shown as a confirmation, so we can check that we are editing the correct management account, in case we have multiple accounts.
• The two shared accounts – We can choose customized names for these two accounts, or bring our own accounts, and we must supply a unique email address for each account, either new or existing.
In order to configure the shared accounts, we have fill in the requested information:
- At the console, enter a name for the account initially called the log archive account. Many customers decide to keep the default name for this account.
- Provide a unique email address for this account.
- Enter a name for the account initially called the audit account. Many customers choose to call it the Security account.
- Provide a unique email address for this account.
Optionally configure log retention
Here, we can customize the log retention policy for Amazon S3 buckets that store our AWS CloudTrail logs in AWS Control Tower, in increments of days or years, up to a maximum of 15 years. If we choose not to customize your log retention, the default settings are one year for standard account logging and 10 years for access logging.
This feature also is available when we update or repair our landing zone.
Optionally configure AWS CloudTrail trails
As a best practice, we have to set up logging. If we wish to allow AWS Control Tower to
set up an organization-level CloudTrail trail and manage it for us, choose Opt in. If we wish to manage logging with our own CloudTrail trails or a third-party logging tool, choose Opt out.
We have to confirm our selection when requested to do so in the console. We can change our selection, and opt into, or opt out of, organization-level trails when we update our landing zone.
We can set up and manage your own CloudTrail trails at any time, including organization-level and account-level trails. If we set up duplicate CloudTrail trails, we may incur duplicate costs when CloudTrail events are logged.
Optionally configure AWS KMS keys
If we wish to encrypt and decrypt your resources with an AWS KMS encryption key, select the checkbox.
If we have existing keys, we will be able to select them from identifiers displayed in a dropdown menu. We can generate a new key by choosing Create a key. we can add or change a KMS key any time we update our landing zone.
When we select Set up landing zone, AWS Control Tower performs a pre-check to validate our KMS key.
The key must meet these requirements:
• Enabled
• Symmetric
• Not a multi-Region key
• Has correct permissions added to the policy
• Key is in the management account
We may see an error banner if the key does not meet these requirements. In that case, we have to choose another key or generate a key.
To make the key's policy update
In order to use a KMS key with AWS Control Tower, we must make a specific policy update to the key. At minimum, the KMS key must have permissions that allow AWS CloudTrail and AWS Config to use the chosen KMS key.
Make the required policy update
Navigate to the AWS KMS console at https://console.aws.amazon.com/kms
Select Customer managed keys on the left
In the table, select the key you wish to edit, or select Create a key from the upper right
Under the section called Key policy, make sure we can see the policy and edit it. We may need to select Switch to policy view on the right.
We can copy and paste the following example policy statement. Alternatively, for an existing key, we can ensure that your KMS key has these minimum permissions by adding them to our own existing policy.
We can add these lines as a group in a single JSON statement, or if we prefer, we can
incorporate them line by line into our policy's other statements.
{
"Sid": "Allow CloudTrail and AWS Config to encrypt/decrypt logs",
"Effect": "Allow",
"Principal": {
"Service": [
"cloudtrail.amazonaws.com",
"config.amazonaws.com"
]
},
"Action": [
"kms:GenerateDataKey",
"kms:Decrypt"
],
"Resource": "*"
}
The AWS Key Management Service (AWS KMS) allows us to create multi-Region KMS keys and asymmetric keys; however, AWS Control Tower does not support multi-Region keys or asymmetric keys.
AWS Control Tower performs a pre-check of our existing keys. We may see an error message if we select a multi-Region key or an asymmetric key. In that case, generate another key for use with AWS Control Tower resources.
The customer data in AWS Control Tower is encrypted at rest, by default, using SSE-S3.
Step 3. Review and set up the landing zone
• At the console, review the Service permissions and when we are ready, choose I understand the permissions AWS Control Tower will use to administer AWS resources and enforce rules on my behalf.
• In order to finalize our selections and initialize launch, choose Set up landing zone.
• It can take about thirty minutes to complete. During setup, AWS Control Tower creates our Root level, the Security OU, and the shared accounts. Other AWS resources are created, modified, or deleted.
Confirm SNS subscriptions
The email address which we provided for the audit account will receive AWS Notification – Subscription Confirmation emails from every AWS Region supported by AWS Control Tower.
In order to receive compliance emails in our audit account, we must choose the Confirm subscription link within each email from each AWS Region supported by AWS Control Tower.
Reference
Labs:
https://controltower.aws-management.tools/immersionday/
Hope you have got some idea about AWS control tower.
Happy Learning 📚
Social Footprints:
Thank you!

Top comments (0)