
AWS strongly recommend splitting different types of workloads as well as your various environments (such as development, test and production) into separate AWS accounts. Each account provides you with isolated security, access and billing boundaries. AWS also provide guidance on how you should setup your account structure in terms of a wider AWS landing zone:
In terms of tooling, AWS provide AWS Organizations, to help centrally manage and govern multiple accounts. They also provide a higher level service in AWS Control Tower that stitches together underlying services like AWS Organizations, AWS SSO, CloudTrail and others. This is the simplest approach if you are looking for a hands-off way to set up your environment through clicking in the AWS Console. However, for those that want to manage their environment using Infrastructure as Code (IaC), deploy changes through a pipeline, and gain a better understanding of what is happening under the covers, an alternative approach is required.
This blog series looks at building out a multi-account best practice landing zone, using an open source tool called AWS Organization Formation (OrgFormation) by Olaf Conijn. The initial setup is indebted to this blog post by Michael Bahr.
This series is made up of the following posts:
- Part 1: Initial setup up of a multi-account AWS environment
- Part 2: Adding AWS SSO and controlling permissions
- Part 3: Centralising audit, compliance and incident detection
By following along with these posts, you will learn more about these services, and how you can take advantage of features with policies and permissions to enforce security and compliance, as well as incident response.
The source code is available in the following Org-Formation reference GitHub repository. The code is not directly deployable as personal information has been replaced with <>, but otherwise is the same code built up during these blog posts.
Multi Account Setup
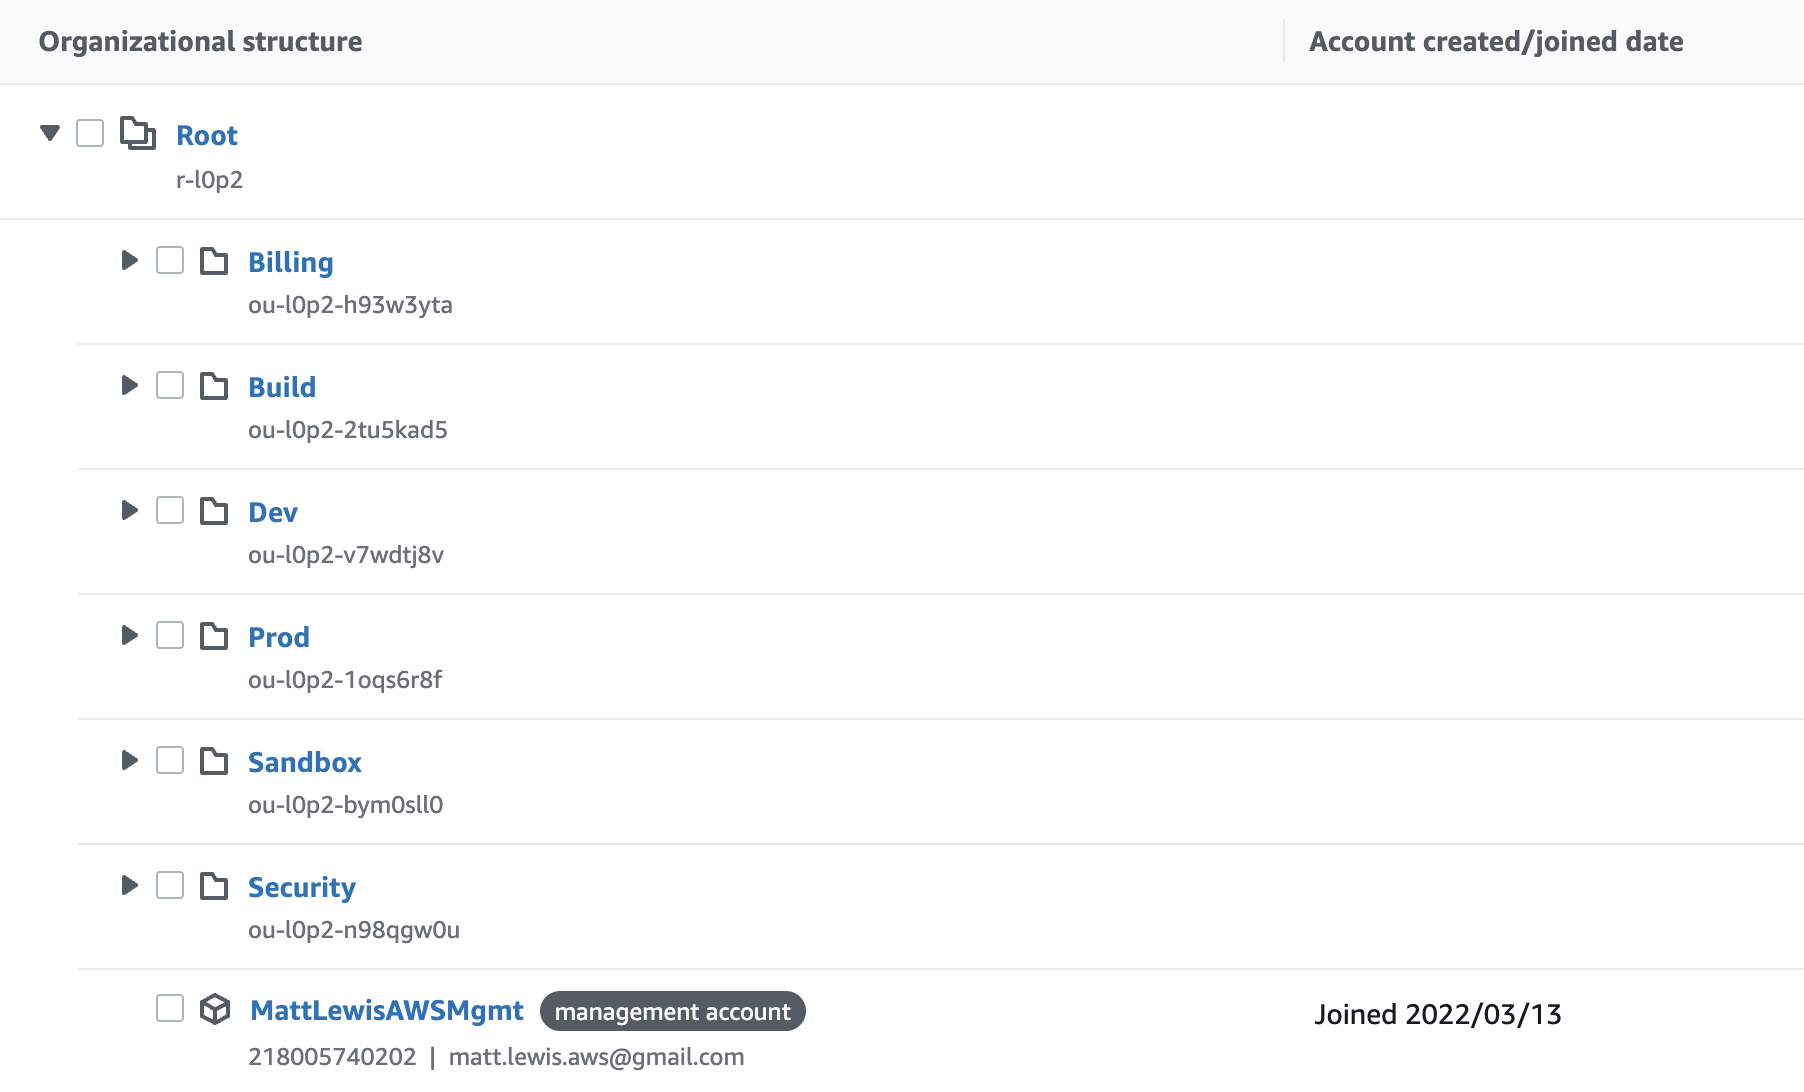
During these blog posts, we will build out a multi-account AWS landing zone as follows consisting of a number of accounts and organizational units (OU). An OU acts as a container for accounts. This allows you to define policies that are attached to an OU, and which then apply to all accounts, though it is possible to apply a policy to an individual account within an OU.

Account and OU Overview
Management Account
The management account is the AWS account used to create the AWS Organization. You cannot change the management account. It also has the responsibility for paying all charges by member accounts.
This account should only be used for very limited functionality. Service Control Policies (SCPs) do not apply to the management account, so access should be limited.
Security Organizational Unit
The Security OU contains two separate AWS accounts:
- Log Archive - this contains the consolidated CloudTrail logs
- Security Tooling - this acts as the delegated administrator for GuardDuty
Build
The Build OU and account is used to run the build pipeline for org-formation. It uses AWS CodeCommit, AWS CodeBuild and AWS CodePipeline.
Billing
The Billing OU and account is used to run reports from the Cost and Usage Reports (CUR) data.
Prod
The Prod OU contains accounts that run production workloads
Dev
The Dev OU contains accounts that run development workloads
Sandbox
The Sandbox OU contains accounts that could be assigned to squads or even individuals that allow for innovation
The OUs and accounts configured above are a subset of those that may be used. For example, the AWS Security Reference Architecture refers to an Infrastructure OU containing a network account to manage the gateway between your application and the broader internet, and a shared services account to support directory and metadata services. These are beyond the scope of this blog post.
Initial Setup
Step 1: Create new AWS Account
The easiest way to get started is with a completely new AWS account, which will act as the management account. This will also be set up with new payment information. Once created and logged in, you should enable MFA for the root user.
Step 2: Enable IAM Access to Billing and Cost Explorer
In order to speed up future processing, carry out the following actions:
- Click on account details from the top right menu. Scroll down to
IAM User and Role Access to Billing Informationand click the check box toActivate IAM Access. - Go to the Cost Explorer and click on “Launch Cost Explorer”
Step 3: Create AWS Organization
The next step is to manually create an AWS Organization. To do this, go to the AWS Organizations service and click on "Create an organization"

Step 4: Add a Build Account
Next we setup the new Build account. This is just clicking on the "Add an AWS Account" button and entering the AWS account name and email address of the account's owner.
Each email address must be unique, which can be done by adding an alias. For me, that meant using unique addresses like the following:
- matt@example.com
- matt+build@example.com (Build Account)
- matt+security@example.com (Security Tooling Account)
- matt+logarchive@example.com (Log Archive Account)
Once the new Build account has been added, you need to make a note of the account ID.
Step 5: Create IAM User and save credentials
Next, we create an IAM user (OrgAdmin) with access key - programmatic access. This will be used to run the initial org-formation setup. Assign administrator access for now, as we will shortly remove this user. Once created, put the credentials in your /.~aws/credentials file from a terminal window. I did this specifying a profile name of orgadmin running the following command:
> aws configure --profile orgadmin
Step 6: Install Org-Formation and initialise pipeline
Install the org-formation CLI using npm as follows:
> npm install -g aws-organization-formation
Initialise a pipeline to create a CodeCommit repository, a CodeBuild project and a CodePipeline pipeline running the following command:
> org-formation init-pipeline --profile orgadmin --region <my-region> --resource-prefix <my-prefix> --build-account-id <org-build-id-from-above> --print-stack --verbose`
```
The `resource-prefix` is a unique value that can be referenced in all stacks being deployed, that makes them easily identifiable to this project. It also tries to ensure that resources such as S3 buckets can be prefixed with this to give them a globally unique name
**Step 7: Log in to Build account**
When you create a new account, AWS Organizations initially assigns a password to the root user that is a minimum of 64 characters long. All characters are randomly generated with no guarantees on the appearance of certain character sets. You can't retrieve this initial password. To access the account as the root user for the first time, you must go through the process for password recovery.
Once logged into the Build account as root, enable MFA for security, and then create a new IAM user to run the build pipelines. I called this user `org-codecommit`, gave programmatic access, and attached the `AWSCodeCommitFullAccess` policy. I then stored the credentials in the `~/.aws/credentials` file.
Finally, it's time to clone the CodeCommit repository. There are a number of options for this. I chose to set up an ssh connection following [these instructions](https://docs.aws.amazon.com/codecommit/latest/userguide/setting-up-ssh-unixes.html). You can also use SSH to connect to different CodeCommit repositories in different AWS accounts using [this guidance](https://docs.aws.amazon.com/codecommit/latest/userguide/troubleshooting-ssh.html#troubleshooting-ssh-multi)
## Setup AWS Accounts and OU Structure
Now we have a working pipeline, it's time to add the required accounts and OU structure. These are all defined in the `organization.yml` file in the root of the repository. You will already see the `MasterAccount`, `OrganizationRoot` and `BuildAccount` defined. We create all of the OUs and Accounts, and ensure that the correct accounts are assigned to each OU. An example is shown below for the Security OU.
```yml
####################################
## Organizational Units ##
####################################
SecurityOU:
Type: OC::ORG::OrganizationalUnit
Properties:
OrganizationalUnitName: Security
Accounts:
- !Ref SecurityAccount
- !Ref LogArchiveAccount
####################################
## Accounts ##
####################################
SecurityAccount:
Type: OC::ORG::Account
Properties:
AccountName: Security
Alias: security-mlorg189
RootEmail: matt+security@example.com
LogArchiveAccount:
Type: OC::ORG::Account
Properties:
AccountName: LogArchive
Alias: log-archive-mlorg189
RootEmail: matt+logarchive@example.com
```
Each account is also given a unique alias. I add the value provided as the resource-prefix to try and ensure global uniqueness.
Once all the OUs and accounts have been added, push the changes to CodeCommit and the pipeline will kick off the build. In CodeBuild you will see the accounts and OUs being created:
```shell
INFO: Executing: include 000-organization-build/organization-tasks.yml.
INFO: Executing: update-organization organization.yml.
OC::ORG::Account | SecurityAccount | Create (180287968268)
OC::ORG::Account | SecurityAccount | CommitHash
OC::ORG::Account | LogArchiveAccount | Create (219856281601)
OC::ORG::Account | LogArchiveAccount | CommitHash
```
Once the pipeline has finished, you can go back in the AWS Organization and see the initial setup
## Org-Formation Project Structure
Before we get into org-formation further, it’s worth understanding a bit more about the structure we will be building out.
There are some great posts about org-formation on the official AWS open source blog:
* [Managing organizations using Infrastructure as Code](https://aws.amazon.com/blogs/opensource/managing-aws-organizations-using-the-open-source-org-formation-tool-part-1)
* [Managing resources using task files](https://aws.amazon.com/blogs/opensource/managing-aws-organizations-using-the-open-source-org-formation-tool-part-2/)
* [Deploying resources using bindings](https://aws.amazon.com/blogs/opensource/managing-aws-organizations-using-the-open-source-org-formation-tool-part-3/)
We will be using the following folder structure in our repository:
```shell
/000-organization-build/
/100-private-types/
/200-account-defaults/
/210-budget-alarms/
/300-iam/
/400-sso/
/500-cloudtrail/
/600-config/
/610-config-custom-rules/
/650-config-conformance-packs/
/700-guardduty/
organization-tasks.yml
organization-parameters.yml
organization.yml
```
We use the `organization-tasks.yml` to organise the tasks and the order in which they will be executed by the pipeline. In the example below, the `ElevatedRole` task is dependent upon the `OrganizationBuild` task.
```yml
OrganizationBuild:
Type: include
Path: ./000-organization-build/organization-tasks.yml
ElevatedRole:
Type: include
DependsOn: [ OrganizationBuild ]
Path: ./300-iam/_tasks.yml
```
Each task then calls a `_tasks.yml` file which defines what action will be taken. In the example below, parameters are including from the global parameters file, and can also be set in this file. The `CrossAccountRole` logical resource is of type `update-stacks` which means it will deploy the CloudFormation resource defined in the template file, generating a CloudFormation stack with the given stack name.
```yml
Parameters:
<<: !Include '../organization-parameters.yml'
roleName:
Type: String
Default: elevated-security-role
CrossAccountRole:
Type: update-stacks
Template: ./cross-account-role.yml
StackName: !Sub '${resourcePrefix}-elevated-role'
StackDescription: 'Cross account role for elevation'
TerminationProtection: false
Parameters:
roleName: !Ref roleName
resourcePrefix: !Ref resourcePrefix
```
The org-formation annotated CloudFormation template will be executed in the targeted account and region.
Now we have the basic structure and a better understanding of org-formation, we will move on in the next post to set up AWS Single Sign-On (SSO) and start applying policies to make the setup more secure.

Top comments (0)