Headless Setup ဆိုတာဘာလဲ
Monitor or Keyboard တို့မပါပဲ Raspberry Pi Setup လုပ်ခြင်းကိုဆိုလိုပါတယ်။ ဒါပေမဲ့ တစ်ခြား wireless network တို့ ssh သုံးဖို့ တစ်ခြား accessories တွေတော့လိုအပ်အုံးမှာဖြစ်ပါတယ်။
Overview
Raspberry Pi Setup လုပ်ဖို့ဆိုရင်
- SD Card (minimum 8 GB, recommended 32 GB)
- Raspberry Pi board (any Pi Model)
- SD card reader
- Wireless Network စသည်တို့လိုအပ်ပါတယ်။
Setup ပြုလုပ်ပုံ အဆင့်များ
- Raspberry Pi OS (Raspbian) ကို SD card ထဲကို burn ဖို့လိုပါမယ်။
- Monitor or Keyboard တို့မပါပဲ Raspberry Pi Setup လုပ်ဖို့ Wireless Network Configure လုပ်ပါမယ်။
- SSH enable လုပ်ရပါမယ်။
- Find Raspberry PI Ip Address
- VNC Viewer setup
- Accessing Raspberry PI Screen from PC/Phone
1. Raspberry Pi OS (Raspbian) ကို SD card ထဲကို burn ဖို့လိုပါမယ်။
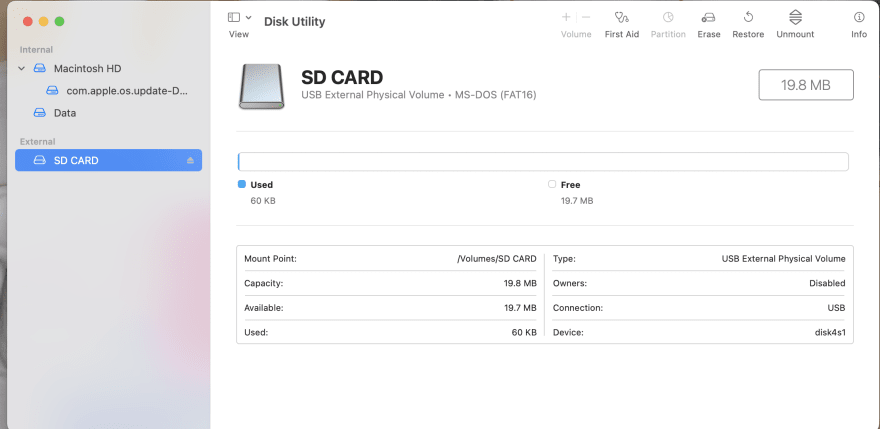
ပထမဆုံး အဆင့်အနေနဲ့ SD Card ကို ဖတ်ဖို့ computer နဲ့ ချိတ်ဆက်ရပါမယ်။ SD card က အသုံးပြုပီးသားဆိုရင်တော့ format အရင်ချပေးပါ။ အသုံးမပြုရသေးတဲ့ SD card ဆိုရင်တော့ format ချဖို့မလိုပါဘူး။ ချိတ်ဆက်ထားတဲ့ SD card ကို စစ်ဆေးချင်တယ် ဆိုရင်တော့ Mac မှာဆိုရင် Disk Utility မှာ သွားပီးစစ်ဆေးလို့ရပါတယ်။
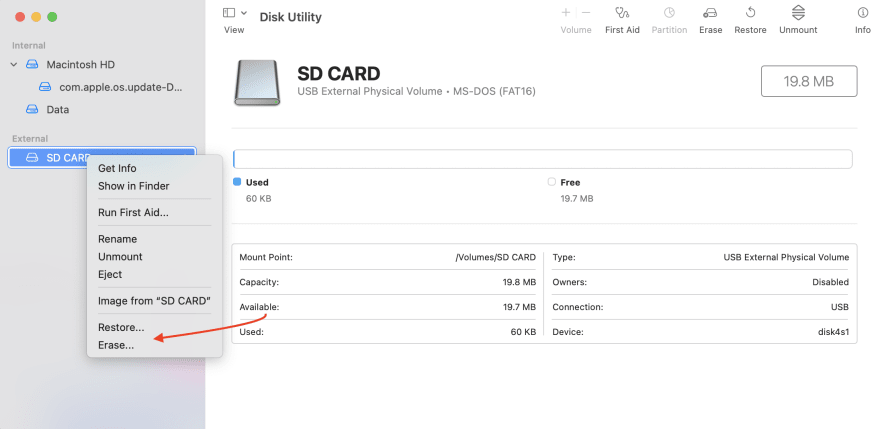
သင့်အနေနဲ့ format ချချင်တယ်ဆိုရင်တော့ Right Click > Erase ကိုနှိပ်ပီး ဆောင်ရွက်နိုင်ပါတယ်။
ပြီးတော့ Raspberry Pi OS (Raspbian) ကို SD card ထဲကို ထည့်ရပါမယ်။ ဒီအဆင့်မှာတော့ open source image writer tools တွေအများကြီးရှိပါတယ်။ ကိုယ်ကြိုက်နှစ်သက်ရာကို အသုံးပြု့နိုင်ပါတယ်။
Image Writer Tools:
- Etcher
- Raspberry Pi Imager
- ...
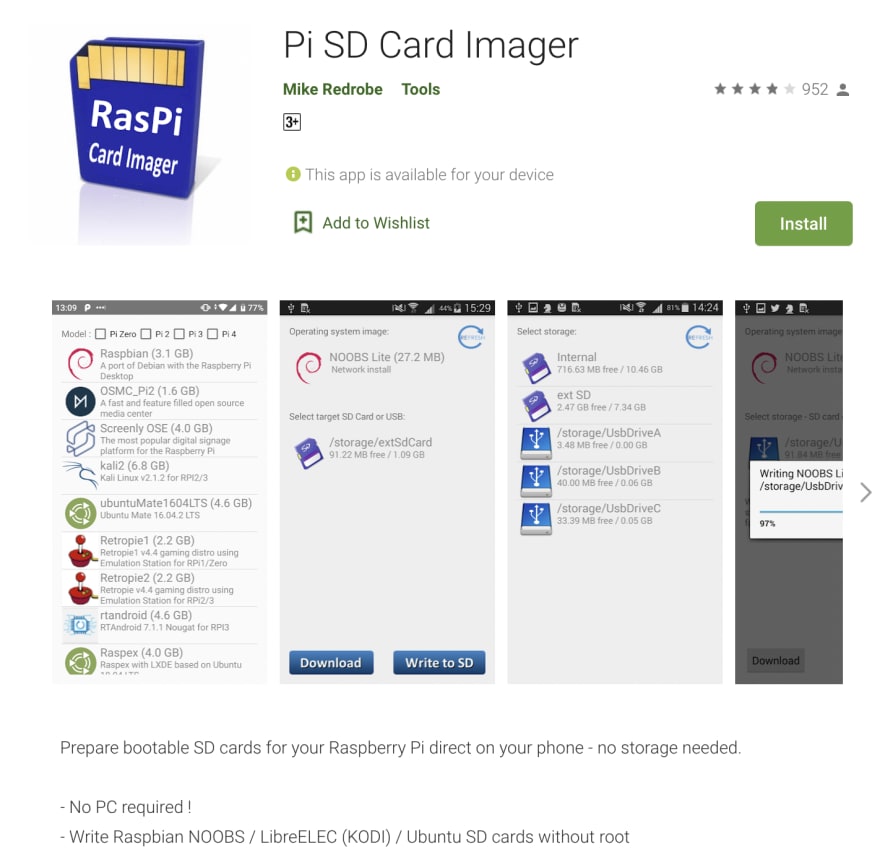
ယခုပြောပြသွားမှာကတော့ Raspberry Pi Imager ကို အသုံးပြု့သည့်နည်းဖြစ်ပါတယ်။ ဒီနေရာမှာ Raspberry Pi setup လုပ်ဖို့ ကိုယ်က ကိုယ်ပိုင် Laptop တစ်လုံး မရှိဘူးဆိုရင်လည်း ဖုန်တစ်လုံးနဲ့လည်းအဆင်ပြေနိုင်ပါတယ်။ ဖုန်းနဲ့ဆိုရင်တော့
Pi SD Card Imager တို့သုံးလို့ရပါတယ်။ Play Store မှာ အလွယ်တကူ download လုပ်နိုင်ပါတယ်။
ကဲ ဆက်လိုက်ကြဉီးစို့။
ကိုယ်အသုံးပြု့မည့် OS ပေါ်မူတည်ပြီး Download လုပ်ပေးရပါမယ်။
- For Window (https://downloads.raspberrypi.org/imager/imager_1.4.exe)
- For Mac (https://downloads.raspberrypi.org/imager/imager_1.4.dmg)
- For Ubuntu (https://downloads.raspberrypi.org/imager/imager_1.4_amd64.deb)
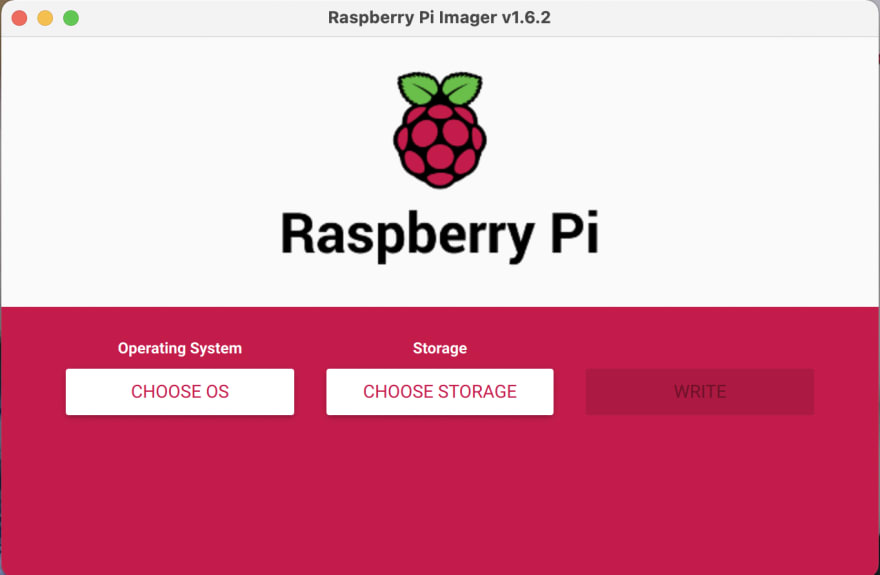
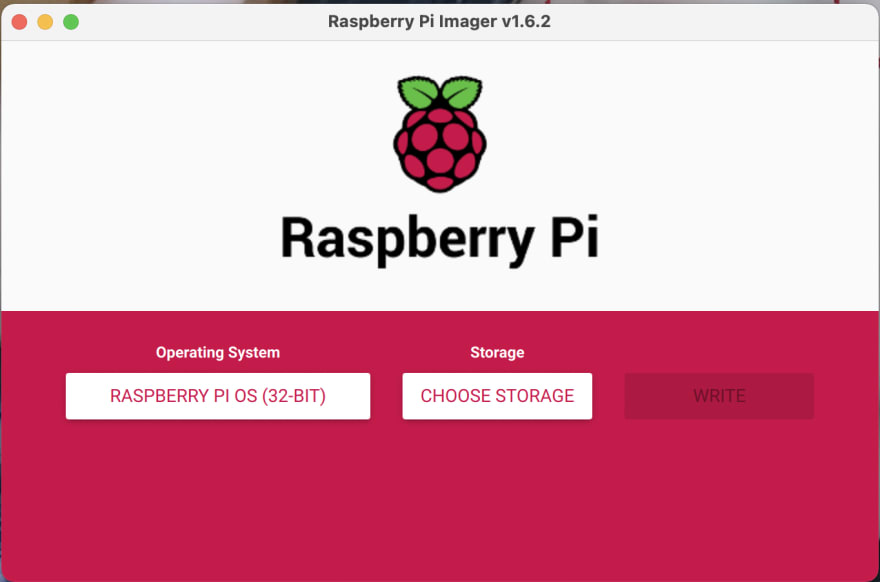
Install လုပ်ပီးသွားတာနဲ့ အောက်ပါအတိုင်းမြင်တွေ့ရမှာ ဖြစ်ပါတယ်။
Choose OS ကို ရွေးပီး Pi board နဲ့ သင့်တော့မည့် OS type ကို ရွေးချယ်ပါ။
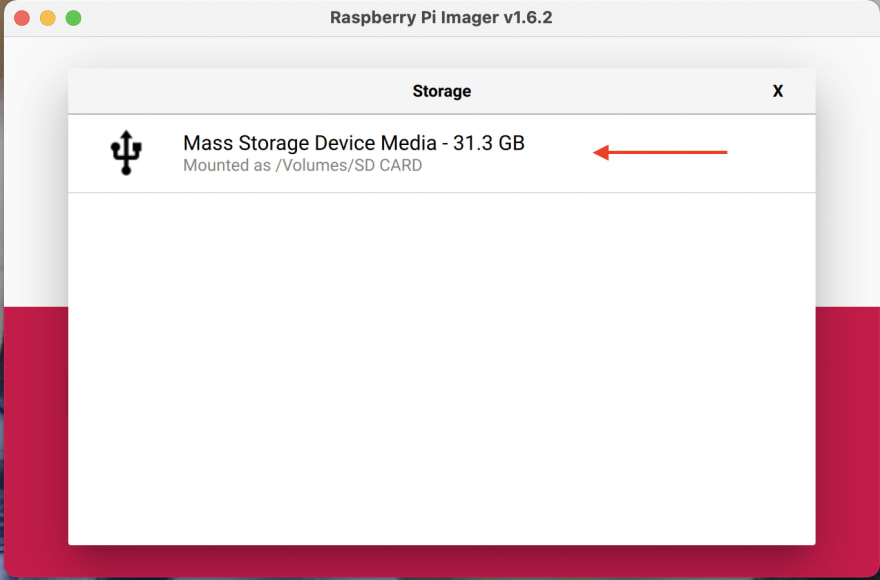
ပြီးရင်တော့ မိ့မိ burn လို့သည့် SD card ရွေးဖို့ Choose Storage ကို နှိပ်ပါ။
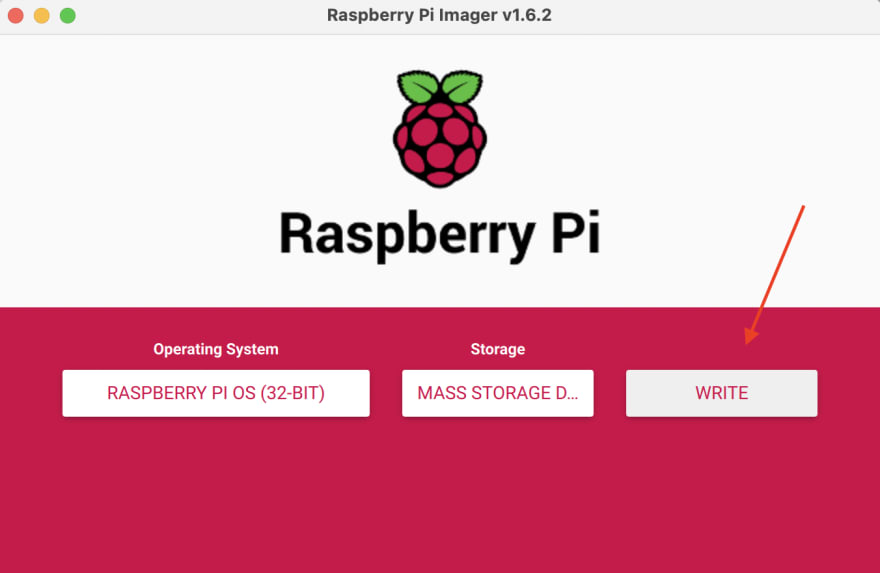
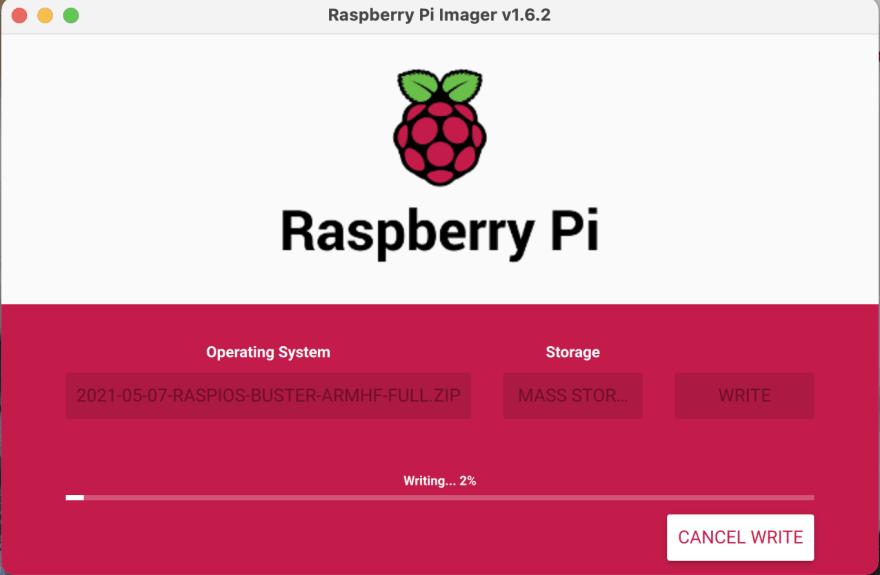
ပြီးရင် Write ကို နှိပ်ပါ။
2. Monitor or Keyboard တို့မပါပဲ Raspberry Pi Setup လုပ်ဖို့ Wireless Network Configure လုပ်ပါမယ်။
Headless Setup ရဲ့ အနှစ်သာရ ကအခုမှ စတာပါ။ ပုံမှန်အတိုင်ဆိုရင် Pi OS ကို SD card ထဲထည့်ပီးပီ ဆိုရင် Pi board မှာ keyboard, mouse, hdmi cable တွေတပ်ပြီး monitor တစ်ခုခုနဲ့ချိတ်ရပါမယ်။ Headless Setup ဆိုတာအဲတာတွေတပ်စရာမလို့ပဲ အသုံးပြု့တဲ့နည်းဖြစ်ပါတယ်။
တစ်နည်းအားဖြင့်ပြောရရင် boot files တွေထဲမှာ customize ဝင်ပြင်ပီးတော့ ssh နဲ့ VNC Viewer on ပြီး access လုပ်တဲ့နည်းဖြစ်ပါတယ်။
အရင်ဆုံးအနေနဲ့ Raspberry PI OS တက်လာတဲ့ အခါ မိ့မိ့ personal connect လုပ်ဖို့ network configuration file ထည့်ပေးရပါမယ်။ Raspberry Pi ဟာဆိုရင် network configuration file လေးကို wpa_supplicant.conf လို့ခေါ်တဲ့ နာမည်နဲ့ သိမ်းထားလေ့ရှိ့ပါတယ်။
wpa_supplicant.conf ရဲ့ format ကတော့ အောက်ပါအတိုင်းဖြစ်ပါတယ်။
country=MM
ctrl_interface=DIR=/var/run/wpa_supplicant GROUP=netdev
update_config=1
network={
       ssid="SSID Name"
       psk="Password"
       key_mgmt=WPA-PSK
    }
SSID Name နေရာမှာ Wifi Name ထည့်ပါ။
Password နေရာမှာ Wifi Password ထည့်ပါ။
ဒီနေရာမှာ ကိုယ့်မှာ wifi စက်တပ်ထားမှ မဟုတ်ပါဘူး။ ဖုန်းရဲ့ hostpot နဲ့လည်းလုပ်လို့ရပါတယ်။
wpa_supplicant.conf လို့ခေါ်တဲ့ ဖိုင်လေးကို SD card root ထဲမှာ ထည့်ပေးရပါမယ်။
အဲဒီလိုထည့်လိုက်တဲ့ အတွက်ကြောင့် PI OS တက်လာတဲ့ အခါ မိ့မိရဲ့ network ကို auto connect လုပ်ပါလိမ့်မယ်။
3. SSH enable လုပ်ရပါမယ်။
နောက်တစ်ဆင့်ကတော့ wifi auto ချိတ်ပီးတဲ့ အခါ Raspberry PI ကို remote acccess လုပ်ဖို့ ssh enable လုပ်ရပါမယ်။
ဒီအဆင့်ကတော့ အရမ်းကို ရိုးရှင်းပါတယ်။
ssh file လေးကို SD card root ထဲမှာ ထည့်လိုက်ရုံပါပဲ။
Terminal မှာ touch ssh လို့ရိုက်လိုက်ရင် ssh ဆိုတဲ့ empty file လေးထွက်လာပါလိမ့်မယ်။
အဲဒီ ssh ဆိုတဲ့ file လေးကို SD card root ထဲမှာ ထည့်ပေးလိုက်ပါ။
Note:
sshfile မှာ ဘာ file extension မှ မပါပါဘူး။
ပြီးရင်တော့ မိ့မိ့ SD card ကို ဖြုတ်ပြီး Raspberry Pi board မှာ တပ်နိုင်ပါပြီ။
Raspberry PI ကို power on လိုက်ပါ။
Raspberry PI မှာ မီးအစိမ်းလေး လင်းလာတဲ့ အထိ့ ခဏစောင့်ပါ။
4. Find Raspberry PI Ip Address
စတုတ္ထ အဆင့်အနေနဲ့ Raspberry PI boot တက်လာပြီ ဆိုရင် ssh ကနေဝင်နိုင်ဖို့ Raspberry PI ရဲ့ Ip Address သိ့ဖို့လိုပါတယ်။
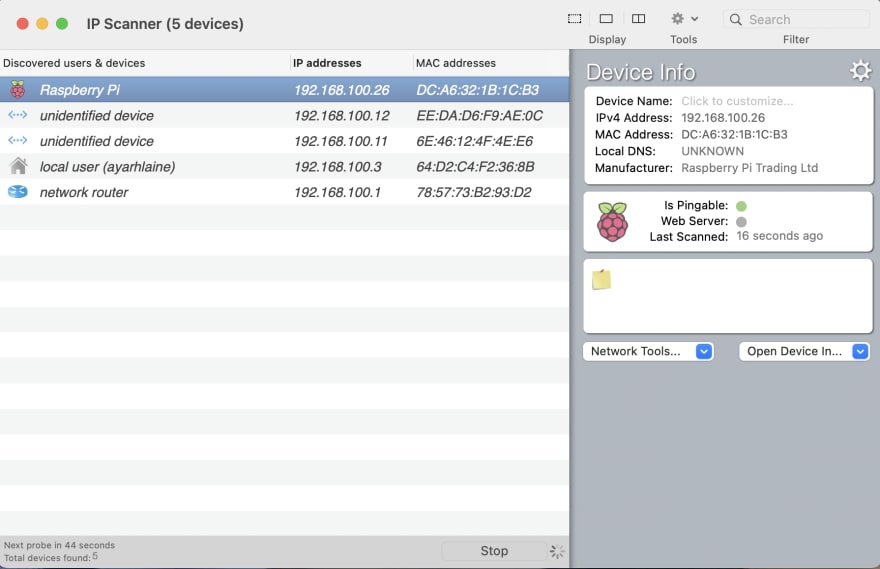
ဒီအတွက် IP Scanner ကိုသုံးပါမယ်။
For Window, Advance IP Scanner သုံးနိုင်ပါတယ်။
For Mac, IP Scanner ကိုသုံးနိုင်ပါတယ်။
IP Scanner ဖွင့်လိုက်တာနဲ့ အောက်ပါအတိုင်းမြင်တွေ့ရမှာ ဖြစ်ပါတယ်။
192.168.100.26 ဆိုတာ Raspberry PI ရဲ့ IP address ဖြစ်ပါတယ်။
အဲဒါကိုအသုံးပြု့ပြီး ssh ကနေ login ဝင်နိုင်ပါပြီ။
SSH က Mac, Ubuntu တိုမှာ ပါပြီးသားဖြစ်ပြီး Window မှာဆိုရင်တော့ Putty စသော ssh client software တွေသုံးနိုင်ပါတယ်။
Terminal မှာ ssh pi@<ip-address> လို့ ရိုက်ပြီးဝင်ရပါမယ်။
ဘာလို့ ssh pi@<ip-address> သုံးတာလဲဆိုတော့ Raspberry Pi ရဲ့
Default User Name = pi
Default Password = raspberry
ဖြစ်လို့ပါပဲ။
5. VNC Viewer setup
Raspberry PI Screen ကို remove access မြင်နိုင်ဖို့ Raspberry PI မှာ default အနေနဲ့ VNC Viewer Software ပါလာပြီးသားပါ။ Default အနေနဲ့တော့ သူက disabled လုပ်ထားတာပါ။ ဒါကို ဖွင့်ပေးဖို့လိုအပ်ပါတယ်။
SSH နဲ့ Raspberry PI ထဲ ဝင်ပြီးတာနဲ့ ဒါကို အလွယ်တကူ enable လုပ်လိုရပါပြီ။
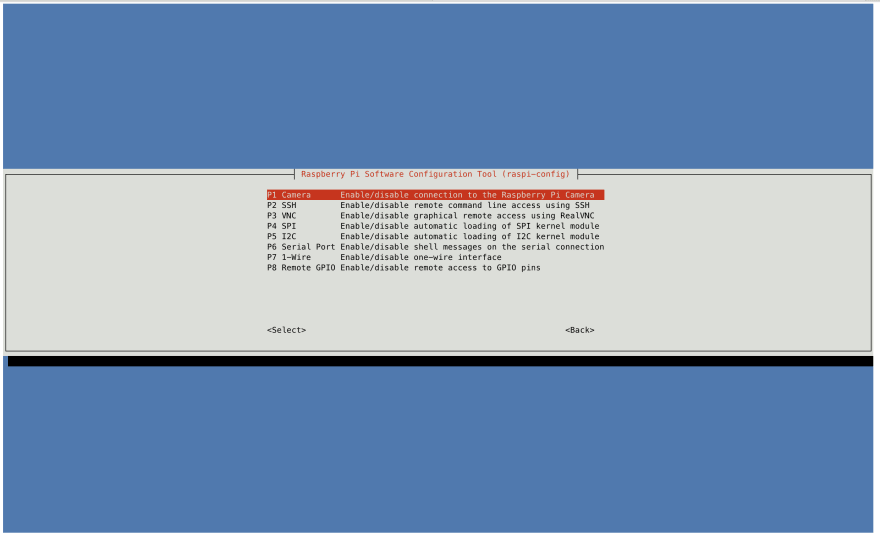
sudo raspi-config ဆိုပြီး ရိုက်ရပါမယ်။
ရိုက်ပြီး Enter ခေါက်လိုက်တာနဲ အောက်ပါအတိုင်းမြင်တွေ့ရမှာ ဖြစ်ပါတယ်။
Arrow Key ကို အသုံးပြု့ပြီး Interface Option ကိုရွေးပါ။
Enter ခေါက်လိုက်တာနဲ့ အောက်ပါအတိုင်းထပ်မံမြင်တွေ့ရမှာ ဖြစ်ပါတယ်။
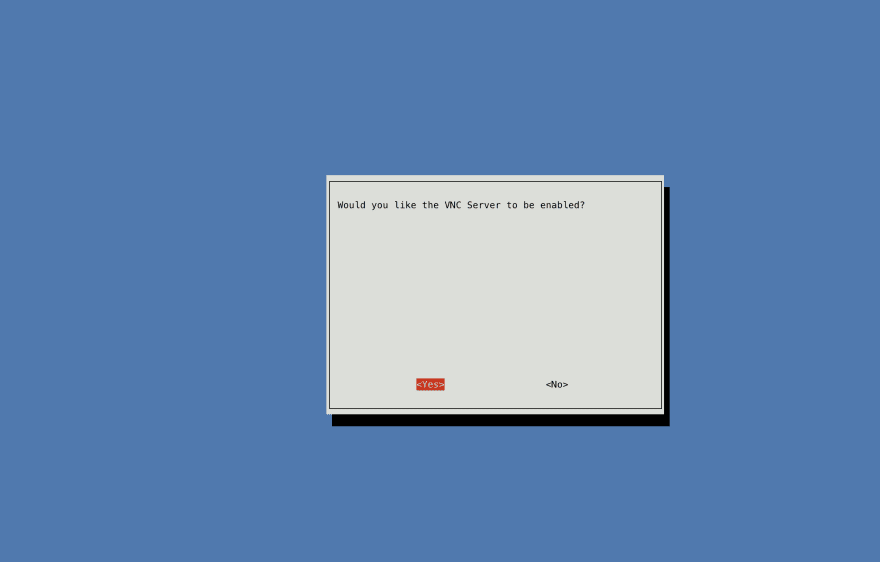
VNC Enable/Disable ကို arrow key နဲ့သွားပါ။ Enter ခေါက်ပါ။
ပြီး ရင် Yes ကို ရွေးပါ။
VNC Viewer Enable လုပ်လို့ပြီးပါပြီ။
6. Accessing Raspberry PI Screen from PC/Phone
နောက်ဆုံးအဆင့်အနေနဲ့ Raspberry PI Screen ကို မိ့မိ laptop/phone ကနေကြည့်နိုင်ပါပြီ။
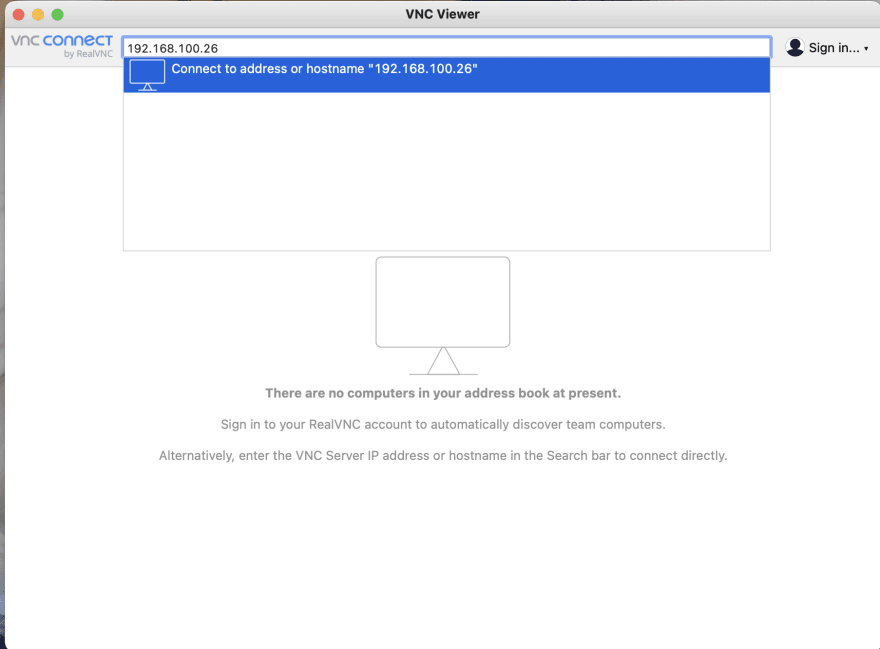
VNC Viewer ကို ဒီမှာ ဒေါင်းပါ။
Window, Mac, Ubuntu, Android အကုန် support ပေးပါတယ်။
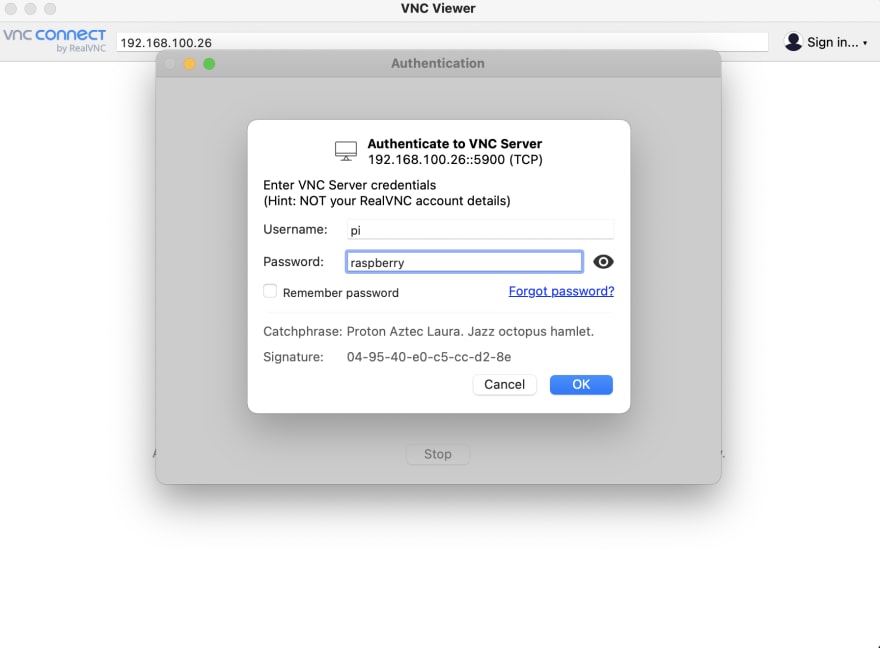
VNC Viewer ဖွင့်ပါ။
Raspberry PI Ip address ရိုက်ထည့်ပါ။
User Name နဲ့ Password ထည့်ပါ။
ပြီးတာနဲ့ အောက်ပါအတိုင်း Raspberry PI Screen ကို မိ့မိ laptop/phone ကနေ ထိန်းချုပ်နိုင်ပါပြီ။
Troubleshoot Guides
Note: ရေးသားသူသည့် Raspberry PI Professional တစ်ယောက်မဟုတ်ပါ။ မိ့မိ့ကိုယ်တိုင် setup လုပ်စဉ်က အတွေ့အကြုံကိုသာမျှဝေခြင်းဖြစ်ပါသည်။
အားလုံးကိုကျေးဇူးတင်ပါတယ်။
ဆက်လက်ကြိုးစားပါအုံးမည်။
Ayar Hlaine









Top comments (0)
Some comments may only be visible to logged-in visitors. Sign in to view all comments.