⏱ This tutorial is an introductory walkthrough of creating a Vue app on Begin. It should take less than 15 minutes.
Introduction
Hello there, Beginner!
This tutorial uses the Vue starter app, extended by an example API endpoint. You'll have all the capabilities of Vue for building beautiful user interfaces, combined with the power, speed, and security of cloud functions and serverless data storage.
What is Vue.js?
Vue (pronounced like view) is a progressive framework for building user interfaces. The core library is focused on the view layer only and is easy to pick up and integrate with other libraries or existing projects. On the other hand, Vue is also perfectly capable of powering sophisticated Single-Page Applications when used in combination with modern tooling and supporting libraries.
If you’d like to learn more about Vue before diving in, here is a video walking through the core principles of Vue and a sample project.
Prerequisites
You will need to have git and Node.js installed to your local computer to follow along with this tutorial. (Learn more about installing git and installing Node.js.)
You'll also need a GitHub account. (Learn more about signing up with GitHub.)
Although it would be helpful to have some experience with Vue, it's not required to follow along with this tutorial. (Related, the Vue docs are a great reference.)
This tutorial also assumes some familiarity with such things as:
- Text editors
- Terminal / CLI
- Git and version control
- General software development using JavaScript
You do not need to be an expert in any of these things in order to follow along and make your first Vue app in Begin!
Getting started
Create your new Vue app
First, click the Deploy to Begin button below. This starts the process of authorizing Begin with your GitHub account. (You may be prompted to log into GitHub, and/or be asked to create a Begin username.)

Name your app & repo
You'll then be prompted to name your new app and repository – this is optional, feel free to use the default app and repo name if you like!
Note: your Begin app name and repository name cannot be changed later.

Once you've clicked the Create... button, Begin will spin up your new project on GitHub (under github.com/{your GH username}/{your repo name}).
By default your Begin app repo is created as a public GitHub repo; it can be set to private by granting Begin additional permissions from this screen (or later from the
Settingsscreen found in the left nav of your Begin app).
Your first deploy
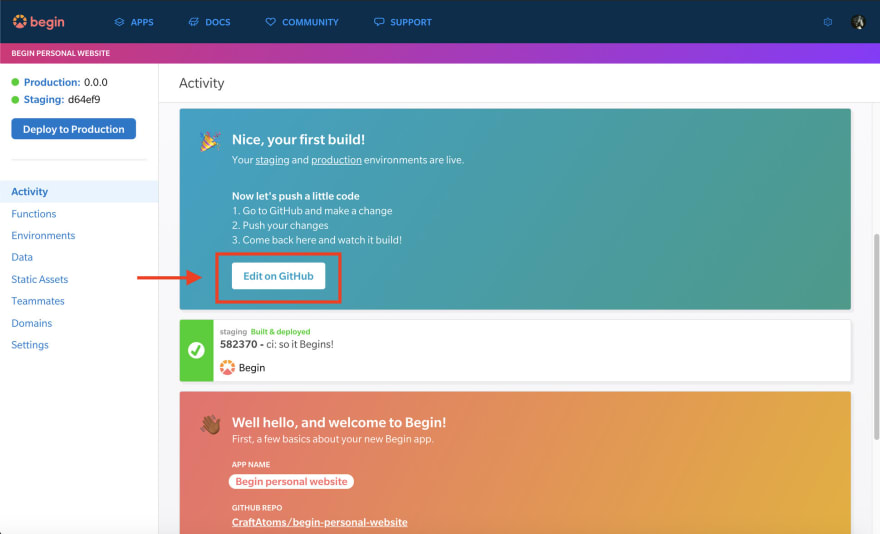
After creating your app, you'll be taken to its Activity stream. Welcome to the main backend interface of your Begin app!

From the Activity view, you'll be able to watch your app build & deploy in real-time. Any time you push to master, you'll see a new build get kicked off in Begin.
Each build undergoes a number of predefined build steps (learn more about build steps here); these build steps may install your app's dependencies (install), test your code's syntax (lint), generate any files or assets needed to run your app (build), and/or run an automated test suite (test).
If no build steps fail, then the build containing your latest commit to master is automatically deployed to your staging environment.
Go ahead and click the Staging link in the upper left corner of your left nav to open your new app's staging URL. You should now see your Vue app:

💡 Learn more! Head here to dig deeper into covers build pipelines, git tagging, and more.
Make your first commit
If you'd like to jump right into making your first commit and running your first build, click the Edit on GitHub button. This will open your app's code in GitHub and allow you to make a quick change.
Look for this code, and try editing your basic app. Let's edit the <h2> tag that says "Change me!" to "My app!":
// Customize your site by changing the data below
return (
  <template>
  <div class="hello">
    <h1>{{ message }}</h1>
    <h2>Change me</h2> // Start by editing here!
    <p>
      For a guide and recipes on how to configure / customize this project,<br>
      check out the
      <a href="https://cli.vuejs.org" target="_blank" rel="noopener">vue-cli documentation</a>.
    </p>
Click the commit changes button on GitHub, and head back to your Activity view to watch it build.
When it's done, don't forget to see your changes live in your staging environment!
Get set up locally
Next, let's get your new site running in your local environment (i.e. the computer you work on).
First, head to your GitHub repo (from the first card in your Activity, or from the left nav). Find the clone or download button and copy the git URL.
Then head to your terminal and clone your repo to your local filesystem.
git clone https://github.com/your-github-username/your-new-begin-app.git
Once you've got your project cloned on your local machine, cd into the project directory, install your dependencies, and start the local dev server:
cd your-new-begin-app
npm install
npm start
You should see a localhost link in your terminal – go ahead and visit that in your browser.
That's all you need to do preview your changes locally before pushing them to staging!
Vue CLI
Vue CLI is a command-line interface that acts as standard tooling for Vue.js development. It's feature-rich with out-of-the-box support for Babel, Typescript, ESLint, Unit Testing & End-to-end Testing. You create, develop and manage your projects through an accompanying graphical user interface. It's really cool and you might want to set it up in your project for future use. We'll show you how to do that.
Getting Started
Since we've already created our project and have it set up locally on our machine, all we have to do is install the CLI globally and run the command to start the GUI(graphical user interface)
Install globally:
npm install -g @vue/cli
# OR
yarn global add @vue/cli
Start GUI:
vue ui
Once you start the GUI, you will see this screen load up in your browser on http://localhost:8000
Our project is already on our local machine so let's click the import button to sync our project and the GUI.

Look for your begin-vue-app project folder and click import this folder as shown in the screen below.

Now we're synced. Welcome to your new project! Vue CLI and the accompanying GUI tool give you tremendous insight and analytics into your Vue app.

💡 Learn more! Be sure to head over to the Vue CLI docs to learn everything that you can do with these Vue development tools.
Project structure
Now that your app is live on staging and running locally, let's take a quick look into how the project itself is structured so you'll know your way around. Here are the key folders and files in the source tree of your Vue app:
.
├── public/
├── src/
│    ├── assets/
│    ├── components/
│    ├── http/
│    │   └── get-api/
│    ├── App.vue
│    └── main.js
└── test/
Let's go over each of these directories & files and learn how you may use them:
public/index.html
public/index.html is the page served in the browser. Vue is a single-page application framework. It's used to create single-page applications(SPA). It loads just one file which is the index.html file. The div with an id of app (as seen in the code below) is a placeholder for our Vue application.
// public/index.html

  <div id="app"></div>
The file public/index.html is a template that will be processed with html-webpack-plugin. During build, asset links will be injected automatically.
src/assets/
All of our apps static assets(images) can be exported from this folder and imported into our components via relative paths.
When you reference a static asset using relative paths (must start with .) inside JavaScript, CSS or *.vue files, the asset will be included into your Webpack dependency graph.
src/components/
You guessed it. This directory is where we keep our apps components.
Components are one of the most powerful features of Vue.js and can be reused as many times as you want. They help you extend basic HTML elements to encapsulate reusable code. At a high level, components are custom elements that Vue.js’ compiler would attach specified behavior to. Think of them as reusable Vue instances with a name!
💡 Learn more! Go here to learn more about using components in Vue.
src/http/get-api/
The cloud function that handles example API requests is found at src/http/get-api/.
Some Begin apps are inert static web sites – but not this one. Your Vue app utilizes this built-in small, fast, individually executing cloud function that handles HTTP API requests and responses. (We call those HTTP functions, for short.)
The HTTP function that handles requests to GET /api is found in src/http/get-api/.
In the next section, we will go more in-depth about how to provision HTTP functions in your Vue app.
💡 Learn more! Head here to dig deeper into HTTP functions in Begin apps.
./App.vue
This ./App.vue file is a component that is structured like any other component you would build inside of a Vue application. It has a template tag for our markup that is loading an image from our src/assets folder and another component called HelloWorld.vue from our src/components folder.
The script tag is for our JS and where we import in our HelloWorld component.
The style tag is for our CSS styling. In this particular component the styles affect our app globally. Whenever you see a <style scoped> tag inside of a component, just know that those particular styles are scoped only to that particular component.
main.js
In our src folder you will find a main.js file which is the entry point into Vue. Here we import Vue and our main app component which is a file called ./App.vue.
We create a new Vue instance and we render the app component inside of an element with the id of app. This would be the div in public/index.html that has an id of 'app'.
src/test/
Your Vue project comes built-in with a few boilerplate tests to ensure that things are running smoothly in your app. We've even loaded some example tests for web integration & Begin data in the /test/example/ directory.
A solid platform is the foundation of a durable application, but tests are essential!
Tests run via npm test or npm t.
While you can use any test runner and reporter combo you want, we recommend the TAP family for testing. Test suites that require their runners to inject globals can create some very difficult to debug situations.
With that said, Vue CLI has built-in options for unit testing with Jest or Mocha that works out of the box. There is also the official Vue Test Utils which provides more detailed guidance for custom setups.
💡 Learn more! Head here to dig deeper into the project structure of Begin apps.
Using API endpoints
Now for the fun part! Let's go over how HTTP functions work.
The text in the red box below is actually being fetched from an example API endpoint, handled by src/http/get-api/index.js.

The output of this HTTP function can be called by fetching GET /api, and subsequently used by any component within your Vue app:
// src/http/get-api/index.js

exports.handler = async function http (req) {
  console.log('Begin API called')
  return {
    statusCode: 200,
    headers: {
      'content-type': 'application/json; charset=utf8',
      'cache-control': 'no-cache, no-store, must-revalidate, max-age=0, s-maxage=0'
    },
    body: JSON.stringify({
      message: 'Hello from your Begin API!'
    })
  }
}
Now let's navigate to src/App.vue to see how this HTTP function is being implemented into your app. ./App.vue is our apps root component. Inside of the script tag you will find an import of our HelloWorld component. This component actually holds and displays the data from our Begin endpoint. As you can see below, GET /api/ is fetched via async function.
// src/App.vue

<script>
import HelloWorld from './components/HelloWorld.vue'

export default {
  name: 'app',
  data: function () {
    return {
      message: 'Loading...'
    }
  },
  components: {
    HelloWorld
  },
  methods:  {
    getData: async function () {
      try {
        let data = await (await fetch('api')).json()
        this.message = data.message
      } catch (err) {
        this.message = err.message
      }
    }
  },
  mounted: function () {
    this.getData()
  }
}
</script>
Then if we head over to our /components/HelloWorld.vue we'll find the h1 receiving the message prop being passed down from our apps root component ./App.vue
<template>
  <div class="hello">
    <h1>{{ message }}</h1> // data passed in.
    <h2>Change me</h2>
As you can probably see by now, being able to fetch and display data within your app serverlessly is an awesome way to extend the capabilities of your Vue app.
Deploy your site
While not required, it's always a good idea to lint and run tests before pushing just to make sure you catch any errors:
npm run lint
npm t
Everything set? Now let's push this commit (and deploy the build to staging):
git add -A
git commit -am 'Just customizing my Begin site!'
git push origin master
Head on back to Begin and open your staging URL once your build is complete. Looking good? Excellent.
Now let's deploy to production: click the Deploy to production button in the upper left, pick a version, leave an optional message summarizing your changes, and Ship it!
When your next build is done, click the production link in the upper left corner to see the latest release of your app.
✨Tip: You can also deploy to production from your terminal by bumping your npm version (
npm version [patch|minor|major] && git push origin) or by cutting a git tag (git tag -a 1.0.0 -m "1.0, here we come" && git push origin --tags)
Congratulations!
You've now got a shiny new Vue app hosted on Begin – nice work.
Now go show it off – people need to see this thing!
Additional resources
- Expand the capabilities of your app:
- Begin reference docs
- Get help:
- More about Vue

Top comments (0)