Scenario
Let us say you have been building your website for a while now and it is time to show the world what you have been working on. One of the best ways to achieve this is by hosting your site using Azure Static Web Aps (SWA). In this blog, I will take you step by step through deploying your site for the world to see.
The first question in your mind might be, what is Static Web Apps?
Static Web Apps is an Azure Service that you can use to build and deploy your web applications.
It automates deployment directly from your repository, for instance with GitHub.
Web applications built using libraries and frameworks like Angular, React, Svelte, Vue, or Blazor where no server-side rendering is required are referred to as Static Web Apps. These apps include HTML (Hyper Text Markup Language), CSS, JavaScript, and image assets that make up the application. Using the Azure SWA, you can easily deploy your applications.
Prerequisites
In addition to Azure SWA, we now have the Static Web Apps CLI, whereby you can integrate Azure Static Web Apps from Local Development. In this tutorial I will do a demo on how you can start using Azure Static Web Apps CLI. When you are done, you will be able to deploy your web application. In order to complete this tutorial, you will need:
- An Azure subscription, get a free students account here
- Visual Studio Code installed, install one here
QuickStart – Local development
- Once you have built your react app, run it locally using npm start. If you are new to React you can follow the step-by-step tutorial to build your first app.
-
Now, onto the SWA CLI. First, you will need to install the CLI using either npm or yarn on the terminal. Using npm, you can:
- Install SWA CLI globally: npm install -g /static-web-apps-cli
- Or install SWA CLI locally withing the project: npm install -D /static-web-apps-cli
Make sure the CLI is installed by running swa –version
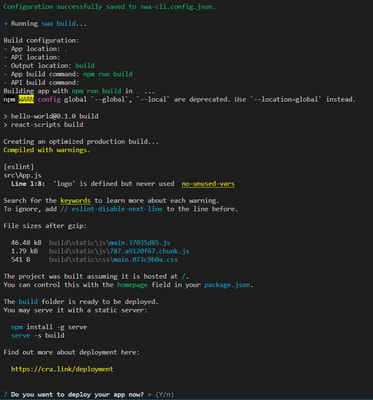
- Once done, you can now go ahead and deploy your application by running swa on the terminal. By running it will generate a configuration for you, build your project then ask you if you want to deploy your application to Azure.
- Once the configuration is generated as shown below, go ahead and accept the configuration which will trigger the build to start.
-
- After the build is concluded, you can proceed and deploy your application. Connect the project to your Azure tenant. Once it has access to your subscription, go ahead and create a new application and give it a name.
- And voila, your application is on the internet, and you can now share it with your friends!
Summary
In simple steps, we have moved our application from the local host to the web. Regardless of the framework you are using, you can easily deploy it to the internet. Learn more about the Static Web Apps CLI and how you can configure your deployment here. Eager to learn more on Azure Static Web Apps? The learning path below will help you get going:
Here is a short clip that goes over the steps above.
@bethanyjep how to move your react app from local host to the Internet. docs: https://aka.ms/swaCLI #students #Azure #SWA #React ♬ original sound - Pikachu 🐣


Top comments (0)