
1. Introduction
The project is showcasing a simple way of using the the BleuIO Dongle to turn on and off a light bulb that is connected to the STM32 Nucleo-144 via a 5V Relay.
You will need two dongles, one connected to the Nucleo board and one connected to a computer, running the web script.
When the BleuIO Dongle is connected to the Nucleo boards USB port the STM32 will recognize it and directly start advertising. This allows the other Dongle to connect to it.
It will also accept 3 different inputs from the UART:
|input|result|
|:--:|:--:|
|0|Send ATI (Request device information) command to BlueIO Dongle.|
|1| Manually turn the light bulb on|
|2|Manually turn the light bulb off|
We have used a STM32 Nucleo-144 development board with STM32H743ZI MCU (STM32H743ZI micro mbed-Enabled Development Nucleo-144 series ARM® Cortex®-M7 MCU 32-Bit Embedded Evaluation Board) for this example.
If you want to use another setup you will have to make sure it support USB Host and beware that the GPIO setup might be different and may need to be reconfigured in the .ioc file.
WARNING – THIS PROJECT INVOLVES HIGH VOLTAGES THAT CAN CAUSE SERIOUS INJURY OR DEATH. PLEASE TAKE ALL NECESSARY PRECAUTIONS, AND TURN OFF ALL POWER TO A CIRCUIT BEFORE WORKING ON IT.
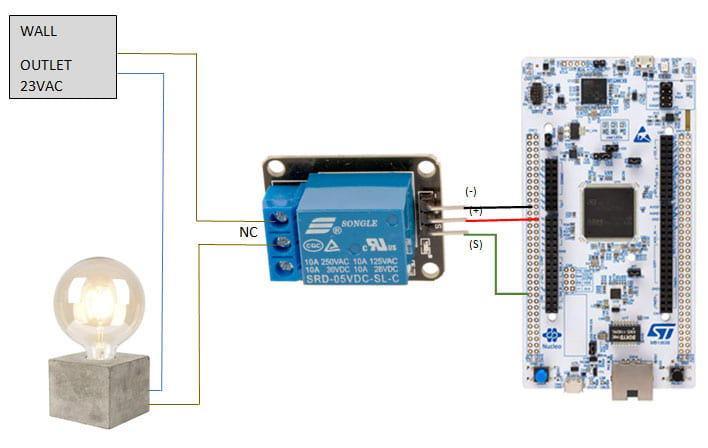
2. Connecting the relay
Beware:
Always be very careful when experimenting with AC, electrical shock can result in serious injuries!
NOTICE OF RISK; DISCLAIMER OF LIABILITY

Pinout and Connection to STM32
For the DC part of the Relay circuit connect S (signal) to pin PE4 on the STM32 NUCLEO board, also connect the Power supply (+) and ground (-) to +5V and GND respectively.

3. About the Code
You can get project HERE
https://github.com/smart-sensor-devices-ab/stm32_bleuio_lightbulb_example
This project based on our previous STM32 project (https://github.com/smart-sensor-devices-ab/stm32_bleuio_example) with these changes in the .ioc file:
In the pinout view we set the GPIO PE4 to OUTPUT and labeled it to 'lightbulb'.

In the USBH_CDC_ReceiveCallback function in USB_HOST\App\usb_host.c we copy the CDC_RX_Buffer into a external variable called dongle_response that is accessable from the main.c file.
void USBH_CDC_ReceiveCallback(USBH_HandleTypeDef *phost)
{
    if(phost == &hUsbHostFS)
    {
        // Handles the data recived from the USB CDC host, here just printing it out to UART
        rx_size = USBH_CDC_GetLastReceivedDataSize(phost);
        HAL_UART_Transmit(&huart3, CDC_RX_Buffer, rx_size, HAL_MAX_DELAY);

        // Copy buffer to external dongle_response buffer
        strcpy((char *)dongle_response, (char *)CDC_RX_Buffer);

        memset(CDC_RX_Buffer,0,RX_BUFF_SIZE);
        USBH_CDC_Receive(phost, CDC_RX_Buffer, RX_BUFF_SIZE);
    }

    return;
}
In main.c we create a simple intepreter so we can react to the data we are recieving from the dongle.
/**
  * @brief Simple dongle interpreter
  * @retval None
  */
void dongle_interpreter(uint8_t * input)
{

    if(strlen((char *)input) != 0)
    {
        if(strstr((char *)input, "\r\nADVERTISING...") != NULL)
        {
            isAdvertising = true;
        }
        if(strstr((char *)input, "\r\nADVERTISING STOPPED.") != NULL)
        {
            isAdvertising = false;
        }
        if(strstr((char *)input, "\r\nCONNECTED") != NULL)
        {
            isConnected = true;
            HAL_GPIO_WritePin(GPIOE, GPIO_PIN_1, GPIO_PIN_SET);
        }
        if(strstr((char *)input, "\r\nDISCONNECTED") != NULL)
        {
            isConnected = false;
            HAL_GPIO_WritePin(GPIOE, GPIO_PIN_1, GPIO_PIN_RESET);
        }
        if(strstr((char *)input, "L=0") != NULL)
        {
            isLightBulbOn = false;
            HAL_GPIO_WritePin(Lightbulb_GPIO_Port, Lightbulb_Pin, GPIO_PIN_RESET);

            writeToDongle((uint8_t*)DONGLE_SEND_LIGHT_OFF);

            uart_buf_len = sprintf(uart_tx_buf, "\r\nLight bulb is %s\r\n", isLightBulbOn ? "on":"off");
            HAL_UART_Transmit(&huart3, (uint8_t *)uart_tx_buf, uart_buf_len, HAL_MAX_DELAY);
        }
        if(strstr((char *)input, "L=1") != NULL)
        {
            isLightBulbOn = true;
            HAL_GPIO_WritePin(Lightbulb_GPIO_Port, Lightbulb_Pin, GPIO_PIN_SET);

            writeToDongle((uint8_t*)DONGLE_SEND_LIGHT_ON);

            uart_buf_len = sprintf(uart_tx_buf, "\r\nLight bulb is %s\r\n", isLightBulbOn ? "on":"off");
            HAL_UART_Transmit(&huart3, (uint8_t *)uart_tx_buf, uart_buf_len, HAL_MAX_DELAY);
        }
    }
    memset(&dongle_response, 0, RSP_SIZE);
}
We also update the handleUartInput function so we can have manual control over the light bulb via the UART.
/**
  * @brief Simple uart input handler
  * @retval None
  */
void handleUartInput(UARTCommandTypeDef cmd)
{
    switch(cmd)
    {
        case UART_RX_0:
        {
            // 0
            uart_buf_len = sprintf(uart_tx_buf, "\r\n(0 pressed)\r\n");
            HAL_UART_Transmit(&huart3, (uint8_t *)uart_tx_buf, uart_buf_len, HAL_MAX_DELAY);
            if(isBleuIOReady)
            {
                writeToDongle((uint8_t*)DONGLE_CMD_ATI);
            } else
            {
                uart_buf_len = sprintf(uart_tx_buf, BLEUIO_NOT_READY_MSG);
                HAL_UART_Transmit(&huart3, (uint8_t *)uart_tx_buf, uart_buf_len, HAL_MAX_DELAY);
            }
            uartStatus = UART_RX_NONE;
            break;
        }
        case UART_RX_1:
        {
            // 1
            uart_buf_len = sprintf(uart_tx_buf, "\r\n(1 pressed light bulb on!)\r\n");
            HAL_UART_Transmit(&huart3, (uint8_t *)uart_tx_buf, uart_buf_len, HAL_MAX_DELAY);
            HAL_GPIO_WritePin(Lightbulb_GPIO_Port, Lightbulb_Pin, GPIO_PIN_SET);
            uartStatus = UART_RX_NONE;
            break;
        }
        case UART_RX_2:
        {
            // 2
            uart_buf_len = sprintf(uart_tx_buf, "\r\n(2 pressed light bulb off!)\r\n");
            HAL_UART_Transmit(&huart3, (uint8_t *)uart_tx_buf, uart_buf_len, HAL_MAX_DELAY);
            HAL_GPIO_WritePin(Lightbulb_GPIO_Port, Lightbulb_Pin, GPIO_PIN_RESET);

            uartStatus = UART_RX_NONE;
            break;
        }
        case UART_RX_NONE:
        {
            break;
        }
        default:
        {
            uartStatus = UART_RX_NONE;
            break;
        }
    }
}
We put the intepreter function inside the main loop.
/* Infinite loop */
  /* USER CODE BEGIN WHILE */
  while (1)
  {
    /* USER CODE END WHILE */
    MX_USB_HOST_Process();

    /* USER CODE BEGIN 3 */
    // Simple handler for uart input
    handleUartInput(uartStatus);
    // Inteprets the dongle data
    dongle_interpreter(dongle_response);

    // Starts advertising as soon as the Dongle is ready.
    if(!isAdvertising && !isConnected && isBleuIOReady)
    {
        HAL_Delay(200);
        writeToDongle((uint8_t*)DONGLE_CMD_AT_ADVSTART);
        isAdvertising = true;
    }
  }
  /* USER CODE END 3 */
4. Using the example project
4.1 What you will need
- Two BleuIO dongles (https://www.bleuio.com/)
- The script for the dongle (available on the source code inside web script folder)
A board with a STM32 Microcontroller with a USB port. (A Nucleo-144 development board: NUCLEO-H743ZI2, was used developing this example. (https://www.st.com/en/evaluation-tools/nucleo-h743zi.html)
To connect the dongle to the Nucleo board a "USB A to Micro USB B"-cable with a USB A female-to-female adapter can be used.)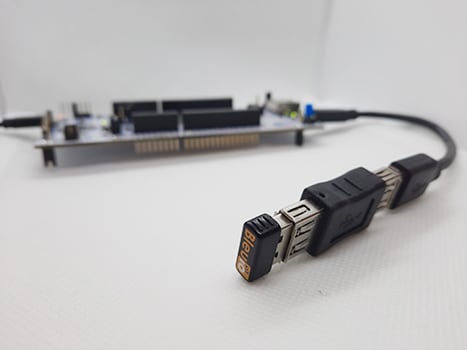
STM32CubeIDE (https://www.st.com/en/development-tools/stm32cubeide.html)
A 5V Relay
A light bulb
5. How to setup project
5.1 Downloading the project from GitHub
Get project HERE
https://github.com/smart-sensor-devices-ab/stm32_bleuio_lightbulb_example
Either clone the project, or download it as a zip file and unzip it, into your STM32CubeIDE workspace.
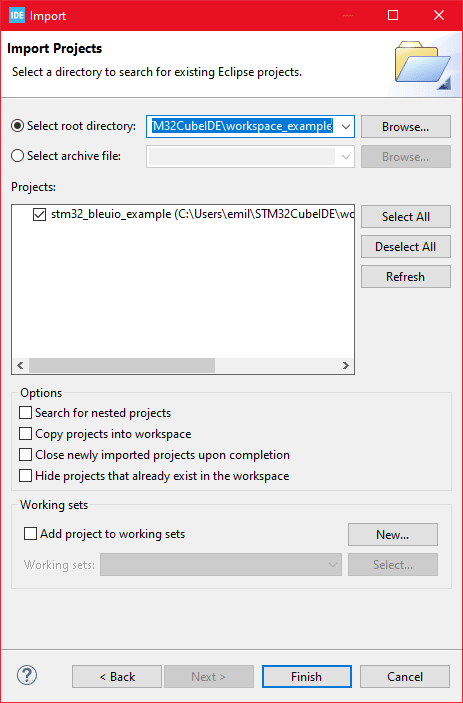
5.2 Importing as an Existing Project
From STM32CubeIDE choose File>Import...

Then choose General>Existing Projects into Workspace then click 'Next >'

Make sure you've choosen your workspace in 'Select root directory:'
You should see the project "stm32_bleuio_example", check it and click 'Finish'.
6. Running the example
- In STMCubeIDE click the hammer icon to build the project.
- Open up the 'STMicroelectronics STLink Viritual COM Port' with a serial terminal emulation program like TeraTerm, Putty or CoolTerm.
Serial port Setup:
Baudrate: 115200
Data Bits: 8
Parity: None
Stop Bits: 1
Flow Control: None
- Connect the BleuIO Dongle before running the example.
In STMCubeIDE click the green play button to flash and run it on your board. The first time you click it the 'Run Configuration' window will appear. You can just leave it as is and click run.
-
You should be greeted by this welcome message:

- Wait until the message: "[BleuIO Dongle Ready]" is shown.

- You can now connect with the other dongle using the script.
You can also use the uart commands (0, 1 or 2):
- Press 0 to get device information. 1 to turn on lightbulb. 2 to turn off lightbulb. Dongle response will be printed to UART.
7. Controlling the light from a web browser
We wrote a simple script that connects to the dongle and sends signals to toggle the light from the web browser.
For this script to work, we need
- BleuIO USB dongle connected to the computer.
- BleuIO javascript library
- Chrome 78 or later, and you need to enable the #enable-experimental-web-platform-features flag in chrome://flags
- A web bundler - (parcel js)
Steps
Create a simple Html file called index.html which will serve as the frontend of the script. This Html file contains some buttons that help connect and signal to the remote dongle, which is connected to stm32.
<!DOCTYPE html>
<html lang="en">
  <head>
    <meta charset="UTF-8" />
    <meta http-equiv="X-UA-Compatible" content="IE=edge" />
    <meta name="viewport" content="width=device-width, initial-scale=1.0" />
    <link
      href="https://cdn.jsdelivr.net/npm/bootstrap@5.1.3/dist/css/bootstrap.min.css"
      rel="stylesheet"
      integrity="sha384-1BmE4kWBq78iYhFldvKuhfTAU6auU8tT94WrHftjDbrCEXSU1oBoqyl2QvZ6jIW3"
      crossorigin="anonymous"
    />
    <title>Control Light using Bleutooth Low Energy</title>
  </head>
  <body class="mt-5">
    <div class="container mt-5">
      <h1 class="mb-5">Control Light using Bleutooth Low Energy</h1>
      <button class="btn btn-success" id="connect">Connect</button>
      <button class="btn btn-warning" id="lightOn" disabled>Turn On</button>
      <button class="btn btn-danger" id="lightOf" disabled>Turn Off</button>
    </div>
    <div class="container mt-5">
      <img id="light" src="light_off.png" alt="" />
    </div>

    <script src="script.js"></script>
  </body>
</html>
Create a js file called script.js and include it at the bottom of the Html file. This js file uses the BleuIO js library to write AT commands and communicate with the other dongle.
import * as my_dongle from "bleuio";
const dongleToConnect = "[0]40:48:FD:E5:35:A5";
import lightOnImg from "./light_on.png";
import lightOfImg from "./light_off.png";
document.getElementById("connect").addEventListener("click", function () {
  my_dongle.at_connect();
  document.getElementById("lightOn").disabled = false;
  document.getElementById("lightOf").disabled = false;
  document.getElementById("connect").disabled = true;
});

document.getElementById("lightOn").addEventListener("click", function () {
  my_dongle
    .ati()
    .then((data) => {
      //make central if not
      if (JSON.stringify(data).includes("Peripheral")) {
        console.log("peripheral");
        my_dongle.at_central().then((x) => {
          console.log("central now");
        });
      }
    })
    .then(() => {
      // connect to dongle
      my_dongle
        .at_getconn()
        .then((y) => {
          if (JSON.stringify(y).includes(dongleToConnect)) {
            console.log("already connected");
          } else {
            my_dongle.at_gapconnect(dongleToConnect).then(() => {
              console.log("connected successfully");
            });
          }
        })
        .then(() => {
          // send command to control light
          my_dongle.at_spssend("L=1").then(() => {
            console.log("Turned on");
            document.getElementById("light").src = lightOnImg;
          });
        });
    });
});

document.getElementById("lightOf").addEventListener("click", function () {
  my_dongle
    .ati()
    .then((data) => {
      //make central if not
      if (JSON.stringify(data).includes("Peripheral")) {
        console.log("peripheral");
        my_dongle.at_central().then((x) => {
          console.log("central now");
        });
      }
    })
    .then(() => {
      // connect to dongle
      my_dongle
        .at_getconn()
        .then((y) => {
          if (JSON.stringify(y).includes(dongleToConnect)) {
            console.log("already connected");
          } else {
            my_dongle.at_gapconnect(dongleToConnect).then(() => {
              console.log("connected successfully");
            });
          }
        })
        .then(() => {
          // send command to control light
          my_dongle.at_spssend("L=0").then(() => {
            console.log("Turned off");
            document.getElementById("light").src = lightOfImg;
          });
        });
    });
});
The script js file has three button actions; connect and control light.
Now we need to know the ID of the other dongle connected to STM32 so that we can connect to it. You can use this web terminal to get the dongle ID.
- Open this site https://bleuio.com/web_terminal.html and click connect to dongle.
- Select the appropriate port to connect.
- Once it says connected, type **"ATI"**. This will show dongle information and current status.
- If the dongle is on peripheral role, set it to central by typing **"AT+CENTRAL"**
- Now do a gap scan by typing **"AT+GAPSCAN"**
- Once you see your dongle on the list ,stop the scan by pressing control+c
- Copy the ID and paste it into the script (script.js) line #2
You will need a web bundler. You can use parcel.js
Once parcel js installed, go to the root directory and type "parcel index.html". This will start your development environment.
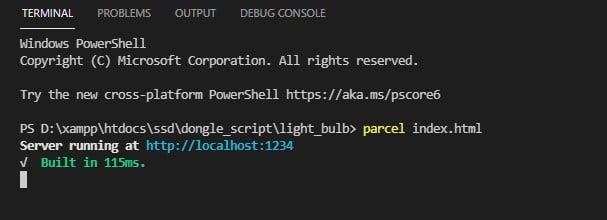
Open the script on a browser using parcel js.
You can easily connect to the dongle and turn on-off light from there.

You can also access the script at
- Wait until the message: "[BleuIO Dongle Ready]" is shown.

Latest comments (0)