
Written by Yusuff Faruq✏️
Storing and retrieving user-generated data is pretty common in mobile and web apps nowadays, and as such, there are different services that give mobile and web developers the ability to store data.
Among these services is Google’s Firebase. Firebase is a BaaS (backend-as-a-service), which means it allows both web and mobile developers to perform common backend tasks like user authentication and creating databases with no need for maintenance or upkeep.
React Native, on the other hand, is a platform that allows developers to use their knowledge of React, a popular frontend framework, to build native apps that work across both Android and iOS devices. React Native improves productivity as developers do not have to manage two different codebases for both the iOS and Android versions of a particular app.
In this article, you will learn how to store, retrieve, and update user-generated data with Firebase. At the end of this article, we will have built a to-do Android app that saves and retrieves the different to-do items in a database, using a database service provided by Firebase.

Prerequisites
To follow along perfectly with this article, you should have a basic understanding of React and React Native.
Setting up
Firstly, let’s create a new React Native project. You can visit the official React Native Documentation for guides on setting up the basics.
Once that is done, you can now create a new React Native project:
npx react-native init ToDoApp
We also need to install the dependencies we will use in the project. These dependencies are:
- Firebase
- react-native-check-box
Run these commands in your terminal to install these dependencies:
npm install --save firebase
npm install react-native-check-box --save
Now that the setup is done, we can start building our app!
Setting up Firebase
Before we start writing our code, we need to do some setup for Firebase to work perfectly with our app.
Create a src folder in the root directory and create a file called config.js in it.
Now, go to the Firebase website.

Click on the Get Started button and you will be taken to a page where you can create a new project. Once you are done creating a new project, you should be taken to a dashboard page similar to the image below.

Select the Database option from the side menu. After that is done, you should now be able to select from the two database options that Firebase provides: Realtime Database and Firestore , both of which have similar functionality.
If you are unsure of which database service to use, you can check out this guide by Firebase on choosing a database. In this article, we will be making use of the Realtime Database.
Once you select the Realtime Database option, a modal for setting the security rules for your database should pop up. Select Start in test mode. Now you should be at a page that shows the data in your database (which is empty for now).

Now that the database has been created, we need to get some information (Firebase configuration) from our Firebase project. These pieces of information or data will help link our code to our Firebase project.
To get our Firebase configuration details, go back to the project overview page and add a web app to the Firebase project. After registering the app, you should get the configuration details in the form of a JavaScript object.
const firebaseConfig = {
  apiKey: 'AIzaXXXXXXXXXXXXXXXXXXXXXXX',
  authDomain: 'test-XXXX.firebaseapp.com',
  databaseURL: 'https://test-XXXXXX.firebaseio.com',
  projectId: 'test-XXXX',
  storageBucket: 'test-XXXX.appspot.com',
  messagingSenderId: 'XXXXXXX',
  appId: "XXXXXXXXXXXXXXXXXXXXXXXXXXXXXXXXXXXX"
};
Now open your config.js file and import Firebase. After importing Firebase, you need to copy and paste the Firebase configuration details in the file.
import Firebase from "firebase";
const firebaseConfig = {
    apiKey: 'AIzaXXXXXXXXXXXXXXXXXXXXXXX',
    authDomain: 'test-XXXX.firebaseapp.com',
    databaseURL: 'https://test-XXXXXX.firebaseio.com',
    projectId: 'test-XXXX',
    storageBucket: 'test-XXXX.appspot.com',
    messagingSenderId: 'XXXXXXX',
    appId: "XXXXXXXXXXXXXXXXXXXXXXXXXXXXXXXXXXXX"
    measurementId: "X-XXXXXXXXXX"
  };
Now we just need to initialize a Firebase app using the configuration details we got from Firebase. Once that is done, we will get a reference to the database service provided by Firebase for our app and export it.
const app = Firebase.initializeApp(firebaseConfig);
export const db = app.database();
We can now read and write to our real-time database!
Creating our components
Let’s begin to write code!
Note : I will be writing all my code in my
app.jsfile.
First of all, we need a component to display a to-do item and manage the state of that to-do item. This component will be responsible for indicating whether or not a certain to-do task has been done. We will call this component ToDoItem.
import React from 'react';
import {
  StyleSheet,
  Alert,
  View,
  Text,
  Button,
  ScrollView,
  TextInput,
} from 'react-native';
import CheckBox from 'react-native-check-box';

const ToDoItem = () => {
  return (
    <View>
      <CheckBox
        checkBoxColor="skyblue"
      />
      <Text>
        A random To-Do item
      </Text>
    </View>
  );
};
As you can see, we imported the CheckBox component from react-native-check-box. This checkbox will be used to indicate whether or not a particular to-do task has been accomplished.
Now let us style our component! React Native comes with a StyleSheet that we can use to define styles for our different elements.
const styles = StyleSheet.create({
  todoItem: {
    flexDirection: 'row',
    marginVertical: 10,
    alignItems: 'center',

  },
  todoText: {
    borderColor: '#afafaf',
    paddingHorizontal: 5,
    paddingVertical: 7,
    borderWidth: 1,
    borderRadius: 5,
    marginRight: 10,
    minWidth: "50%",
    textAlign: "center"
  },
});
We can now apply these styles in the style attribute of each element like so:
<View style = {styles.todoItem}></View>
We want to style our ToDoItem component differently once the checkbox has been checked. To do this, we will create a state called doneState to manage the state of the to-do task — whether the task has been accomplished or not — using the useState Hook from React.
Firstly, import the useState Hook alongside React like this:
import React, {useState} from 'react';
Now, with the useState Hook imported, we can create our state like this:
const [doneState, setDone] = useState(false);
If you are not familiar with Hooks, you should check out the React documentation.
Basically, we created a state called doneState, which has an initial value of false. If, at some point in the future, we want to update the value of doneState and set it to true, we can always use setDone:
setDone(true);
The CheckBox comes with a prop called isChecked, which enables us to control when the checkbox should be checked. In this case, we want to check our checkbox when the to-do task has been done (when the value of doneState is true).
Since the isChecked prop of our checkbox component is dependent on the value of doneState, we want to change the value of doneState to the opposite of the current value whenever the checkbox is clicked.
This can be done with the onClick prop that comes with the CheckBox component. We will create an event handler called onCheck for the onClick event of the checkbox.
const onCheck = () => {
    setDone(!doneState);
};
Now, as I pointed out before, we want to style our ToDoItem component differently once it has been checked. Once it has been checked, the opacity of the ToDoItem will reduce and the checkbox will be disabled. Let us implement that:
return (
    <View style={styles.todoItem}>
      <CheckBox
        checkBoxColor="skyblue"
        onClick={onCheck}
        isChecked={doneState}
        disabled={doneState}
      />
      <Text style={[styles.todoText, {opacity: doneState ? 0.2 : 1}]}>
        A random To-Do item
      </Text>
    </View>
  );
};
Now that we have the basic parts of our ToDoItem component ready, let us create our App component, which will serve as the home screen of our app. Our App component will be a class-based component, but you can make yours into a functional component if you wish.
We need two pieces of state for our App component: todos, which contains all the to-do items, and presentToDo, which will be the current to-do item being added. We also need to add a View component to contain the list of to-do items; a TextInput component in which the user will type out a new to-do item; a button to add a to-do item; and another button to clear our database, thereby getting rid of all the to-do items.
With some styling, our App component should look like this:
class App extends React.Component {
  constructor() {
    super();
    this.state = {
      todos: {},
      presentToDo: '',
    };
  }
  componentDidMount() {
  }
  addNewTodo() {
  }
  clearTodos() {
  }
  render() {
    return (
      <ScrollView
        style={styles.container}
        contentContainerStyle={styles.contentContainerStyle}>
        <View>
          {/*Empty view: will contain to-do items soon*/}
        </View>
        <TextInput
          placeholder="Add new Todo"
          value={this.state.presentToDo}
          style={styles.textInput}
          onChangeText={e => {
            this.setState({
              presentToDo: e,
            });
          }}
          onSubmitEditing = {this.addNewTodo}
        />
        <Button
          title="Add new To do item"
          onPress={this.addNewTodo}
          color="lightgreen"
        />
        <View style={{marginTop: 20}}>
          <Button title="Clear todos" onPress={this.clearTodos} color="red" />
        </View>
      </ScrollView>
    );
  }
}

const styles = StyleSheet.create({
  container: {
    flex: 1,
    backgroundColor: 'white',
  },
  contentContainerStyle: {
    alignItems: 'center',
  },
  textInput: {
    borderWidth: 1,
    borderColor: '#afafaf',
    width: '80%',
    borderRadius: 5,
    paddingHorizontal: 10,
    marginVertical: 20,
    fontSize: 20,
  },
  todoItem: {
    flexDirection: 'row',
    marginVertical: 10,
    alignItems: 'center',
  },
  todoText: {
    borderColor: '#afafaf',
    paddingHorizontal: 5,
    paddingVertical: 7,
    borderWidth: 1,
    borderRadius: 5,
    marginRight: 10,
    minWidth: '50%',
    textAlign: 'center',
  },
});
Working with Firebase
Now, we are ready to start working with some Firebase code.
First, we need to import the database from the config.js file:
import {db} from './src/config';
Before we move on, we need to understand how data is structured in the Realtime Database that Firebase provides. The data is literally structured as a JSON tree.
According to the documentation:
“All Firebase Realtime Database data is stored as JSON objects. You can think of the database as a cloud-hosted JSON tree. Unlike a SQL database, there are no tables or records. When you add data to the JSON tree, it becomes a node in the existing JSON structure with an associated key.”
This makes working with the Realtime Database easy and familiar.
When our App component mounts, the first thing we want to do is get all the current to-do items and add them to our todos state object. To do that, we need to get a reference to a particular location on our database. The path to this location will be called todos. Once we have done that, we need to listen for changes to the contents of that path or location. This is very similar to listening for events in vanilla JavaScript. In this case, we will be listening for an event called value.
Again, according to the Firebase documentation:
“[This event allows us] to read a static snapshot of the contents at a given path, as they existed at the time of the event. This method is triggered once when the listener is attached and again every time the data, including children, changes.”
The event callback function is passed a snapshot that contains all the data at that location, including child data. We can now grab the data from the snapshot using the val() method. This data is usually in the form of a JavaScript object.
componentDidMount() {
    db.ref('/todos').on('value', querySnapShot => {
      let data = querySnapShot.val() ? querySnapShot.val() : {};
      let todoItems = {...data};
      this.setState({
        todos: todoItems,
      });
    });
  }
We used the ternary operator to assign an empty object to the data variable if we have no data in the path we are reading from.
We also need to add some code to our addNewTodo() method. We want each to-do item to have a name or title and a value to indicate whether or not the relevant to-do task has been accomplished.
Therefore, we will use an object to represent each to-do item in our database. To add data to a particular location, we need to reference the path to the location to which we want to add the data and use the push() method. We also want the user to receive an alert once they have added a new to-do item.
addNewTodo() {
    db.ref('/todos').push({
      done: false,
      todoItem: this.state.presentToDo,
    });
    Alert.alert('Action!', 'A new To-do item was created');
    this.setState({
      presentToDo: '',
    });
  }
To clear the data in our todos path, we just need to get a reference to that location and use the remove() method.
clearTodos() {
    db.ref('/todos').remove();
  }
Now, try adding a to-do item using the TextInput component. You should notice a change to your database in your database dashboard or console.
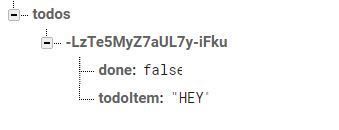
If we logged the list of to-do items to the console, we should have something like this:
{
  "-LzTe5MyZ7aUL7y-iFku": {
    "done": false,
    "todoItem": "HEY"
  }
}
If you observe this result, you will notice that the list of to-do items is an object that has key names equal to a unique ID assigned to all to-do items by Firebase. The value of each to-do item is an object, which has a similar format to what we specified in our addNewTodo() method.
With this information in hand, we can now extract the keys from our todos state object and pass in the necessary props to each ToDoItem component. Let’s extract the keys and assign them to a variable called todosKeys:
render() {
    let todosKeys = Object.keys(this.state.todos);
    return (
      <ScrollView ...>
        ...
      </ScrollView>
    );
}
Let’s add this to the empty View component in the App component:
<View>
  {todosKeys.length > 0 ? (
    todosKeys.map(key => (
      <ToDoItem
        key={key}
        id={key}
        todoItem={this.state.todos[key]}
      />
    ))
  ) : (
        <Text>No todo item</Text>
  )}
</View>
Now, we need to make some changes to our ToDoItem component. Since our to-do item components now have access to their appropriate names and state, we can get rid of the placeholder values. Our ToDoItem component should look like this now:
const ToDoItem = ({todoItem: {todoItem: name, done}, id}) => {
  const [doneState, setDone] = useState(done);
  const onCheck = () => {
    setDone(!doneState);
  };
  return (
    <View style={styles.todoItem}>
      <CheckBox
        checkBoxColor="skyblue"
        onClick={onCheck}
        isChecked={doneState}
        disabled={doneState}
      />
      <Text style={[styles.todoText, {opacity: doneState ? 0.2 : 1}]}>
        {name}
      </Text>
    </View>
  );
};
Right now, our simple to-do app is mostly done. There is still a slight problem, however: if you check a to-do item as done and you reload the app, that to-do item will be back to its original unchecked state. What’s the purpose of having a database we can’t update?
We will, therefore, need to update the value of done on the database whenever the checkbox has been checked. We can do this with the update() method. To update a particular field, you simply have to pass in an object containing the updated fields:
const onCheck = () => {
    setDone(!doneState);
    db.ref('/todos').update({
      [id]: {
        todoItem: name,
        done: !doneState,
      },
    });
  };
  return (
    <View style={styles.todoItem}>
      <CheckBox
        checkBoxColor="skyblue"
        onClick={onCheck}
        isChecked={doneState}
        disabled={doneState}
      />
        ...
      </View>
    )
  }
Now whenever you check a particular to-do item as done, the to-do item’s value of done should be updated in the database.
Conclusion
That’s it! We have created our to-do Android app with a backend powered by Firebase!
Normally, you would add some authentication to this app so that users will be able to log in on any supported device in the world and still have access to their data. This can also be done with Firebase, and you can learn more about Firebase in the documentation.
Plug: LogRocket, a DVR for web apps

LogRocket is a frontend logging tool that lets you replay problems as if they happened in your own browser. Instead of guessing why errors happen, or asking users for screenshots and log dumps, LogRocket lets you replay the session to quickly understand what went wrong. It works perfectly with any app, regardless of framework, and has plugins to log additional context from Redux, Vuex, and @ngrx/store.
In addition to logging Redux actions and state, LogRocket records console logs, JavaScript errors, stacktraces, network requests/responses with headers + bodies, browser metadata, and custom logs. It also instruments the DOM to record the HTML and CSS on the page, recreating pixel-perfect videos of even the most complex single-page apps.
Try it for free.
The post Storing and retrieving data for React Native apps with Firebase appeared first on LogRocket Blog.

Top comments (0)