
React's Context API has become the state management tool of choice for many, oftentimes replacing Redux altogether. In this quick 5-minute tutorial, you'll see an introduction to what Context is and how to use it!
If you want a proper introduction to this subject, you can join the waitlist for my upcoming advanced React course, or if you're still a beginner, check out my free introductory course on React.
Consider this tree, in which the bottom boxes represent separate components:
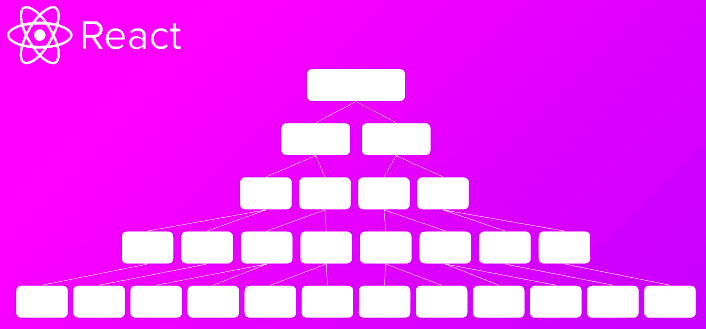
We can easily add state to the bottom components, but until now the only way to pass data to a component's sibling was to move state to a higher component and then pass it back down to the sibling via props.
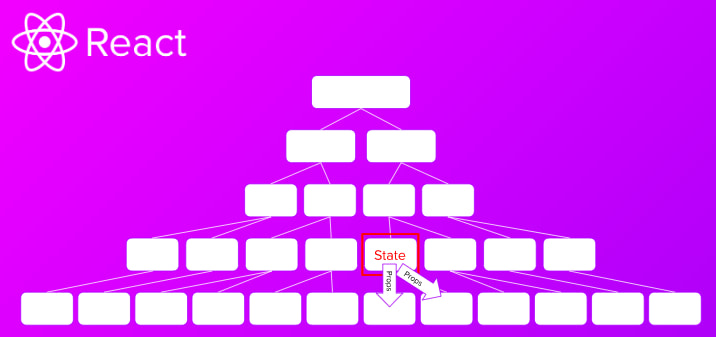
If we later find out that the sibling of the component with state also needs the data, we have to lift state up again, and pass it back down:

While this solution does work, problems begin if a component on a different branch needs the data:
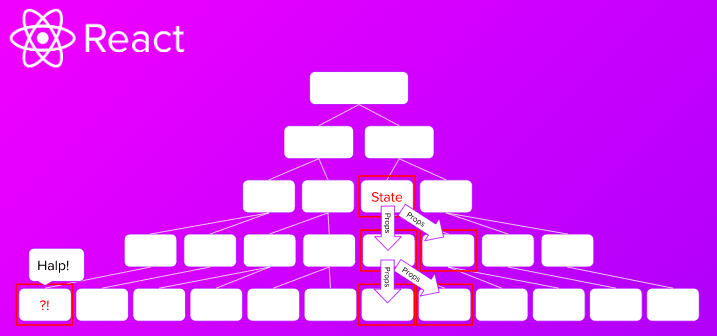
In this case, we need to pass state from the top level of the application through all the intermediary components to the one which needs the data at the bottom, even though the intermediary levels don't need it. This tedious and time-consuming process is known as prop drilling.
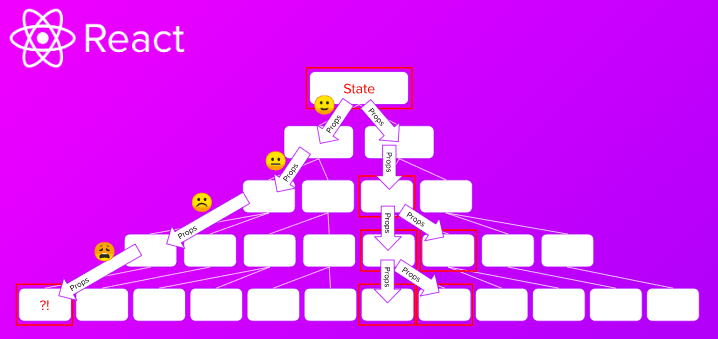
This is where Context API comes in. It provides a way of passing data through the component tree via a Provider-Consumer pair without having to pass props down through every level. Think of it as the components playing Catch with data - the intermediary components might not even "know" that anything is happening:

To demonstrate this, we will create this funky (and super useful) day-to-night switching image.

If you want to see the full code, be sure to check out the Scrimba playground for this article.
Create Context
To begin, we create a new Context. As we want the entire app to have access to this, we go to index.js and wrap the app in ThemeContext.Provider.
We also pass the value prop to our Provider. This holds the data we want to save. For now, we just hardcode in 'Day'.
import React from "react";
import ReactDOM from "react-dom";
import ThemeContext from "./themeContext";

import App from "./App";

ReactDOM.render(
  <ThemeContext.Provider value={"Day"}>
    <App />
  </ThemeContext.Provider>,
  document.getElementById("root")
);
Consuming Context with contextType
Currently, in App.js, we are simply returning the <Image /> component.
import React from "react";
import Image from "./Image";

class App extends React.Component {
  render() {
    return (
      <div className="app">
        <Image />
      </div>
    );
  }
}

export default App;
Our goal is to use Context to switch the classNames in Image.js from Day to Night, depending on which image we want to render. To do this, we add a static property to our component called ContextType and then use string interpolation to add it to the classNames in the <Image /> component.
Now, the classNames contain the string from the value prop. Note: I have moved ThemeContext into its own file to prevent a bug.
import React from "react";
import Button from "./Button";
import ThemeContext from "./themeContext";

class Image extends React.Component {
  render() {
    const theme = this.context;
    return (
      <div className={`${theme}-image image`}>
        <div className={`${theme}-ball ball`} />
        <Button />
      </div>
    );
  }
}

Image.contextType = ThemeContext;

export default Image;
Context.Consumer
Unfortunately, this approach only works with class-based components. If you've learned about Hooks in React already, you'll know we can do just about anything with functional components these days. So for good measure, we should convert our components into functional components and then use ThemeContext.Consumer component to pass info through the app.
This is done by wrapping our elements in an instance of <ThemeContext.Consumer> and within that (where the children go), providing a function which returns the elements. This uses the "render prop" pattern where we provide a regular function as a child that returns some JSX to render.
import React from "react";
import Button from "./Button";
import ThemeContext from "./themeContext";

function Image(props) {
  // We don't need this anymore
  // const theme = this.context

  return (
    <ThemeContext.Consumer>
      {theme => (
        <div className={`${theme}-image image`}>
          <div className={`${theme}-ball ball`} />
          <Button />
        </div>
      )}
    </ThemeContext.Consumer>
  );
}

// We don't need this anymore
// Image.contextType = ThemeContext;

export default Image;
Note: We also need to wrap the <Button /> component in <ThemeContext.Consumer> - this allows us to add functionality to the button later.
import React from "react";
import ThemeContext from "./themeContext";

function Button(props) {
  return (
    <ThemeContext.Consumer>
      {context => (
        <button className="button">
          Switch
          <span role="img" aria-label="sun">
            🌞
          </span>
          <span role="img" aria-label="moon">
            🌚
          </span>
        </button>
      )}
    </ThemeContext.Consumer>
  );
}

export default Button;
Extract Context Provider
We are currently passing a hard-coded value down through the Provider, however, our goal is to switch between night and day with our button.
This requires moving our Provider to a separate file and putting it in its own component, in this case, called ThemeContextProvider.
import React, { Component } from "react";
const { Provider, Consumer } = React.createContext();

class ThemeContextProvider extends Component {
  render() {
    return <Provider value={"Day"}>{this.props.children}</Provider>;
  }
}

export { ThemeContextProvider, Consumer as ThemeContextConsumer };
Note: the value property is now being handled in the new file ThemeContext.js, and should, therefore, be removed from index.js.
Changing Context
To wire up the button, we first add state to ThemeContextProvider:
import React, { Component } from "react";
const { Provider, Consumer } = React.createContext();

// Note: You could also use hooks to provide state and convert this into a functional component.
class ThemeContextProvider extends Component {
  state = {
    theme: "Day"
  };
  render() {
    return <Provider value={"Day"}>{this.props.children}</Provider>;
  }
}

export { ThemeContextProvider, Consumer as ThemeContextConsumer };
Next, we add a method for switching between day and night:
toggleTheme = () => {
  this.setState(prevState => {
    return {
      theme: prevState.theme === "Day" ? "Night" : "Day"
    };
  });
};
Now we change our value property to this.state.theme so that it returns the info from state.
 render() {
    return <Provider value={this.state.theme}>{this.props.children}</Provider>;
  }
}
Next, we change value to an object containing {theme: this.state.theme, toggleTheme: this.toggleTheme}, and update all the places where we use a single value to look for theme in an object. This means that every theme becomes context and every reference to theme as value becomes context.theme.
Finally, we tell the button to listen for the onClick event and then fire context.toggleTheme - this updates the Consumers which are using the state from the Provider. The code for the button looks like this:
import React from "react";
import { ThemeContextConsumer } from "./themeContext";

function Button(props) {
  return (
    <ThemeContextConsumer>
      {context => (
        <button onClick={context.toggleTheme} className="button">
          Switch
          <span role="img" aria-label="sun">
            🌞
          </span>
          <span role="img" aria-label="moon">
            🌚
          </span>
        </button>
      )}
    </ThemeContextConsumer>
  );
}

export default Button;
Our button now switches the image between night and day in one click!
Context caveats
Like all good things in code, there are some caveats to using Context:
Don't use Context to avoid drilling props down just one or two layers. Context is great for managing state which is needed by large portions of an application. However, prop drilling is faster if you are just passing info down a couple of layers.
Avoid using Context to save state that should be kept locally. So if you need to save a user's form inputs, for example, use local state and not Context.
Always wrap the Provider around the lowest possible common parent in the tree - not the app's highest-level component. No need for overkill.
Lastly, if you pass an object as your value prop, monitor performance and refactor as necessary. This probably won't be needed unless a drop in performance is noticeable.
Wrap up
This example is pretty simple and it would probably be easier to put state in the app and pass it down via props. However, it hopefully shows the power of having Consumers which can access data independently of the components above them in the tree.
To learn more about React Context and other great features of React, you can join the waitlist for my upcoming advanced React course. Or if you're looking for a more beginner friendly you can check out my free introductory course on React.
Happy coding :)

Top comments (0)