
// This is where we all started... [just with your fav. language of course]
console.log(Hello, world!)
Hello there and welcome to my first ever blog post, it took me a 'few' more years than expected but finally it is happening!
So grab some beverage of choice and let’s begin, since according to the title we have a lot to cover!
My name is Bojanche (you can call me Che or bokjo or however you please since it is hard to pronounce anyway 😅) and I’m a
Software Engineer from Macedonia with passion for Automation and Cloud Computing. In this blog post, I’ll try to briefly explain the structure
and components in an ELK analytics data pipeline I have built utilizing multiple AWS and GCP products and services.
Analytics data is absolutely necessary for small startup companies like mine to understand the behavior of its users and
improve as much as possible its products and services. Our mobile app is used by tens of thousands of users and it depends
on our distributed backend services and APIs running on various cloud providers. All of the requests that the mobile app makes
to our backends are proxied through HAProxy and together with all the logs from our virtual machines are sent to a central Graylog instance
for easy search and debugging needs. Even after passing through all the necessary filters and cleanup we are speaking for a GBs
worth of log data on a daily basis, so we had to build some kind of pipeline that will make sense of this data.
The initial manual approach
The first approach was fast and naive, we built our custom Docker images for Elasticsearch and Logstash which were orchestrated by
docker-compose and everything was running manually in a local environment. Elasticsearch container would extract data from Graylog locally,
then several Logstash pipelines would run against that data, extract unnecessary bits, transform it into the
appropriate format and even enrich it with extra bits from our APIs if needed and load (ETL) it into prebuild Google BigQuery dataset
which was connected to Google DataStudio for visializing the data. This approach was fine in the beginning when the amount of data was low,
but as the data grew day by day running it locally took too much time and we needed a new fully automated solution!
The fully automated analytics pipeline
Learning from our previous mistakes and especially valuing our developer time we decided to make a fully automated analytics pipeline that will run
every day autonomously. The pipeline architecture is fairly similar to the original one, we will reuse the Docker images for running Elasticsearch and Logstash
but now we will run the containers on AWS Fargate, ECS and orchestrate everything with AWS StepFunctions. Below are listed all the parts involved so let's go over every step one by one.
Architecture parts
- AWS ECS Fargate cluster (with task definitions for Elasticsearch and Logstash)
- Lambda for starting the Elasticsearch ECS Task and StepFunction
- Lambda for restoring Elasticsearch
- AWS StepFunctions definition (for orchestrating the whole pipeline workflow)
- Lambda for Elasticsearch backup (snapshot)
- Lambda for killing the Elasticsearch Task
- Google Cloud BigQuery dataset and DataStudio setup
- Google Cloud Function BigQuery backup
1. AWS ECS Fargate cluster
For running our docker containers we will use AWS Fargate fully managed serverless compute engine running directly
on AWS ECS Tasks (Elastic Container Service). We won't utilize the whole potential offered by
AWS ECS because we don't need auto-scaling services running 24/7 with load-balancing and service mesh (we can check this one in a different blog post 😉).
Since we need to run this analytics pipeline as a batch process only once per day we only need a few ECS Task Definitions for
Elasticsearch and Logstash which will be orchestrated by Serverless Lambda function and AWS StepFunction.
Before creating our ECS cluster and task definitions we first have to upload our docker images to AWS ECR
(Elastic Container Registry) and transfer all our environment variables and secrets
to the AWS System Manager parameter store which will take care of injecting our secrets to the containers at runtime.
p.s I'm sorry for the bunch of abbreviations, hope that you are not overwhelmed by now 🥱
2. Lambda for starting the Elasticsearch ECS Task and StepFunction
This lambda function is simple and its purpose is only to start our Elasticsearch container in our ECS Cluster, wait a few seconds for the container's PrivateIP address to be exposed and then start
the StepFunction execution with the data necessary.
// NOTE: Some parts (AWS SDK declarations) are removed for space utilization :)
exports.startElasticsearch = async (event) => {
    const runParams = {
        "[YOUR ECS CLUSTER NAME]",
        taskDefinition: "[YOUR ECS TASK DEFINITION NAME]",
        count: 1,
        launchType: "FARGATE",
        group: "[YOUR ECS CLUSTER GROUP]",
        networkConfiguration: {
            awsvpcConfiguration: {
                subnets: ["[YOUR SUBNET]"],
                assignPublicIp: "ENABLED", // If your docker image is build from a public docker hub base image this one is needed, otherwise it won't be able to pull the image!
                securityGroups: ["[YOUR SECURITY GROUP]"]
            }
        },
    }
    const { tasks: [{ taskArn }] } = await ecs.runTask(runParams).promise()
    const describeParams = { "[YOUR ECS CLUSTER NAME]", tasks: [taskArn] }
    const describeData = await ecs.describeTasks(describeParams).promise()
    const stepFunctionParams = {
        stateMachineArn: "arn:aws:states:[YOUR REGION AND ACCOUNT]:stateMachine:[YOUR STEPFUNCTION]",
        input: JSON.stringify(describeData),
        name: `[YOUR CUSTOM NAME FOR STEPFUNCTION]-${Date.now()}`
    }
    const stepFuncData = await stepfunctions.startExecution(stepFunctionParams).promise()
    return Promise.resolve()
}
3. Lambda for restoring Elasticsearch
This lambda function is part of the StepFunction definition and it will be invoked by it. Its sole purpose is to get the appropriate Elasticsearch
backup from a S3 bucket and do a
restore operation in our now running Elasticsearch container on ECS. We are using the
Elasticsearch S3 Repository Plugin in our container to make this possible!
// This is only example code, some parts are skipped and whitespace is cleared for saving space! :)
module.exports.restore_elasticsearch = async (event) => {
  const elasticsearchHostUrl = event.Input.esHostUrl ? `http://${event.Input.esHostUrl}:9200` : 'N/A' // the PrivateIP address of the Elasticsearch container

  const initiateRepoPayload = {
    "type": "s3",
    "settings": {
      "bucket": "[YOUR S3 BUCKET NAME]",
      "region": "[YOUR PREFERED AWS REGION]",
      "base_path": "[YOUR S3 BUCKET PARENT FOLDER IF ANY]",
      "compress": true
    }
  }

  const esRepoName = 'YOUR ES REPO NAME' // Repository initiation inside ES
  const initRepoResponse = await axios.put(`${elasticsearchHostUrl}/_snapshot/${esRepoName}`, initiateRepoPayload)
  const getSnapshotsResponse = await axios.get(`${elasticsearchHostUrl}/_cat/snapshots/${esRepoName}?v&s=start_epoch:desc&format=json`) // List all the available snapshot in S3
  const { data: listOfSnapshots } = getSnapshotsResponse || null
  const [latestSnapshot, ] = listOfSnapshots || 'snapshot-1563891934448'                                                                // EXAMPLE: Set one default fallback snapshot
  const esRestoreUrl = `${elasticsearchHostUrl}/_snapshot/${esRepoName}/${latestSnapshot.id}/_restore?wait_for_completion=true`

  try {
    const snapshotRestoreResponse = await axios.post(esRestoreUrl)
    console.log(`Snapshot restored: '${latestSnapshot.id}'`, snapshotRestoreResponse)
  } catch(error) {
     console.log('ERROR: ', error)
     throw new Error(error)
  }

  const getIndicesResponse = await axios.get(`${elasticsearchHostUrl}/_cat/indices?v&format=json`)

  return Promise.resolve('ES restore from snapshot finished!')
}
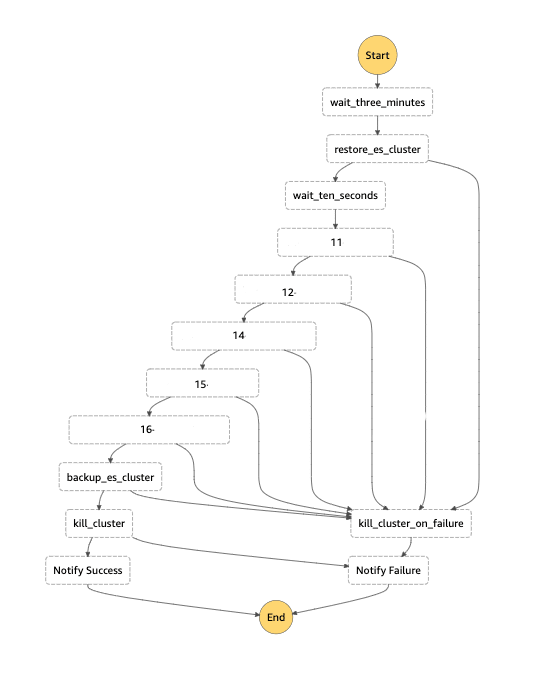
4. AWS StepFunctions definition
For gluing our AWS multi product analytics pipeline we will use AWS Step Functions
which is an AWS service that lets you coordinate multiple AWS services into serverless workflows so you can build and update apps quickly. It has its own JSON based language
called Amazon States Language(ASL) which is a structured language used to define your state machine which we won't
cover now but you can check it.

Our final Step Function looks like this, you can see all the steps that will be performed. The numbers represent the separate Logstash pipelines that will be executed
one after another because all of them depend on the previous one in our case, but the StepFunctions support running stuff in parallel too!
5. Lambda for Elasticsearch backup (snapshot)
Similarly like our previous restore lambda we have the backup(snapshot) lambda function which will be invoked by the StepFunction if and only if our Logstash pipelines finish with success.
The sole purpose of this lambda function as the name suggests is to make a backup from our Elasticsearch index data and store it in a predefined S3 bucket with the appropriate Elasticsearch standard.
We are using the Elasticsearch S3 Repository Plugin in our container to make this possible!
// This is only example code, some parts are skipped and whitespace is cleared for saving space! :)
module.exports.backup_elasticsearch = async (event) => {
  const elasticsearchHostUrl = event.Input.esHostUrl ? `http://${event.Input.esHostUrl}:9200` : 'N/A'  // the PrivateIP address of the Elasticsearch container

  const initiateRepoPayload = {
    "type": "s3",
    "settings": {
      "bucket": "[YOUR S3 BUCKET NAME]",
      "region": "[YOUR PREFERED AWS REGION]",
      "base_path": "[YOUR S3 BUCKET PARENT FOLDER IF ANY]",
      "compress": true
    }
  }

  const esRepoName = '[YOUR ES REPO NAME]'
  const initRepoResponse = await axios.put(`${elasticsearchHostUrl}/_snapshot/${esRepoName}`, initiateRepoPayload)
  const snapshotNamePostfix = new Date().toISOString().substr(0, 10)
  const snapshotName = `snapshot-${snapshotNamePostfix}`
  const esSnapshotUrl = `${elasticsearchHostUrl}/_snapshot/${esRepoName}/${snapshotName}?wait_for_completion=true`

  const createSnapshotPayload = {
    "indices": "[YOUR ES INDEX NAME]",
    "ignore_unavailable": true,
    "include_global_state": false
  }

  try {
    const snapshotResponse = await axios.put(esSnapshotUrl, createSnapshotPayload)
    console.log(`Snapshot created: '${snapshotName}'`, snapshotResponse)
  } catch(error) {
     console.log('ERROR: ', error)
     throw new Error(error)
  }

  const pingRepoResponse = await axios.get(`${elasticsearchHostUrl}/_snapshot/_all`)
  console.log('RESULT: ', pingRepoResponse.data)

  return Promise.resolve('ES snapshot finished!')
}
6. Lambda for killing the Elasticsearch Task
Since we are orchestrating our pipeline with AWS StepFunction we have to create a lambda function that will terminate our ECS Elasticsearch Cluster once
all the work is done or we encounter some kind of error along the way (since we don't want it to run forever and waste resources). Below is an example lambda function
that terminates the Elasticsearch (in our implementation we know that we have only one task running, but it can be easily done for multiple tasks and containers!)
// This is only example code, some parts are skipped and whitespace is cleared for saving space! :)
exports.killElasticsearch = async (event) => {
    const listParams = {
        "[YOUR ECS CLUSTER NAME]",
        family: "[YOUR ECS CLUSTER GROUP]",
        desiredStatus: 'RUNNING'
    }

    const { taskArns } = await ecs.listTasks(listParams).promise()
    const [taskToBeStopped, ] = taskArns

    if(taskToBeStopped){
        const stopResult = await ecs.stopTask({
            task: taskToBeStopped,
            "[YOUR ECS CLUSTER NAME]",
            reason: 'Elasticsearch should be killed after all the steps are executed....'
        }).promise()
    }

    return Promise.resolve('ECS Elasticsearch cluster terminated')
}
7. Google Cloud BigQuery dataset and DataStudio setup
Once we glued everything on the AWS side we have to switch to the Google Cloud side of things
in order to finish the whole flow for our analytics pipeline. Our Logstash pipelines are pushing (or steam inserting as Google calls it) data to Google BigQuery dataset
which has to be created beforehand. Once our data is present in BigQuery we can easily further process it and as a final step display it in beautiful
charts and graphs in Data Studio.
8. Google Cloud Function BigQuery backup
And finally once we have all the data in BigQuery as good engineers we have to make an automatic backup solution too, since everything can happen and no one wants to lose data in any shape or form.
In order to successfully do a backup we need to utilize Google Cloud Functions, Cloud Scheduler and the Google BigQuery APIs.
With the Google Cloud Scheduler we will schedule our backup Cloud Function to run every morning, a few hours before the AWS StepFunction starts execution.
// This is only example code, some parts are skipped and whitespace is cleared for saving space! :)
exports.backupBigQueryDatasets = async (event, context) => {

  const datasets = await getDataSetsAsync()

  for (const dataset of datasets) {
    const copyTablePostfix = new Date().toISOString().substr(0, 10).replace(/-/g, '')
    const tablesToDelete = []
    const tables = await getTablesAsync(dataset.id)
    const tablesToCopy = tables.filter(t => !t.id.includes('backup'))

    for (const table of tablesToCopy) {
      const backupTableID = `${table.id}_backup_${copyTablePostfix}`
      await copyTableAsync(dataset.id, table.id, dataset.id, backupTableID)

      const oldBackupTables = tables.filter(t => t.id.includes(`${table.id}_backup`))
      const [tableToDelete] = oldBackupTables.sort((a, b) => (a.creationTime - b.creationTime))

      if (tableToDelete) {
        tablesToDelete.push(tableToDelete)
      }
    }

    if (tablesToDelete.length) {
      console.info(`Old backup tables to delete in dataset '${dataset.id}':`, tablesToDelete.length)
      for (const table of tablesToDelete) {
        await deleteTableAsync(dataset.id, table.id)
      }
    }
  }
}
Conclusion
Finally we have a fully automated analytics pipeline that runs every day without any intervention (of course unless the above mentioned cloud providers don't have some kind of problem(s),
which happens from time to time and it is mostly network related!). This solution is far from perfect and maybe is not suitable for everyone but it helped us to save a lot of time and I hope
that I gave you a brief overview on some cloud products that you can utilize. The main problem with this implementation is that both cloud providers are separate entities and the things are not
synchronized and there can be some mismatch. In the future once the data grows too much and it is too slow and inefficient to process we can rethink our implementation with possibly some new
multi-cloud tool or product.
If you managed to get to this part congrats, I believe that you learned something new and thank you from the bottom of my heart!
Cheers!🍺
This blogpost was originally shared on my personal blog 👉 blog.che.mk
Questions and feedback are welcomed!

Top comments (0)