
When I was first starting with Django, one of the most challenging obstacles I faced was deploying my application. In this tutorial, I will show you guys how to deploy your Django applications to PythonAnywhere and hopefully help you avoid the pitfalls I made.
PythonAnywhere is a cloud-based hosting provider where you can deploy your Django project. The best part is that it’s free to get started, and you can upgrade anytime you are ready.
One of the things I liked most about PythonAnywhere is that it comes with a Python environment already set up for you, making deploying your project easier.
Setting Up Our Github Repository
The first thing we will do is get our project ready for Github. Login to your Github account and click the new button to create a new repository. Fill out the info and click create. Once you have that setup, we need to get the project connected to your Github using Git.

After you set up the repository, it should look like this:

Initializing Your Git Repository
Let’s switch gears for a second. We will come back to Github in just a moment. Inside of your project working directory on your machine, that is your Django projects folder, so the one that contains your manage.py file, run git init. This will initialize a new git repository for your project.
Configuring Our .gitignore File
Before we continue, we need to create a file in our project directory called .gitignore. This file is used to tell git what files and folders to ignore. We don’t want to put our db.sqlite database in our Github repository since our production environment will have its database.
Create the .gitignore using the touch command for Mac and Linux. If you are using Windows, you will have to use your text editor or file explorer to create the file.
touch .gitignore
Once it’s created, open the file and add the following folders and files to your .gitignore.
*.log
*.pot
*.pyc
__pycache__/
db.sqlite3
db.sqlite3-journal
media
static
We are telling Git to ignore the development database, our static files, and our media files.
Unsure of which files and folders to include in your .gitignore file? No worries, check out gitignore.io for a list of files and folders you might want to add to your .gitignore.
Gathering Project dependencies with Requirements.txt
Next, we will create a requirements.txt file. If you have worked with Node and Express before, this is similar to your package.json file. The requirements.txt file lists all the dependencies your project needs to run properly. This file is handy to keep track of what your project needs. We will see this in action later, where it will become more clear.
Inside of your project directory, run the following terminal command to create your requirements.txt file.
pip freeze >> requirements.txt
Connecting Our Git Repository to Github
Now that our project is ready for Github, let’s make our first commit and set the branch to main. Making a commit in Git is like putting all the changes you made in your code inside a box and attaching a label to it so the “mailman” or git can deliver it to Github.
Then we set the origin to our Github repository. We’re basically telling Git or our “mailman” where to deliver our code package too. After we set the origin or “address,” we push our code up to Github. For the sake of our mailman analogy, this would be equivalent to raising the red flag on our mailbox so the mailman can come to take our package to its destination.
git init
git commit -m "first commit."
git branch -M main
git remote add origin https://github.com/<your_github_username>/<your_project>.git
git push -u origin main
Git and Github Development Workflow
From this point forward, our workflow will follow this pattern: develop and make changes locally => Push code to GitHub => Pull changes into our production environment. This pattern will give us a smooth development cycle and keep all our code in sync with each other.
Making changes and developing on the server is a bad idea because you might make breaking changes causing your site to go down. Also, your development environment will be out of sync with your production environment.
If that was your first time setting up Git and Github, don’t worry. It can be unclear at first, but it makes more sense after the second and third time.
Setting Up PythonAnywhere Account
Now that our Github repository is set up, we need to make a pythonanywhere account to start deploying our Django project.

Go to the top right-hand corner and click signup/pricing; then click the “create a beginner account” button and fill in the information. Once that is set up, we can move on to the next step.
Creating PythonAnywhere Web App
After setting up your account, click on the web tab, and then on the left-hand side, click “add a new web app.”
Select manual configuration from the options. The Django option will install Django 2.2 for you, I believe. Since we already have a specific Django version we are working with, we will choose the manual configuration. Click next.

Select the version of Python you are using. I chose version 3.8. Click next and next again. Alright, now we have our web app setup. You should see a screen like this:

Don’t worry about the extra tabs I have on the left. Those are other web apps I have running. If you deploy another web app, it will be displayed on the left. Alright, we’re getting closer to having our Django project deployed.
Bash Console
Select the Dashboard tab and click on the bash console on the left-hand side. It doesn’t matter which bash console you select if there is more than one option. The bash console is a Linux terminal. The rest of this guide will be working mostly in this terminal and configuring our web tab.
Creating a Virtual Environment
Creating a virtual environment for our Django project will allow us to deploy future projects on the same server without them interfering with each other.
For example, one project might require Django 3.1 and the other Django 2.2. If we didn’t have a virtual environment created, that would cause issues trying to run different versions on the same server. Virtual environments create containers or little walled gardens for our projects to run in, so they don’t interfere with each other.
Inside of your bash console, run the following command:
mkvirtualenv myprojectvenv --python=/usr/bin/python3.8
The command mkvirtualenv will create a virtual environment called myprojectvenv. Specifying the –python flag on the mkvirtualenv command will set the python version for that environment. So you could have different virtualenvs running different versions of python—something we couldn’t do without a virtualenv. Your virtual environments are stored in the .virtualenvs directory in the home directory.
You should see something like this in your console:
Running virtualenv with interpreter /usr/bin/python3.8
Using base prefix '/usr'
New python executable in /home/myusername/.virtualenvs/myprojectvenv/bin/python3.8
Also creating executable in /home/myusername/.virtualenvs/myprojectvenv/bin/python
Installing setuptools, pip, wheel...done.
virtualenvwrapper.user_scripts creating /home/myusername/.virtualenvs/myprojectvenv/bin/predeactivate
virtualenvwrapper.user_scripts creating /home/myusername/.virtualenvs/myprojectvenv/bin/postdeactivate
virtualenvwrapper.user_scripts creating /home/myusername/.virtualenvs/myprojectvenv/bin/preactivate
virtualenvwrapper.user_scripts creating /home/myusername/.virtualenvs/myprojectvenv/bin/postactivate
virtualenvwrapper.user_scripts creating /home/myusername/.virtualenvs/myprojectvenv/bin/get_env_details

(myprojectvenv) $ which python
/home/myusername/.virtualenvs/myvirtualenv/bin/python
When the virtual environment is activated, you will see parentheses with the name of your virtual environment on the left in your console. Whenever this is present, we are in our virtual environment.
Connecting Our Virtual Environment with Our Web App
We need to let pythonanywhere know where to find our virtual environment. So let’s get the working directory for that. Cd into your virtual environment directory like so:
cd .virtualenvs
pwd
After we cd into the virtual environment directory from our home directory, we run pwd to get the working directory. Copy that path and go back to the web tab in pythonanywhere and under the section, virtualenvs paste in the path, then add the name of your virtual environment to the end.

If you need to exit the virtual environment, run deactivate in the console. When you are ready to work on the project again, you can start your virtual environment back up by running workon myprojectvenv.
If you would like to know more about how the virtual environments work in PythonAnywhere, check out their article here.
Cloning our Project to PythonAnywhere
With our virtual environment set up, we can clone our project from Github and start setting it up.
Go to your Github repository, click on the green code button, and copy your Github repository link. In your bash console, run the following to clone your project:
git clone https://github.com/<username>/<repository>.git
This command downloads all the code from your repository to your PythonAnywhere server.
Install Project Requirements
Let’s cd into our project directory, the directory with manage.py in it, and install our project requirements. This is where our requirements.txt file shines. Run the following command in your bash console.
TIP: Run ls in your console to list out all the files and directories to see which one you need to cd into.
cd myproject
pip install -r requirements.txt
Pip will read the requirements.txt file and install all the packages our project requires to run. Sweet, let’s wait for that to install. It may take a moment.
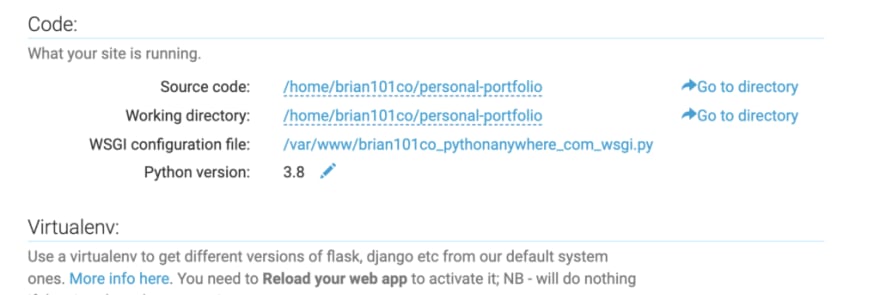
Now that our requirements are installed let’s configure our source directory real quick.
Configure Web App Directories
The source directory lets pythonanywhere know where our project’s code lives. Run pwd in the console to get your project working directory. Copy it, go back to the web tab, and in the Code section, you should see two file paths listed out—one for Source code and the other for project working directory. Paste in the project working directory you copied for both source and working directory.
Setting Up Static and Media Files
After all our packages are installed, we can collect our static files. Django will store all your static assets in the directory name you specified in your STATIC_ROOT setting.
Run the following command in your bash console to collect your static files.
python manage.py collectstatic
When prompted, select yes.
Sweet, now let’s tell PythonAnywhere where it can find our static files. Cd into your newly generated statics directory or whichever name you chose and run pwd in the console. This will print out your current working directory. Copy the path and go to your project’s web tab in PythonAnywhere.
Scroll down some, and you should see a section called static files. Paste the file path into the directory box. Then set the URL box to /static/ or the folder name you specified in your settings.py. It should look similar to this:
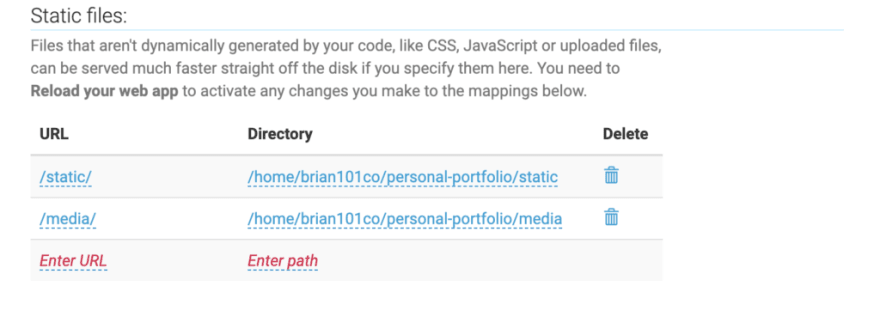
If you are storing user-generated media files in a media folder, go ahead and add that as shown in the image above.
This isn’t the best way to store user-uploaded media. I will write another tutorial on how to store user uploaded media using AWS S3 or DropBox later. We will serve our media files from our Django application for this tutorial but keep in mind this isn’t ideal.
The same applies to our static assets. It’s best to have a web server such as NGINX or a CDN serve the static assets. I will write another tutorial looking into these solutions later.
Adjusting Our Settings for Production
We’re getting close to the end now. If you have followed along with the tutorial this far, we are just about finished.
Go to the web tab, and under the section code, click on “go to directory.” From there, navigate to your project’s settings.py file. Click on the file. This should open up an editor in the browser so you can make changes to the file.
Change the DEBUG setting to False. We set this too False so that debugging information isn’t sent to the browser but instead sends a 404 error. The debug message sends essential information about our project’s structure that hackers can take advantage of if they knew.
Next, add your free pythonanywhere domain name to your ALLOWED_HOSTS list. Make sure quotes surround it. It has to be a string. This setting is a list of strings representing the host/domain names that this Django site can serve. This is a security measure to prevent HTTP Host header attacks, possibly even under many seemingly-safe web server configurations.
Save the file and go back to the web tab and click the reload button at the top. This will take a second. This will load the new settings that we changed.
HTTPS with Let’s Encrypt
Next, we need to make sure our site uses HTTPS. There is almost no reason to use HTTP anymore. HTTPS encrypts all the information sent to and from our website and protects our visitors.
In the web tab under the Security section near the bottom, click on the HTTPS certificate’s pencil icon. Select the Let’s Encrypt option and save. This creates a valid SSL certificate from Let’s Encrypt. The best part is that PythonAnywhere takes care of the renewal process, so you don’t have to worry about renewing it before it expires.
Enable Forced HTTPS. Now let’s go back to the top of the page and reload our website.
Alright, that takes care of HTTPS.
Environment Variables with .env File
In this section, we will address our SECRET_KEY issue. This key must be hidden because it is used to provide cryptographic signing and having it in plain text is a security risk.
Back inside your project directory in the bash console, we need to create a .env file at the same level as the manage.py file.
touch .env
nano .env
Inside of the terminal editor, add your secret key like below:
export SECRET_KEY="mysupersupersecretkey"
Then press control+x then y then enter/return. That saves our .env file with our secret key added to it.
Next, we need to install dotenv so we can use our environment variable file.
pip install python-dotenv
echo python-dotenv >> requirements.txt
This installs dotenv and adds it to our requirements.txt file.
Now we need to edit our WSGI file. Let’s go back to the web tab, and under the code section, you should see the WSGI configuration file below the source and working directory. Click on it to open it up.
Delete everything from the WSGI file except the Django section. It should look like this:

Make sure to set the path variable in your WSGI file to your project working directory and change your DJANGO_SETTINGS_MODULE from mysite.settings to the app your project’s settings.py file is under. For example, my settings.py file is under my portfolio app, so I put portfolio.settings.
Right beneath the imports, add this to your WSGI file:
from dotenv import load_dotenv
project_folder = os.path.expanduser('~/your-project-dir')
load_dotenv(os.path.join(project_folder, '.env'))
This loads our .env file so our Django project can access the environment variables we have set in it. Make sure to replace your-project-dir with your project’s working directory (the one that contains manage.py). Save your WSGI file.
Now we need to remove our secret key from our settings.py and load in our environment variable. Let’s navigate back to our settings.py files and change our SECRET_KEY to this:
SECRET_KEY = os.getenv("SECRET_KEY")
Save your settings.py file.
Next, let’s load our .env variables into our bash console. Inside your bash console, run the following commands:
set -a; source ~/my-project-dir/.env; set +a
echo 'set -a; source ~/my-project-dir/.env; set +a' >> ~/.virtualenvs/my-project-virtualenv/bin/postactivate
Test this out by activating your virtualenv, with, e.g., workon my-project-virtualenv and then trying to run, e.g., echo $SECRET_KEY.
You should see your SECRET_KEY printed to console if you see that everything is set up properly.
IMPORTANT: If you change or add new environment variables, you have to reload the .env file in the console, as we did above. Otherwise, your Django project won’t have access to them.
That takes care of our environment variables.
Configuring MySQL Database
Lastly, let’s configure our Django application to use MySQL. Head over to the Database tab in pythonanywhere and initialize MySQL.
Once the database is initialized, we need to edit our settings.py file to configure the MySQL database. Navigate to your settings.py file and open the in-browser editor.
Scroll down to the Database settings and replace it with this:
DATABASES = {
    'default': {
        'ENGINE': 'django.db.backends.mysql',
        'NAME': '<your_username>$<your_database_name>',
        'USER': '<your_username>',
        'PASSWORD': '<your_mysql_password>',
        'HOST': '<your_username>.mysql.pythonanywhere-services.com',
    }
}
Navigate back to the database tab to get the configuration settings. All the settings are under the Connection and Your Databases sections. Save your settings.py file when you’re done.
Next, we need to install the python-mysql connector so we can connect to the database. Open your bash console and activate your project virtual environment, then run the following command:
pip install mysqlclient
python manage.py migrate
When that is finished installing, navigate back over to your web tab and reload your website. To see your web application, click on the link at the top of the web tab or enter your pythonanywhere domain name in your browser.
Don’t forget to go back and set environment variables for your database password as we did for the secret key.
All done! Congratulations on making it this far. It was a long tutorial, but it was worth it. Now you have a Django application up and running.
For more articles, check out my blog EngineerToDeveloper.

Top comments (1)
This is really in-depth and gold. Thank you.