Once, your users may have forgiven a bug in your app. Today, they likely won’t.
Today’s consumers, many of them Gen-Zers who’ve been using gadgets since they learned their hands, expect a mobile experience that’s swift, seamless and secure. And with page speeds increasing all the time, lags and snags are no longer acceptable.
Which means our apps need to glitch-free right out of the gate. But debugging and testing be a vexxing challenge, especially when you have to have to manually install, launch and test your app on a bunch of different devices or emulators.
Thankfully, the folks at Android have created a powerful set of tools for debugging apps, and Android Debug Bridge, or ADB, is arguably the most crucial of the lot. ADB lets you wire your workstation straight into your advice, so you can pick apart the problems from your tried-and-trusted command centre.
In this piece, we’re going to look at ADB in detail, specifically at:
- How to download ADB.
- How to install it.
- How to use it for Android debugging with USB drives.
- How to use it for Android debugging over WiFi.
You’ll save time, reduce effort and, crucially, be better placed to manage your users’ expectations.
So First of All, What is ADB Actually Used For?
By using ADB, you can install, uninstall and manage apps on your Android device from your computer, which can save a lot of time and effort. You can also access and modify system-level files and settings, such as the device’s build.prop file, which can be useful for advanced debugging approaches and customization tasks.
Additionally, you can capture screenshots and screen recordings, simulate device inputs, and view and analyze logs, which can help you trace the origin story of bugs and issues during development.
Ok, So How Do I Download ADB?
Simple. You can download the Android SDK from the official Android developer website (https://developer.android.com/studio/releases/platform-tools), or, if you prefer, you can download the whole Android Studio IDE (https://developer.android.com/studio) and you’ll get the rest of the Android SDK too.
Now, Here’s How To Enable Developer Mode
Once you’ve downloaded and installed the Android SDK, you can active it by enabling the developer mode in your device.
If you’ve already done this, no worries, just skip to the next step. But if you still need to do it, here’s how:
- Open the Settings app on your Android device.
- Scroll down to the “About phone” section and tap on it.
- Look for the “Build number” or “Build version” entry and tap on it repeatedly (it usually needs 7 times) until you see a message that says “You are now a developer!”
- Once you see the message, great: you’ve successfully enabled developer mode on your Android device.
After enabling developer mode, you’ll be able to access additional settings and options that are not visible to regular users. These settings may include options for debugging, performance tuning, and other advanced features.
To tap into the developer options, simply go back to the main Settings screen and look for the “Developer options” or “Developer settings” entry.
Right, Let’s Start With USB Debugging
Now that your device has the Developer Mode, you need to enable Android debugging with USB.
Unlocking this option means you can connect your Android device to a computer and use tools like Android Debug Bridge (ADB) to debug applications and access advanced device features.
Here are the steps:
- Once you have enabled developer mode, go to the “Developer options” or “Developer settings” section in the Settings app.
- Look for the “USB debugging” option and toggle it on.
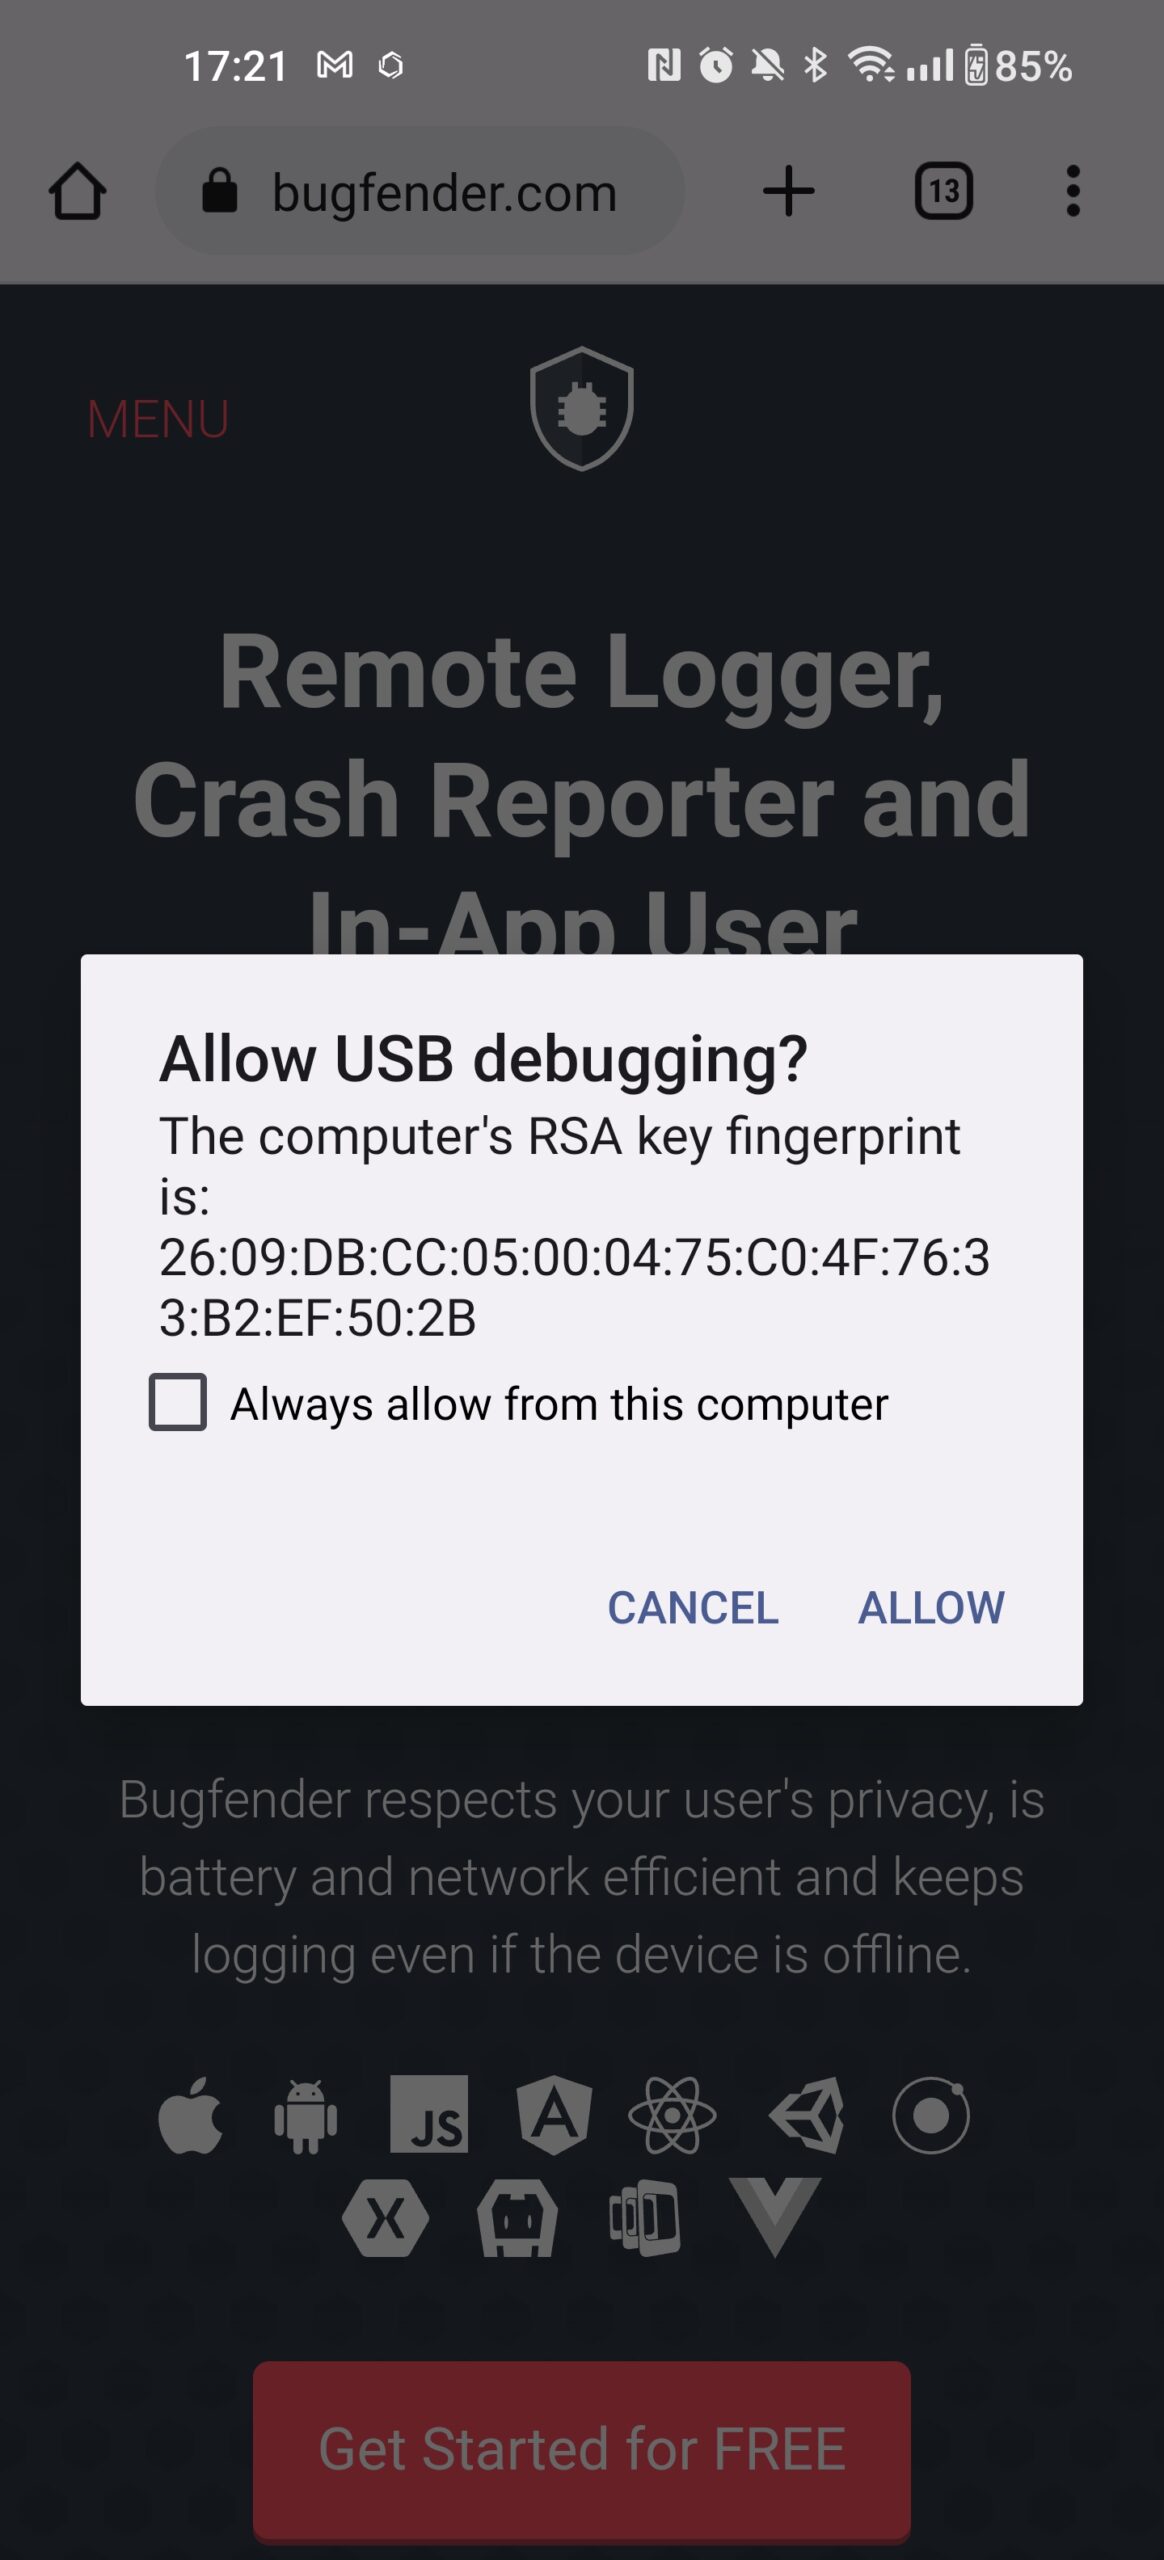
- A warning message will appear, asking if you want to allow Android debugging with USB. Tap “OK” to confirm that you do.
- Connect your Android device to your computer, using a USB cable.
- At some point, the device will display a dialogue requesting permission to connect the device. You should allow this — if you don’t, you won’t be able to connect it to your computer.
Using ADB
Now that you have your device connected to your computer, you’re ready to use adb to get inside your applications and start rooting out those bugs before they affect your users.
But first, it’s worth taking a quick look to ensure everything is working as expected.
So, on your computer, open a command prompt or terminal window and navigate to the folder where you’ve installed ADB. Type the following command: **adb devices.**
This will verify that your device is connected and recognized by ADB. If it is, then great: off you go.
ADB Commands
ADB has various commands to demystify the Android debugging process and optimize your repetitive tasks. Here are some of the most commonly used ones:
-
adb logcatdisplays the device’s log messages in real time. It can be used to troubleshoot issues with your application, or the device itself. -
adb install <path/to/apk>installs an APK file on the connected device, so you can test your app on a real-world device. -
adb uninstall <package-name>uninstalls an application. Simple, really. -
adb shellopens a shell on the device, allowing you to execute commands directly on the device’s operating system. -
adb push <local> <remote>pushes a file from your computer to the device. -
adb pull <remote> <local>, as you can probably guess, pulls a file from the device to your computer. -
adb screenrecordstarts recording the screen of the connected device (useful for creating app demos and tutorials). -
adb shell screencap <filename>captures screenshots of your Android device’s screen. -
adb rebootreboots the device (fyi if you want to reboot and start in bootloader mode you can usea **db reboot bootloader.** Alternatively, if you have a problem with the device and want to use the recovery mode, you can run** adb reboot recovery**).
There’s a whole bunch of other commands to choose from with ADB, but these are the most useful. You can find a full list by running the **adb**command, without any arguments.
Android Debugging Over WiFi
If your device and your computer are hooked up to the same network, you can use ADB over WiFi to connect to your Android device wirelessly, without needing to connect it via USB cable, thereby adding a further level of simplicity.
But be aware that the WiFi connection is not stable as the USB connection, so if you want the most reliable way to connect to your device, we’d advise using the USB cable.
Here’s how to set it up:
- Connect your Android device to your computer via USB cable.
- Open a command prompt or terminal on your computer.
- Type the following command to connect your device via ADB:
adb devices - If your device is recognized, type the following command to enable ADB over Wi-Fi:
adb tcpip 5555 - Disconnect your device from the computer.
- Find your device’s IP address. You can do this by going to Settings > About Phone > Status > IP address on your Android device.
- Type the following command in the command prompt or terminal to connect to your device over WiFi:
adb connect <device-ip-address>:5555 - If the connection is successful, you should see a message in the command prompt or terminal saying “connected to :5555”.
And… While We’re Talking…
…it would be remiss not to mention our own piece of kit, Bugfender.
While ADB enables you to troubleshoot issues quickly and test your app on real devices, it’s worth noting that debugging your application solely with ADB can be time-consuming and challenging. Even if you’ve enabled Android debugging over WiFi, it’s useless when you don’t have physical access to the devices.
That’s why we recommend using additional tools, such as Bugfender.
Wherever your devices are located, you can access them with Bugfender and get those vital logs. You’ll streamline the debugging process, fix bugs faster and get a view of logs and crashes in real time. So there’s no need to have the physical devices anymore.
SIGN UP NOW
By combining ADB with Bugfender, you can debug your Android applications even more efficiently and give your users the experience they demand… and deserve.
You May Be Also Interested in
If you want to improve your Android debugging skills, you can check the following articles from our blog:
Android Studio and Xcode App Debugging With Breakpoints: How to From Zero

Top comments (0)