
We are going to discuss how to display notifications using the flutter_local_notifications plugin.
As always with these posts, you can be sure you've got all of the basic knowledge you need by reading my Flutter book, but not all of you like that way of learning, so I'll list the topics which are considered prerequisites for this post.
For the local notifications part, you need to know the following:
- basics of Flutter app development, including knowledge of basic Material Design widgets, but also UI composition and basic state management;
- asynchronous programming with
Streams and listening to them (StreamSubscription);
The backend for our app will be the one we wrote for the previous post in the series. The app itself will be based on that, so I highly recommend you read the last part of that post if you want to understand how we've got topics a fully working example app at the end of this post. One way or another, here's the GitHub repository with the example Flutter code:
 carzacc
/
flutter_notifications_example
carzacc
/
flutter_notifications_example
Flutter app sending notifications used for a carmine.dev blog post about Flutter local notifications
and, for your convenience, here's the repo for the Node.js backend code:
carzacc
/
websocketsbackend
Backend for a Flutter app used as example code in a carmine.dev blog post about WebSockets
The flutter_local_notifications Package
In Flutter apps, you can show notifications to the user while the app is running using the flutter_local_notifications package. It is fairly easy to use.
Initializing the Plugin
Before being able to use the plugin, you need to initialize it. This requires two different configuration steps: Android configuration and iOS configuration. Even though this is platform-specific, this is all done in Dart code. More specifically, plugin initialization works the following way:
FlutterLocalNotificationsPlugin notifications = FlutterLocalNotificationsPlugin();
AndroidInitializationSettings androidInit = /* ... */;
IOSInitializationSettings iOSInit = /* ... */;
var initSettings = InitializationSettings(androidInit, iOSInit);
notifications.initialize(initSettings);
~~~

Now we are going to focus on `AndroidInitializationSettings` and `IOSInitializationSettings`.

## Android Initialization Settings

Android configuration requires the creation of a drawable asset to use as the app icon displayed in the notification. To do that in Android Studio, get to the `android/app/src/main/res/drawable` directory in the left *Project* panel, right-click, and select New->Vector Asset. This will guide you through the creation of a drawable vector asset.

Take note of its name because, in order to initialize the `flutter_notifications` package, you need an `AndroidInitializationSettings` object, which is created in the following way:
var androidInit = AndroidInitializationSettings('name_of_the_drawable');
## iOS Initialization Settings

The configuration for iOS is at the same time simpler and harder: there is no required argument, but there are a bunch of optional ones, which are fine to be left to default values and that you can find on the [official API reference for the package](https://pub.dev/documentation/flutter_local_notifications/latest/flutter_local_notifications/IOSInitializationSettings-class.html). By default, it will ask the user to give permission to the app to show notifications when the plugin is initialized.

This means you can get a simple {% raw %}`IOSInitializationSettings` with default settings with
var iOSInit = IOSInitializationSettings();
## Showing Notifications
The notifications can be shown with {% raw %}`plugin.show(id, title, body, NotificationDetails);`.
`title` and `body` are self-explanatory, `id` can just be set to 0.
`NotificationDetails` is constructed with ` NotificationDetails(AndroidNotificationDetails android, IOSNotificationDetails iOS) `. The required (positonal) arguments for the `AndroidNotificationDetails` constructor are `AndroidNotificationDetails(String channelId, String channelName, String channelDescription)`, whereas the `IOSNotificationDetails` constructor has no required parameters. Both take many optional named arguments, which I won't cover here (also because I can't be sure they will stay the same for long and we won't use them in this tutorial), but that you should check out on the official API reference for the plugin ([click here to see the options for iOS](https://pub.dev/documentation/flutter_local_notifications/latest/flutter_local_notifications/IOSNotificationDetails-class.html) and [here for those for Android](https://pub.dev/documentation/flutter_local_notifications/latest/flutter_local_notifications/AndroidNotificationDetails-class.html)).
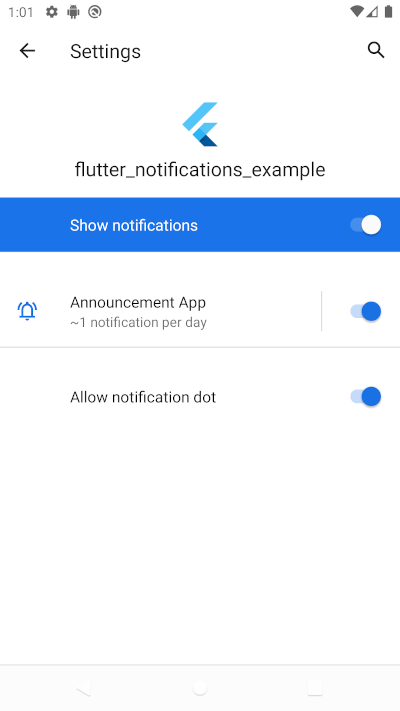
The `AndroidNotificationDetails` constructor requires all of the arguments Android requires to show notifications. More specifically, Android Oreo (8.0, API level 26) and successive releases allows users to have different settings for different notification channels originating from the same app. The `channelId` can be any integer, you use the same number for notifications to be sent on the same channel and you use different numbers for different channels. `channelName` and `channelDescription` are names the user will use to differentiate your app's channels, so they should be descriptive of the purpose of each notification channel if you plan to use multiple channels (e.g. a social networking app could have a channel for follow requests, one for direct messages received, one for likes to posts, etc.).
Here's what the app-level notification settings look like:

and here's what the channel-specific settings look like:
Here's an example, where `notifications` is the `FlutterLocalNotificationsPlugin` object:
void showNotification(String title, String body) {
notifications.show(0, title, body, NotificationDetails(
AndroidNotificationDetails(
"my_app_channel_id_0",
"User-Visible Notification Channel Title",
"Useful, user-visible description of the notification channel"
),
IOSNotificationDetails()
));
}
# Using It In The App

This second part of the post is going to be about using the plugin in an app, more specifically changing [the app we built in the previous post](https://www.carmine.dev/posts/flutterwebsockets/) to also display notifications to the user. If you don't want to read that but still want the code we are starting from here's the GitHub repo of the previous post's app:

{% github carzacc/websockets_flutter no-readme %}

whereas this is the one for the app we'll build in this post:

{% github carzacc/flutter_notifications_example no-readme %}

## Importing

First of all, add {% raw %}`flutter_local_notifications` to the `dependencies` in `pubspec.yaml`:


and import it at the start of main.dart. You'll  notice we are also importing the status codes for the WebSocket library, which we'll need when we close the connection to the server in the dispose() method of the State of the AnnouncementPage:


  Summary of The Changes


The AnnouncementPage becomes a StatefulWidget, we don't use a StreamBuilder, instead we wait for new data, change what's displayed and also show a notifications. here's the entire AnnouncementPage and AnnouncementPageState that we'll analyze in more detail in the next section of the post:


One of the changes you need to keep in mind is that we now have a text String variable that we will update as we get data from the server, and that text is what's going to be displayed on the user's screen.


  Using the Plugin


The flutter_local_notifications package has to be initialized. This can be done in multiple places. You could to do it in main and have a global variable to be able to access the notifications plugin from anhywhere within the app without having to use InheritedWidgets or the Provider. In our case, though, we don't really need that, as there really is only one widget that's going to cause notifications to be displayed, which is our app's AnnouncementPage. What we need to do is define a StreamSubscription that listens for changes in the stream received from the WebSocket and, if there are any, both updates the AnnouncementPage to show the new announcement (by calling initState and setting the text variable) and displays a notification.

All of this is done in the initState method:


  The New build Method


The build method now simply needs to display the text we already get using the StreamSubscription, without requiring the use of a StreamBuilder. If the connection hasn't been established yet, which would mean text is still null, we display a CircularProgressIndicator as we did when we used a StreamBuilder and we had no data yet. Given that the nickname is now defined inside the AnnouncementPage StatefulWidget definition, we need to access it using the this.nickname syntax in the onPressed callback for the FloatingActionButton that sends announcements.


  The dispose Method


The dispose() method needs to close the WebSocket, letting the server know it's being closed and freeing resources on both ends of the connection, and cancels the StreamSubscription because it's not necessary anymore to listen for new announcements.


  Wrapping It Up


That's it! The app now sends notifications when it gets new announcements (including when it's the one generating them, but for this app this is intended)!

The entire main.dart is going to be the following:


  Receiving Notifications in The Background


People have complained that I focused on Firebase too much in my book, so I'm trying to compensate here on my blog by focusing on more traditional backend implementations and ways to do things.

One caveat is that, for example, the only way to be able to send notifications to closed apps on both Android and iOS is to use Firebase Cloud Messaging, which can send notifications directly to Android devices (what used to be called Cloud to Device Messaging and then Google Cloud Messaging) and uses the Apple Push Notification Service to send notifications to iOS devices.


  Onwards


You can now subscribe to my newsletter to get email updates about new posts and, as always you can follow me on Twitter if you are active on there and want to be updated, and remember to check out my Flutter book in case you haven't yet.

Top comments (4)
Hi Carmine, thanks for this great article. I tried to subscribe to your newsletter, however I did not receive a successful notification. I don't know if I subscribed successfully or not
It should be working fine now, try to subscribe, I'm sorry for the inconvenience.
Subscribed! Thanks
Привет, у меня проблема следующая. Я выставил у AndroidNotificationDetails приоритет высокий. Но уведомления не высвечиваются на экране, а просто появляется иконка в шапке. Как это можно исправить?