
Kubernetes is taking the world of software development by storm and every company in the world feels tempted to develop their software on the platform or migrate existing solutions to it. There are a few basic principles to be considered when the application is finally operated productively in Kubernetes.
One of them, is the implementation of a clean autoscaling. Kubernetes offers a number of options, especially when it comes to horizontally scaling your workloads running in the cluster.
I will discuss the different options in a short series of blog posts. This article is about the introduction to the topic and the presentation of the “out-of-the-box” options of Kubernetes. In the second article I will discuss the possibilities of scaling deployments using custom metrics and how this can work in combination with popular monitoring tools like Prometheus. The last article then will be about the use of KEDA (Kubernetes Event-Driven Autoscaling) and looks at the field of “Event Driven” scaling.
Why?
A good implementation of horizontal scaling is extremely important for applications running in Kubernetes. Load peaks can basically occur at any time of day, especially if the application is offered worldwide. Ideally, you have implemented measures that automatically respond to these load peaks so that no operator has to perform manual scaling (e.g. increase the number of pods in a deployment) – I mention this because this type of “automatic scaling” is still frequently seen in the field.
Your app should be able to automatically deal with these challenges:
- When the resource demand increases , your service(s) should be able to automatically scale up
- When the demand decreases , your service(s) should be able to scale down (and save you some money!)
Options for scaling your workload
As already mentioned, Kubernetes offers several options for horizontal scaling of services/pods. This includes:
- Load / CPU-based scaling
- (Custom) Metrics-based scaling
- Event-Driven scaling
Recap: Kubernetes Objects
Before I start with the actual topic, here is a short recap of the (basically) involved Kubernetes objects when services/applications are hosted in a cluster – just to put everyone on the same page.
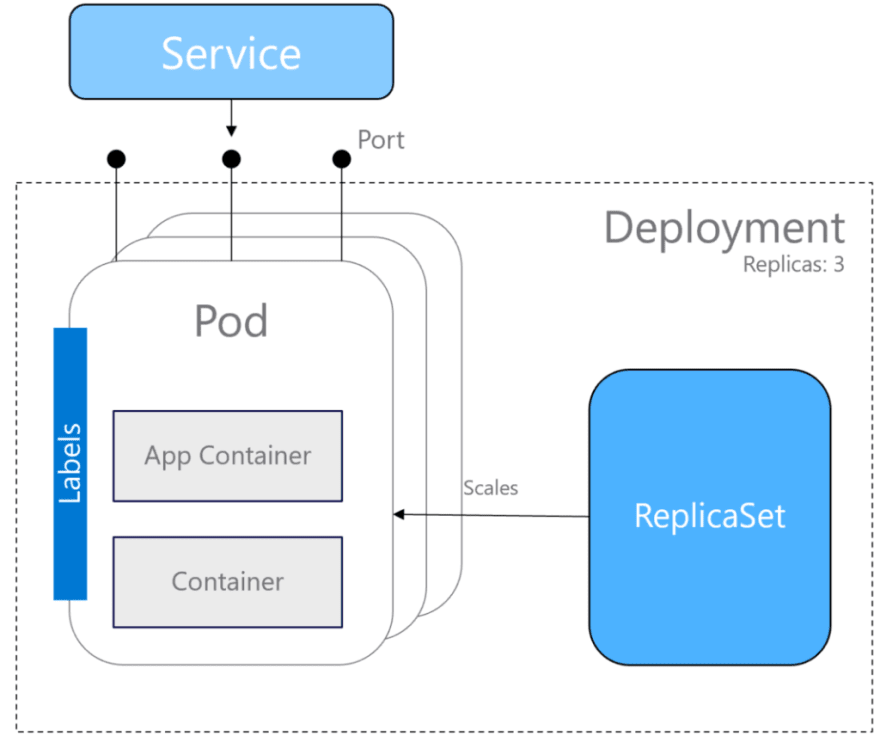
- Pods : smallest unit of compute/scale in Kubernetes. Hosts your application and n additonal/„sidecar“ containers.
- Labels : key/value pairs to identify workloads/kubernetes objects
- ReplicaSet : is responsible for scaling your pods. Ensures that the desired number of pods are up and running
- Deployment : defines the desired state of a workload (number of pods, rollout process/update strategy etc.). Manages ReplicaSets.
If you need more of a “refresh”, please head over to the offical Kubernetes documentation.
Horizontal Pod Autoscaler
To avoid manual scaling, Kubernetes offers the concept of the “Horizontal Pod Autoscaler”, which many people have probably already heard of before. The Horizontal Pod Autoscaler (HPA) itself is a controller and configured by HorizontalPodAutoscaler resource objects. It is able to scale pods in a deployment/replicaset (or statefulset) based on obeserved metrics like e.g. CPU.
How does it work?
The HPA works in combination with the Metrics server, which determines the corresponding metrics from running Pods and makes them available to the HPA via an API (Resource Metrics API). Based on this information, the HPA is able to make scaling decisions and scale up or down according to what you defined in terms of thresholds. Let’s have a look at a sample definition in YAML:
apiVersion: autoscaling/v1
kind: HorizontalPodAutoscaler
metadata:
  name: my-hpa
spec:
  maxReplicas: 20
  minReplicas: 5
  scaleTargetRef:
    apiVersion: apps/v1
    kind: Deployment
    name: my-deployment
  targetCPUUtilizationPercentage: 50
The sample shown above means, that if the CPU utilization constantly surpasses 50% of the deployment (considering all pods!), the autoscaler is able to scale the number of pods in the deployment between 5 and 20.
The algorithm of how the number of replicas is determined, works as follows:
replicas = ceil[currentReplicas \* ( currentValue / desiredValue )]
Here’s the whole process:

Pretty straightforward. So now, let’s have a look at a concrete sample.
Sample
Let’s see the Horizontal Pod Autoscaler in action. First, we need a workload as our scale target:
$ kubectl create ns hpa
namespace/hpa created
$ kubectl config set-context --current --namespace=hpa
Context "my-cluster" modified.
$ kubectl run nginx-worker --image=nginx --requests=cpu=200m --expose --port=80
service/nginx-worker created
deployment.apps/nginx-worker created
As you can see above, we created a new namspace called hpa and added a deployment of nginx pods (apparently only one at the moment – exposing port 80, to be able to fire some request against the pods from within the cluster). Next, create the horizontal pod autoscaler object.
$ kubectl autoscale deployment nginx-worker --cpu-percent=5 --min=1 --max=10
Let’s have a brief look at the YAML for the HPA:
apiVersion: autoscaling/v1
kind: HorizontalPodAutoscaler
metadata:
  name: nginx-worker
spec:
  maxReplicas: 10
  minReplicas: 1
  scaleTargetRef:
    apiVersion: apps/v1
    kind: Deployment
    name: nginx-worker
  targetCPUUtilizationPercentage: 5
So now that everything is in place, we need some load on our nginx deployment. BTW : You might wonder, why the target value is that low (only 5%!). Well, seems like the creators of NGINX have done a pretty good job. It’s really hard to “make NGINX sweat” ! :)
Let’s simulate load! Create another pod (in this case “busybox”) in the same namespace, “exec into it” and use wget to request the default page of NGINX in an endless loop:
$ kubectl run -i --tty load-generator --image=busybox /bin/sh
$ while true; do wget -q -O- http://nginx-worker.hpa.svc; done
While this is running, open another terminal and “watch” the Horizontal Pod Autoscaler do his job.

As you can see, after a short period of time, the HPA recognizes that there is load on our deployment and that the current value of our metric (CPU utilization) is above the target value (29% vs. 5%). It then starts to scale the pods within the deployment to an apropiate number, so that the utilization drops after a few seconds back to a value that is – more or less – within the defined range.
After a certain time the wget loop was aborted, so that basically no more requests were sent to the pods. As you can see here, the autoscaler does not start removing pods immediately after that. It waits a given time (in this case 5min) until pods are killed and the deployment is set back to “replicas: 1”.
Wrap-Up
In this first article, I discussed the basics of horizontal scaling in Kubernetes and how you can leverage CPU utilization – a standard metric in Kubernetes – to automatically scale your pods up and down. In the next article, I will show you how to use custom metrics for scaling decisions – as you might guess, CPU is not always the best metric to decide if your service is under heavy load and needs more replicas to do the job.

Top comments (0)